
OBKV-HBase allows you to connect to an OBKV-HBase cluster by using the OBKV-HBase client and to perform data operations through HBase-compatible APIs. If your business currently uses native HBase data access logic, you can deploy an OceanBase AI Database cluster, create HBase tables on the OBServer node, and manage data by using the OBKV-HBase client. This topic describes how to configure the client, connect to an OBServer, and perform basic CRUD operations.
Notice
OBKV-HBase supports only the Java client.
OBKV-HBase client
The OBKV-HBase client is built on the basic interfaces provided by OBKV-Table and encapsulates HBase-compatible APIs on the client side. It currently supports the features of HBase 1.x and 2.x.
Prerequisites
Before you connect to an OBKV-HBase cluster and process data by using the OBKV-HBase client, make sure that you have completed the following steps:
- You have deployed an OceanBase AI Database cluster. For supported deployment options, methods, and detailed instructions, see Overview of OBKV-HBase application development.
- You have created a user tenant. For detailed steps, see Create a tenant.
- You have created a database. For detailed steps, see Create a database.
- You have created OBKV-HBase data tables. For detailed steps, see OBKV-HBase data model.
The following example shows how to create tables:
-- First, create a table group named htable1.
CREATE TABLEGROUP htable1;

-- Create a test table named htable1$family1 that is bound to the htable1 table group.
CREATE TABLE htable1$family1 (
       K varbinary(1024),
       Q varbinary(256),
       T bigint,
       V varbinary(1048576) NOT NULL,
       PRIMARY KEY(K, Q, T))
       TABLEGROUP = htable1;
Step 1: Add the client dependency
Add the OBKV-HBase client JAR package to the pom.xml file of your local Java project (or see the OBKV-HBase usage demo). For more information about the compatibility of the OBKV-HBase client, see Core features of OBKV-HBase.
<dependency>
    <groupId>com.oceanbase</groupId>
    <artifactId>obkv-hbase-client</artifactId>
    <version>0.1.4</version>
</dependency>
Notice
- Use the latest version of the JAR package. Older versions may not be compatible with new server versions.
- The version number shown here may not be the latest. For the latest version, see the central repository and replace the version number with the latest one.
Step 2: Set client connection parameters
OBKV-HBase offers different deployment modes for public cloud and on-premises environments, and the client connection parameters that you need to configure vary accordingly. If you have deployed OceanBase AI Database on-premises, see Direct connection mode. If you use the OBKV service in a public cloud, see Cloud mode.
You can set all parameters in either of the following ways:
- In your code, before you initialize the connection, use the
setmethod ofHBaseConfigurationorConfiguration. - In the OBKV-HBase client configuration file:
- If you use
org.apache.hadoop.hbase.HBaseConfigurationto initialize the connection, set the parameters in thehbase-site.xmlfile. - If you use
org.apache.hadoop.conf.Configurationto initialize the connection, set the parameters in thecore-site.xmlfile.
- If you use
Direct connection mode (on-premises deployment)
By using the Configuration class
## Assume that the current cluster is as follows:
## ClusterName: obkvcluster
## TenantName: obkv
## DatabaseName: test
## UserName: root
## SYS_USER_NAME: sysroot

#### Required parameters
Configuration conf = new Configuration();

#### Optional parameters
## Format: userName@tenantName#clusterName
conf.set(HBASE_OCEANBASE_FULL_USER_NAME, "root@obkv#obkvcluster");

## The password of the userName for accessing OceanBase.
conf.set(HBASE_OCEANBASE_PASSWORD, "");
## The URL for obtaining the RSlist from the OBConfig server. For more information, see Obtain the Config URL.
conf.set(HBASE_OCEANBASE_PARAM_URL, "");

## The username of the system tenant. Only users in the system tenant can access the routing table.
conf.set(HBASE_OCEANBASE_SYS_USER_NAME, "sysroot");

## The password of the system tenant user.
conf.set(HBASE_OCEANBASE_SYS_PASSWORD, "");

#### Optional parameters
## The timeout for executing a request (based on business characteristics). The unit is ms. The following example indicates a timeout of 1 second.
conf.set("rpc.execute.timeout", "1000");
By using a configuration file
<!--
Assume that the current cluster is as follows:
ClusterName: obkvcluster
TenantName: obkv
DatabaseName: test
UserName: root
User password:
SYS_USER_NAME: sysroot
SYS user password:
-->

<configuration>
  <property>
    <name>hbase.oceanbase.fullUserName</name>
    <value>root@obkv#obkvcluster</value>
  </property>
  <property>
    <name>hbase.oceanbase.password</name>
    <value></value>
  </property>
  <property>
    <!-- Obtain the RSlist URL from the OBConfig server. For more information, see Obtain the Config URL. -->
    <name>hbase.oceanbase.paramURL</name>
    <value>your config url</value>
  </property>
  <property>
    <name>hbase.oceanbase.sysUserName</name>
    <value>sysroot</value>
  </property>
  <property>
    <name>hbase.oceanbase.sysPassword</name>
    <value></value>
  </property>
</configuration>
Notice
The paramURL may contain the XML special character &, which needs to be converted to &; otherwise, parsing will fail.
Obtain the Config URL
You can obtain the Config URL in the following ways:
Obtain the Config URL from OceanBase Cloud Platform (OCP)
If you use OCP, you can obtain the Config URL from OCP.
Log on to the OCP console.
In the left-side navigation pane, click Clusters.
Click the name of the cluster that you want to access.
On the cluster details page, find the ConfigURL parameter. You need to configure this parameter during client initialization.

Deploy the Config Server by using OBD and obtain the Config URL
If you do not use OCP, you need to deploy a Config Server by using the CLI and obtain the ObRootServiceInfoUrl.
Cloud mode configuration (public cloud)
By using Configuration
## Assume that the current cluster is as follows:
## DatabaseName: test
## UserName: root

#### Required parameters
Configuration conf = new Configuration();

## The username of the user who is created in the database. The username does not need to be in the three-part format.
conf.set(HBASE_OCEANBASE_FULL_USER_NAME, "root");

## The password of the user.
conf.set(HBASE_OCEANBASE_PASSWORD, "");

## For more information, see the remarks about the ODP address.
conf.set(HBASE_OCEANBASE_ODP_ADDR, "");

## The port number of OBKV is 3307 (fixed).
conf.setInt(HBASE_OCEANBASE_ODP_PORT, 3307);

## Use ODP in cloud mode (fixed).
conf.setBoolean(HBASE_OCEANBASE_ODP_MODE, true);

## The name of the database.
conf.set(HBASE_OCEANBASE_DATABASE, "test");

#### Optional parameters
## The timeout period for request execution. You can configure this parameter based on your business requirements.
conf.set("rpc.execute.timeout", "1000");
By using a configuration file
Set the corresponding parameters in the OBKV-HBase client configuration file.
<!--
Assume that the current cluster is as follows:
DatabaseName: test
UserName: root
-->
<configuration>
    <property>
        <name>hbase.oceanbase.fullUserName</name>
        <value>root</value>
    </property>
    <property>
        <name>hbase.oceanbase.password</name>
        <value></value>
    </property>
    <property>
        <!-- For details, see Obtain ODP Address. -->
        <name>hbase.oceanbase.odpAddr</name>
        <value></value>
    </property>
    <property>
        <name>hbase.oceanbase.odpPort</name>
        <value>3307</value>
    </property>
    <property>
        <name>hbase.oceanbase.odpMode</name>
        <value>true</value>
    </property>
    <property>
        <name>hbase.oceanbase.database</name>
        <value>test</value>
    </property>
</configuration>
Notice
The paramURL may contain the XML special character &, which needs to be converted to &; otherwise, parsing will fail.
Obtain the ODP address
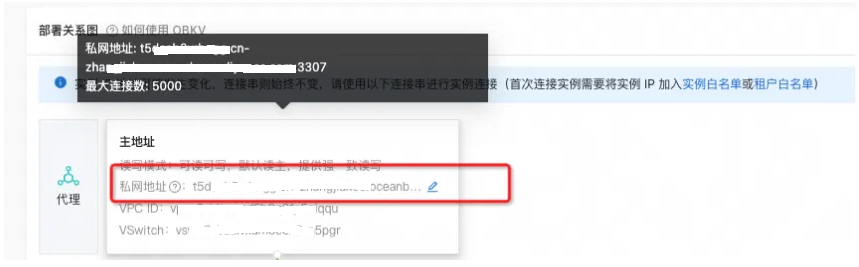
You can obtain the OceanBase Database Proxy (ODP) address by logging on to the OB Cloud console and viewing the deployment relationship diagram.
Connect to the OceanBase AI Database cluster
After you set the client connection parameters, initialize the client. Currently, three methods are supported: ConnectionFactory, OHTableClient, and OHTablePool. The differences between them are as follows:
- ConnectionFactory (recommended): This is the native HBase client method for creating connections. Through ConnectionFactory, you can create an HBase Connection and operate on different HBase instances. The Connection itself is thread-safe. The client is initialized by using configuration files. With this method, HBase applications can be migrated without code changes.
- OHTableClient: Not thread-safe and internally maintains only one OHTable handle. Concurrent access to the same OHTable from multiple threads may cause unpredictable issues (use in single-threaded scenarios).
- OHTablePool: An OHTable pool. You can obtain an OHTable instance for the required table from the pool as needed (use in multi-threaded scenarios).
Connect to OceanBase AI Database by using ConnectionFactory
Modify the HBase connection type
First, you need to change the Connection type to the OBKV-HBase Connection type. You can do this in either of the following ways:
Modify the configuration file
In the configuration file, set the HBase Connection type to the OBKV-HBase Connection type:
<property>
    <name>hbase.connection.impl</name>
    <value>com.alipay.oceanbase.hbase.util.OHConnectionImpl</value>
</property>
Set the Configuration directly
In your HBase application code, update the Configuration and add the
HBASE_CLIENT_CONNECTION_IMPLsetting:import org.apache.hadoop.hbase.client.ClusterConnection; conf.set(ClusterConnection.HBASE_CLIENT_CONNECTION_IMPL, "com.alipay.oceanbase.hbase.util.OHConnectionImpl");
Create an HBase connection
// Set the configuration. You can also set the configuration in the configuration file. For more information, see the previous section.
Configuration conf = new Configuration(); // Create a configuration object.
conf.set(xxx); // Set each parameter.
Connection connection = ConnectionFactory.createConnection(conf);
TableName tableName = TableName.valueOf("your hbase table");
Table hTable = connection.getTable(tableName);
// Execute the relevant logic.
hTable.close(); // Close the hTable object.
connection.close(); // Close the connection object.
Connect to OceanBase AI Database by using OHTable
// Set the configuration. For more information, see the previous section.
Configuration conf = new Configuration(); // Create a configuration object.
conf.set(xxx); // Set each parameter.
OHTableClient hTable = new OHTableClient("test1", conf); // Create an hTable object.
hTable.init(); // Initialize the hTable.
// Execute the relevant logic.
hTable.close(); // Close the hTable object.
Connect to OceanBase AI Database by using OHTablePool
OBKV-HBase provides a table pool mechanism for managing operation instances of multiple tables. The resource pool currently supports three modes: Reusable, RoundRobin, and ThreadLocal. You can specify the desired mode when you create the table pool.
This works in the same way as HBase's HTablePool. To obtain an HTable for a specific table, use pool.getTable("xx"). Note the following:
- Parameter precedence: Table-specific parameters (such as pool.setOdpAddr()) take priority over parameters set in Conf, which in turn take priority over default parameters.
- After you use an HTable, call close() to return the OHTable to the pool. We recommend that you use a try/finally block to ensure that the HTable is returned.
// Set the configuration. For more information, see the previous section.
Configuration conf = new Configuration(); // Create a configuration object.
conf.set(xxx); // Set each parameter.

// Initialize maxSize, which indicates the maximum number of hTable references for each table in the pool.
int maxSize = 100;
// Initialize poolType, which can be Reusable, ThreadLocal, or RoundRobin. We recommend that you use ThreadLocal.
PoolMap.PoolType poolType = PoolMap.PoolType.ThreadLocal;
OHTablePool pool = new OHTablePool(conf, maxSize, poolType);
HTableInterface hTable = pool.getTable("test"); // Obtain the hTable for the corresponding table.
// Execute the relevant logic.
hTable.close(); // Return the table to the pool.
OBKV-HBase client parameters
In addition to connection parameters, you can set other parameters by using Configuration. For example, the following code sets the client RPC timeout to 3 seconds.
conf.set("rpc.execute.timeout", "3000");
Quick reference for common parameters
Parameter |
Description |
Default value |
|---|---|---|
| HBASE_OCEANBASE_FULL_USER_NAME | The username. For more information, see Step 2: Set client connection parameters. | Empty |
| HBASE_OCEANBASE_PASSWORD | The user password. | Empty |
| HBASE_OCEANBASE_PARAM_URL | The URL for obtaining the RSlist from the OBConfig server. | Empty |
| HBASE_OCEANBASE_SYS_USER_NAME | The username for the system tenant. | Empty |
| HBASE_OCEANBASE_SYS_PASSWORD | The password for the system tenant user. | Empty |
| HBASE_OCEANBASE_ODP_MODE | Indicates whether cloud configuration is used. | False |
| HBASE_OCEANBASE_ODP_ADDR | The ODP address. For more information, see Step 2: Set client connection parameters. | Empty |
| HBASE_OCEANBASE_ODP_PORT | The ODP port. For more information, see Step 2: Set client connection parameters. | Empty |
| HBASE_OCEANBASE_DATABASE | The database name (used in cloud mode). | Empty |
rpc.connect.timeout |
The timeout for establishing RPC connections, in milliseconds. | 1000ms |
rpc.execute.timeout |
The socket timeout for executing RPC requests, in milliseconds. | 3000ms |
rpc.operation.timeout |
The timeout for internal OceanBase AI Database RPC execution, in milliseconds. We recommend that you set this parameter to the same value as rpc.execute.timeout. |
2000ms |
metadata.refresh.interval |
The interval for refreshing metadata, in milliseconds. | 60000ms |
runtime.continuous.failure.ceiling |
The maximum number of consecutive failures before refreshing table information. | 100 |
bolt.netty.buffer.low.watermark |
The Netty write buffer low watermark. | 5*1024 (512K) |
bolt.netty.buffer.high.watermark |
The Netty write buffer high watermark. | 1024*1024 (1M) |
runtime.retry.interval |
The interval between retries on runtime errors, in milliseconds. | 100ms |
runtime.retry.times |
The number of retries on runtime errors. | 3 |
OHTable configuration
You can also set the configuration of a single OHTable by using the OHTable interface:
API |
Description |
Default value |
|---|---|---|
setAutoFlush() |
Sets auto-flush. | True |
setWriteBufferSize() |
Sets the size of the write buffer. | 2097152 Byte |
Supported HBase operations
After you initialize the client as described in the preceding steps, you can perform operations. This section describes some operations of the OHTable interface. For more information about the OHTable interface, see OHTable.java.
For more information about how to use OBKV-HBase, see OBKV-HBase usage demo.
What to do next
After you deploy the OBKV-HBase client and establish a connection to the cluster, you can perform operations on the data. For more information about data operations, see Data operation examples.