
Model Context Protocol (MCP) is an open-source protocol introduced by Anthropic in November 2024. It allows large language models to interact with external tools or data sources. With MCP, you do not need to manually copy and execute the output of large language models. Instead, the large language model can directly command tools to perform specific actions.
OceanBase MCP Server enables large language models to interact with OceanBase Database through the MCP protocol and execute SQL statements. It allows you to quickly build a project prototype with the help of an appropriate client and has been open-sourced on GitHub.
TRAE is an IDE that can integrate with MCP Server, can be downloaded from its official website.
This topic will guide you through the process of integrating TRAE IDE with OceanBase MCP Server to quickly build a backend application.
Prerequisites
A transactional instance is available in your environment. For instructions on how to create the instance, see Create an transactional instance.
You have created a MySQL-compatible tenant in the instance. For instructions on how to create the tenant, see Create a MySQL-compatible tenant.
You have a MySQL database and account available under the tenant, and you have granted read and write permissions to the database account. For more information, see Create an account and Create a database (MySQL only).
You are a project admin or instance admin and have the permissions required to read and write data in the instance. If not, contact your organization admin to grant the required permissions.
You have installed Python 3.11 or later and pip. If your local machine has an earlier version of Python, you can use Miniconda to create a new Python 3.11 or later environment. For more information, see Miniconda installation guide.
You have installed Git based on your operating system.
You have installed uv, a Python package manager. After the installation, run the
uv --versioncommand to check whether the installation was successful:pip install uv uv --versionYou have downloaded TRAE IDE and installed the version suitable for your operating system.
Step 1: Obtain the database connection information
Log in to the OceanBase Cloud console.
In the instance list page, expand the the information of the target instance.
Select Connect > Get Connection String under the target tenant.
In the pop-up window, select Public Network as the connection method.
Follow the prompts in the pop-up window to obtain the public endpoint and the connection string.
Step 2: Configure the OceanBase MCP server
Clone the OceanBase MCP Server repository
Run the following command to download the source code to your local device:
git clone https://github.com/oceanbase/mcp-oceanbase.git
Go to the source code directory:
cd mcp-oceanbase
Install the dependencies
Run the following commands in the mcp-oceanbase directory to create a virtual environment and install the dependencies:
uv venv
source .venv/bin/activate
uv pip install .
Create a working directory for the TRAE client
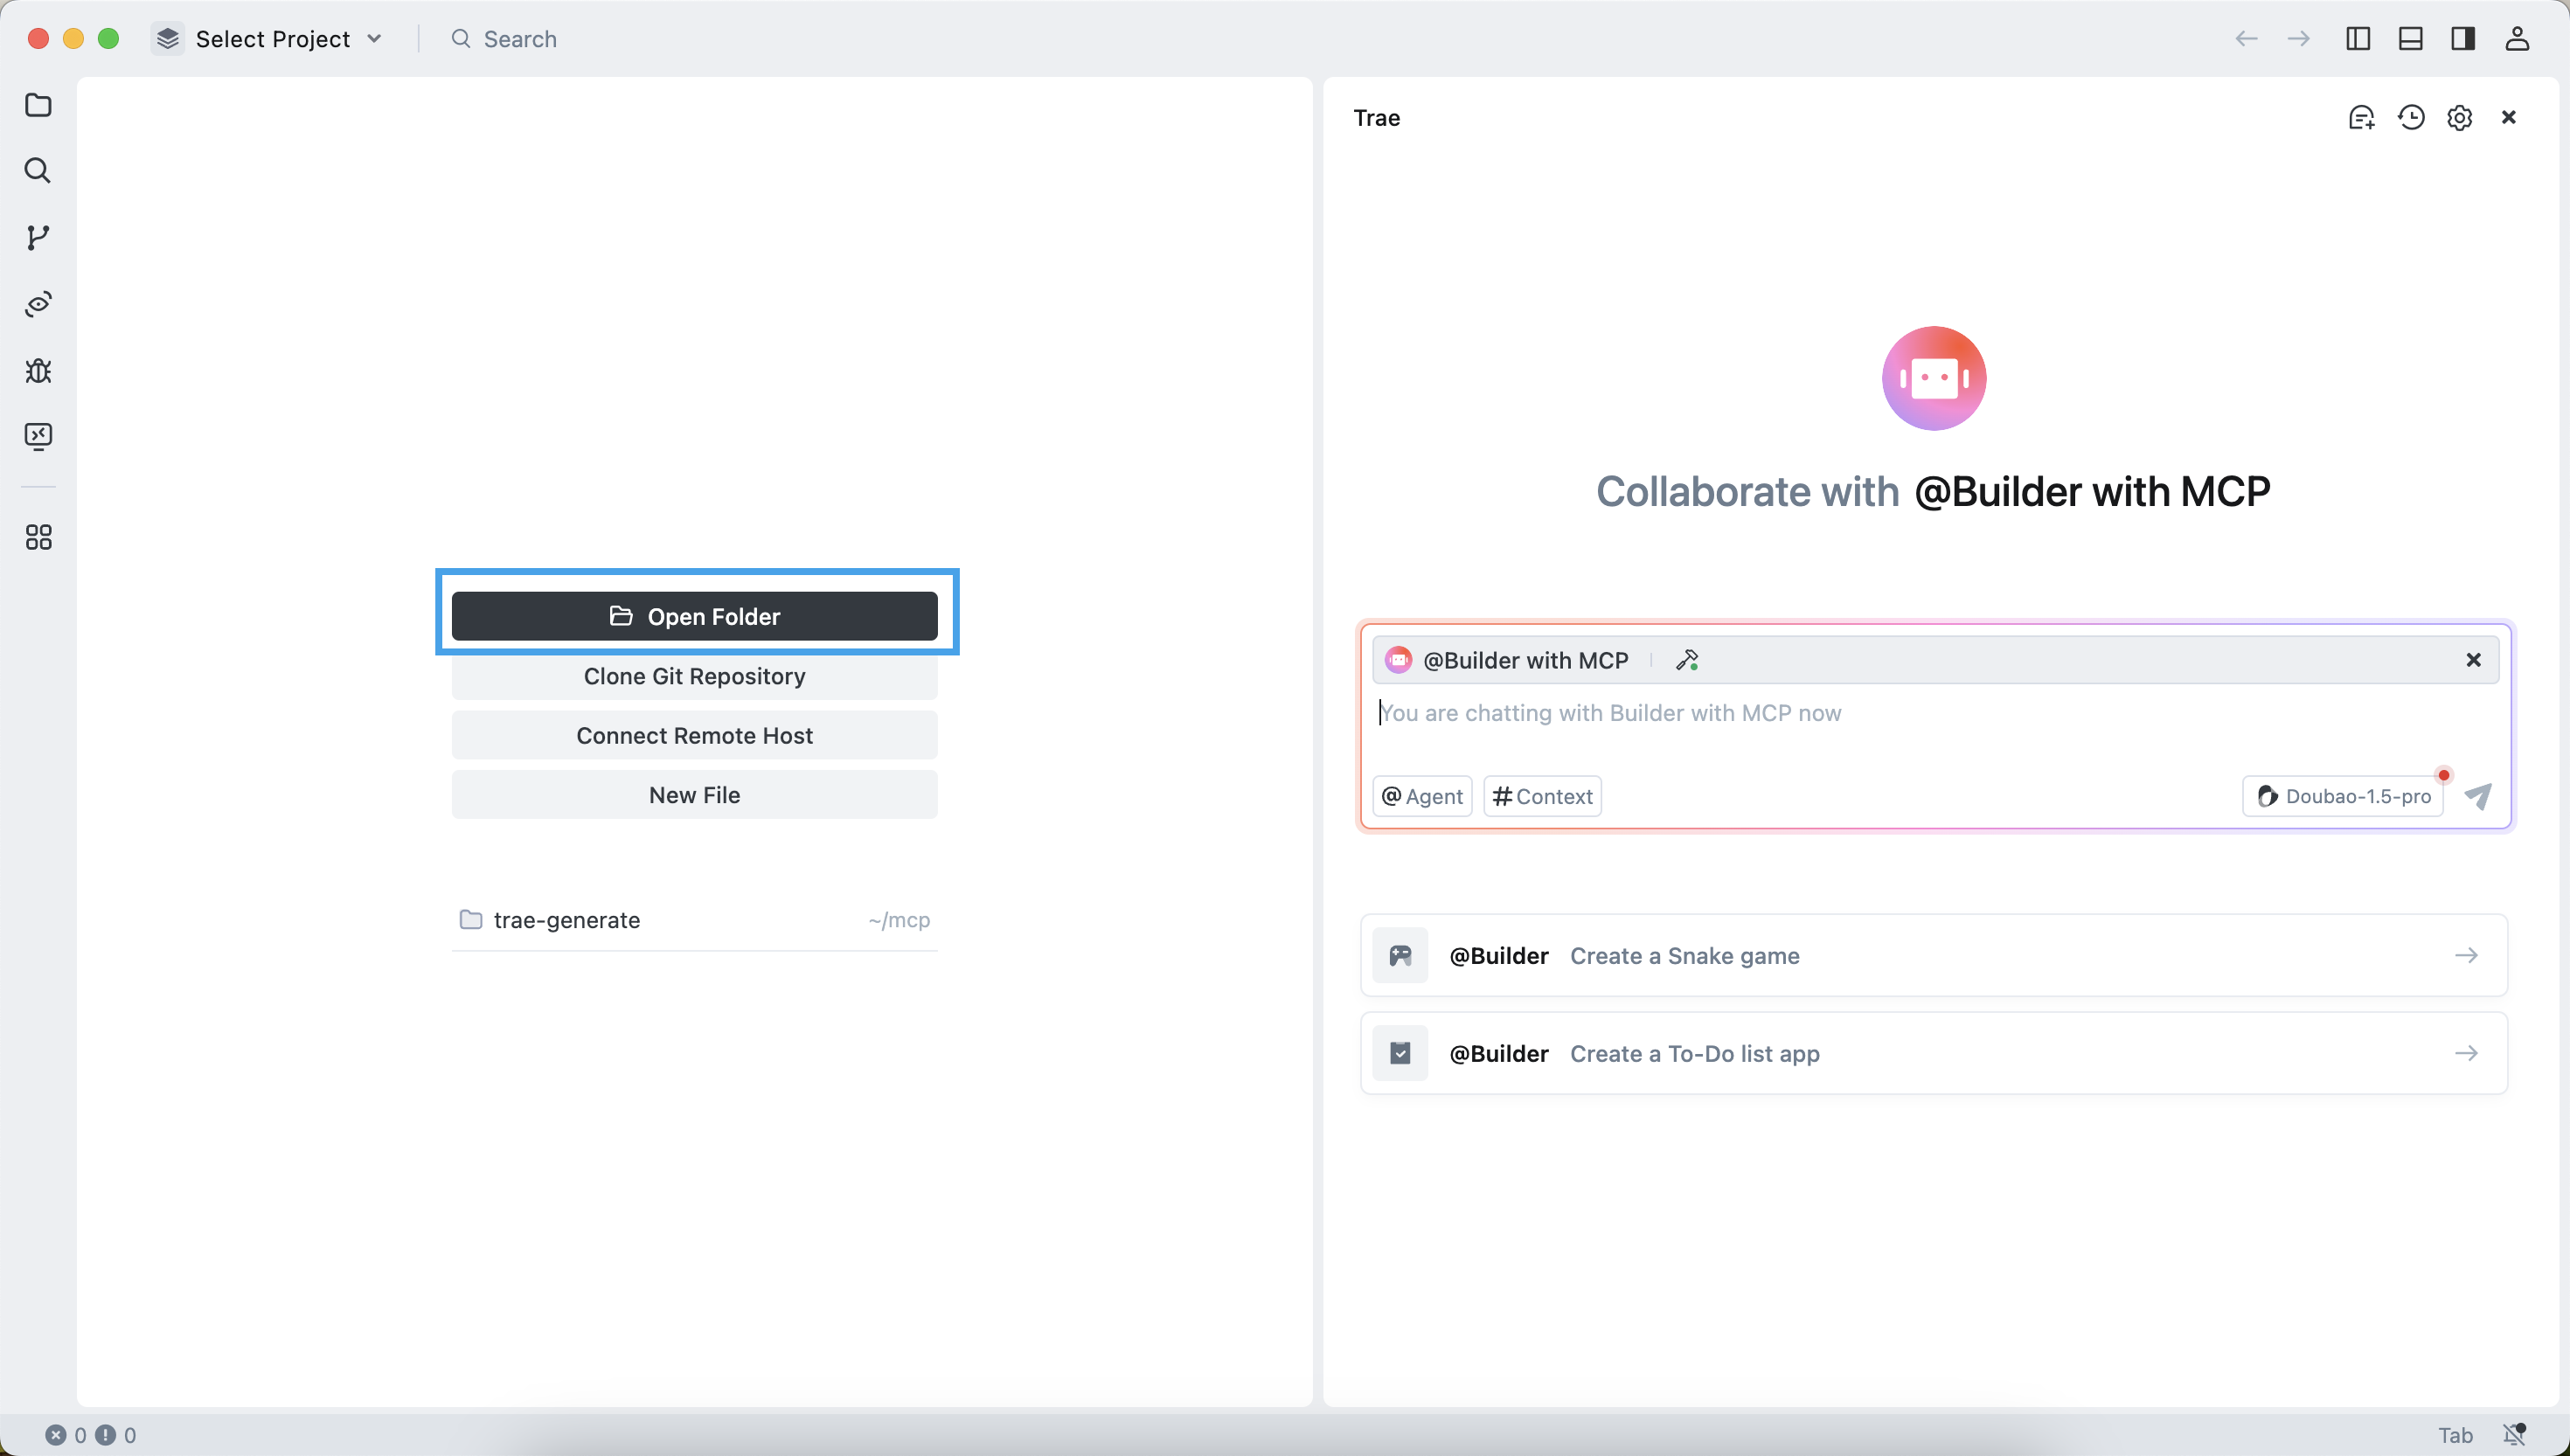
Manually create a working directory for TRAE and open it. Files generated by TRAE will be stored in this directory. The example directory name is trae-generate.
Configure OceanBase MCP Server in the TRAE client
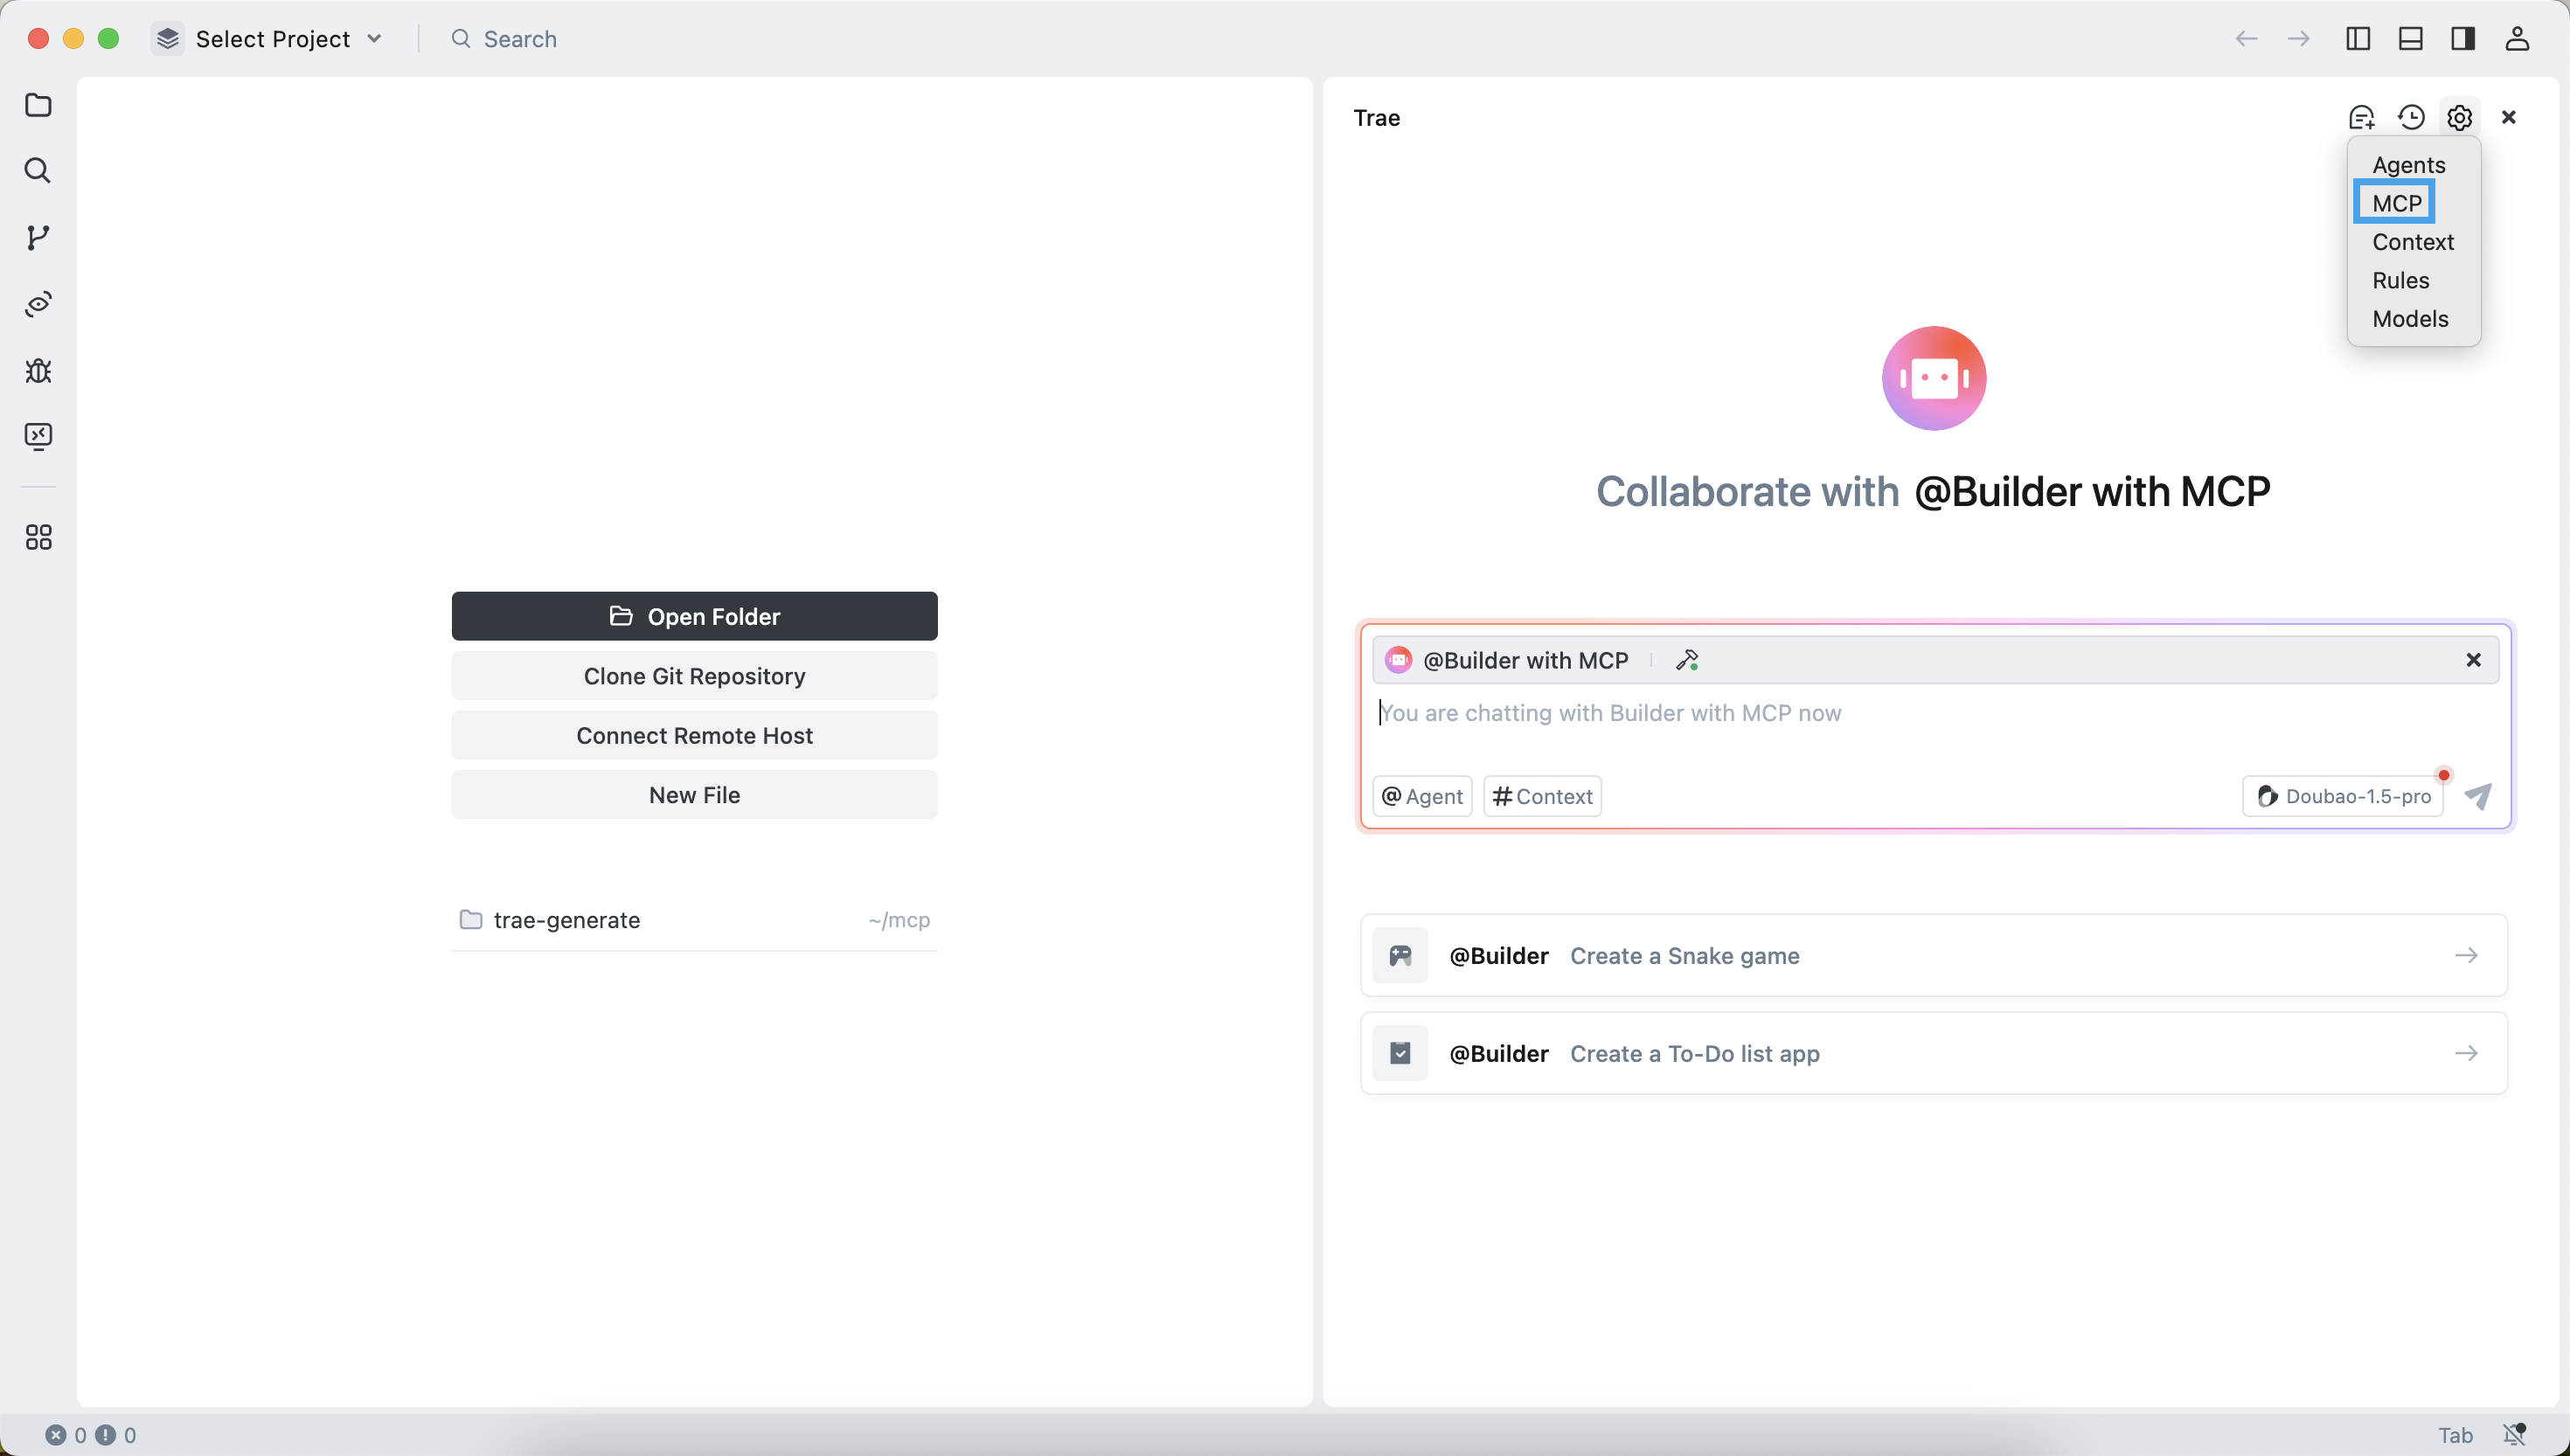
Press Ctrl + U (Windows) or Command + U (MacOS) to open the chat box. Click the gear icon in the upper-right corner and select MCP.
Add and configure MCP servers
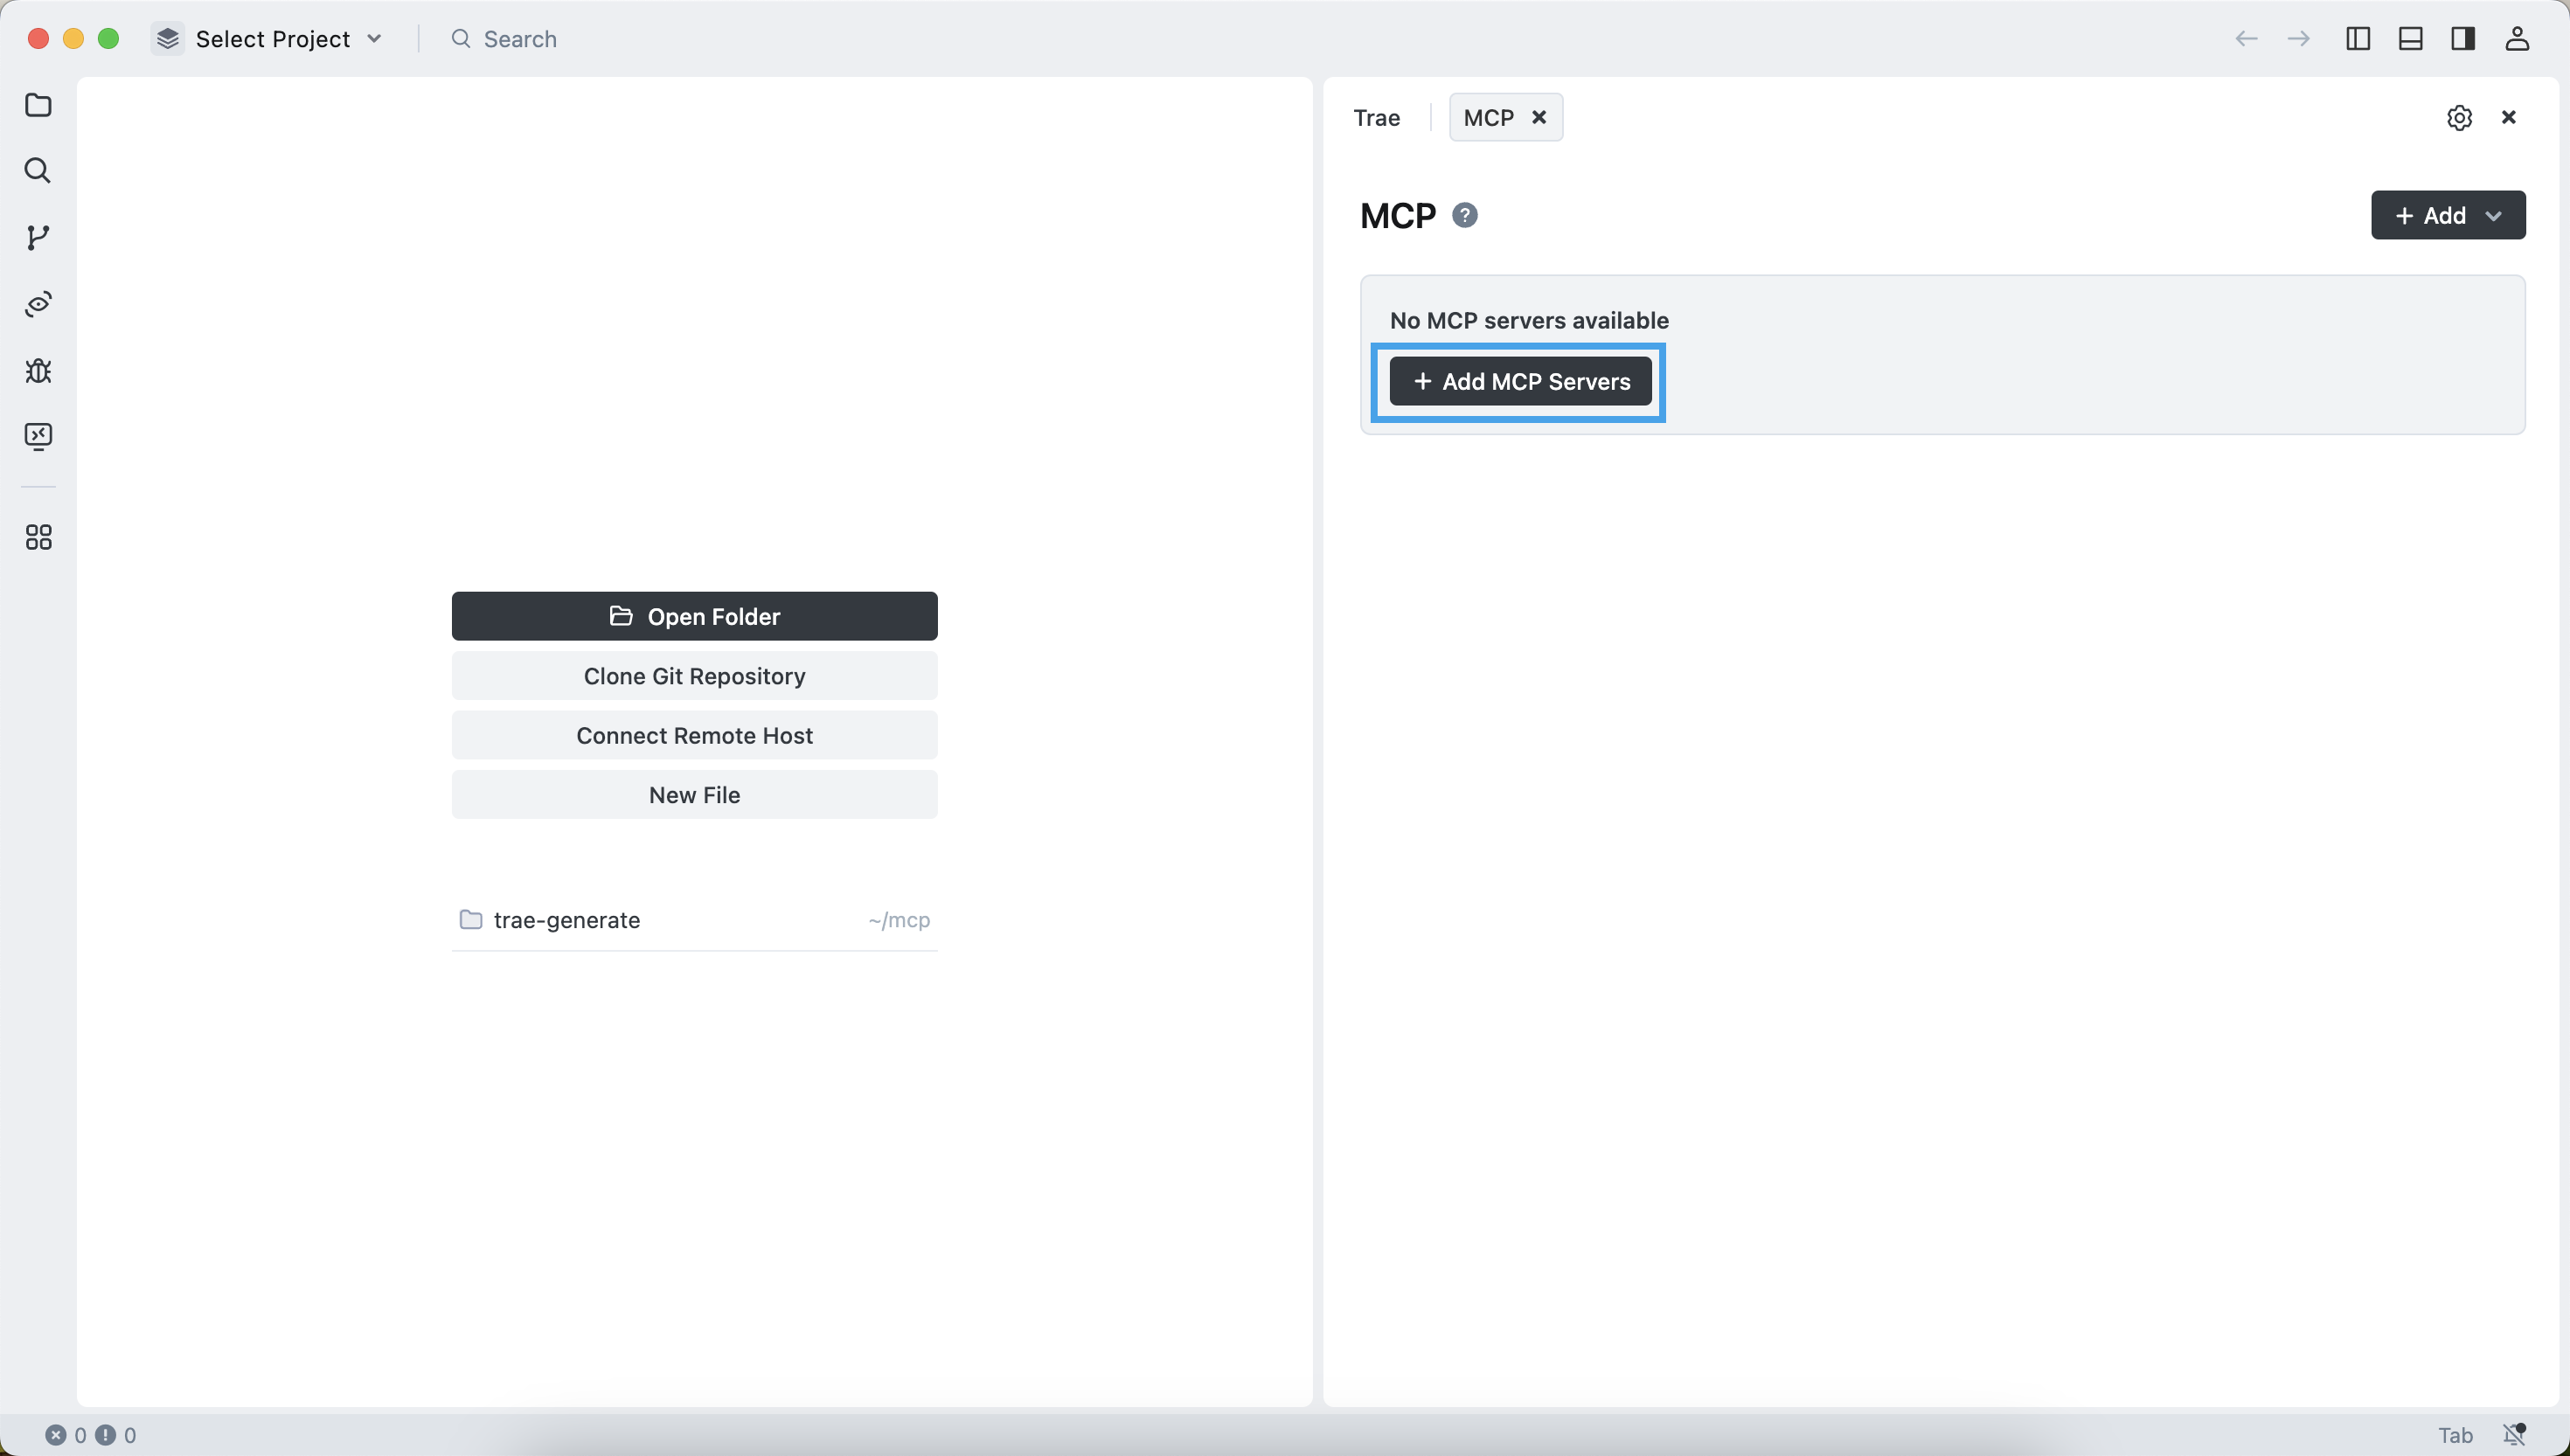
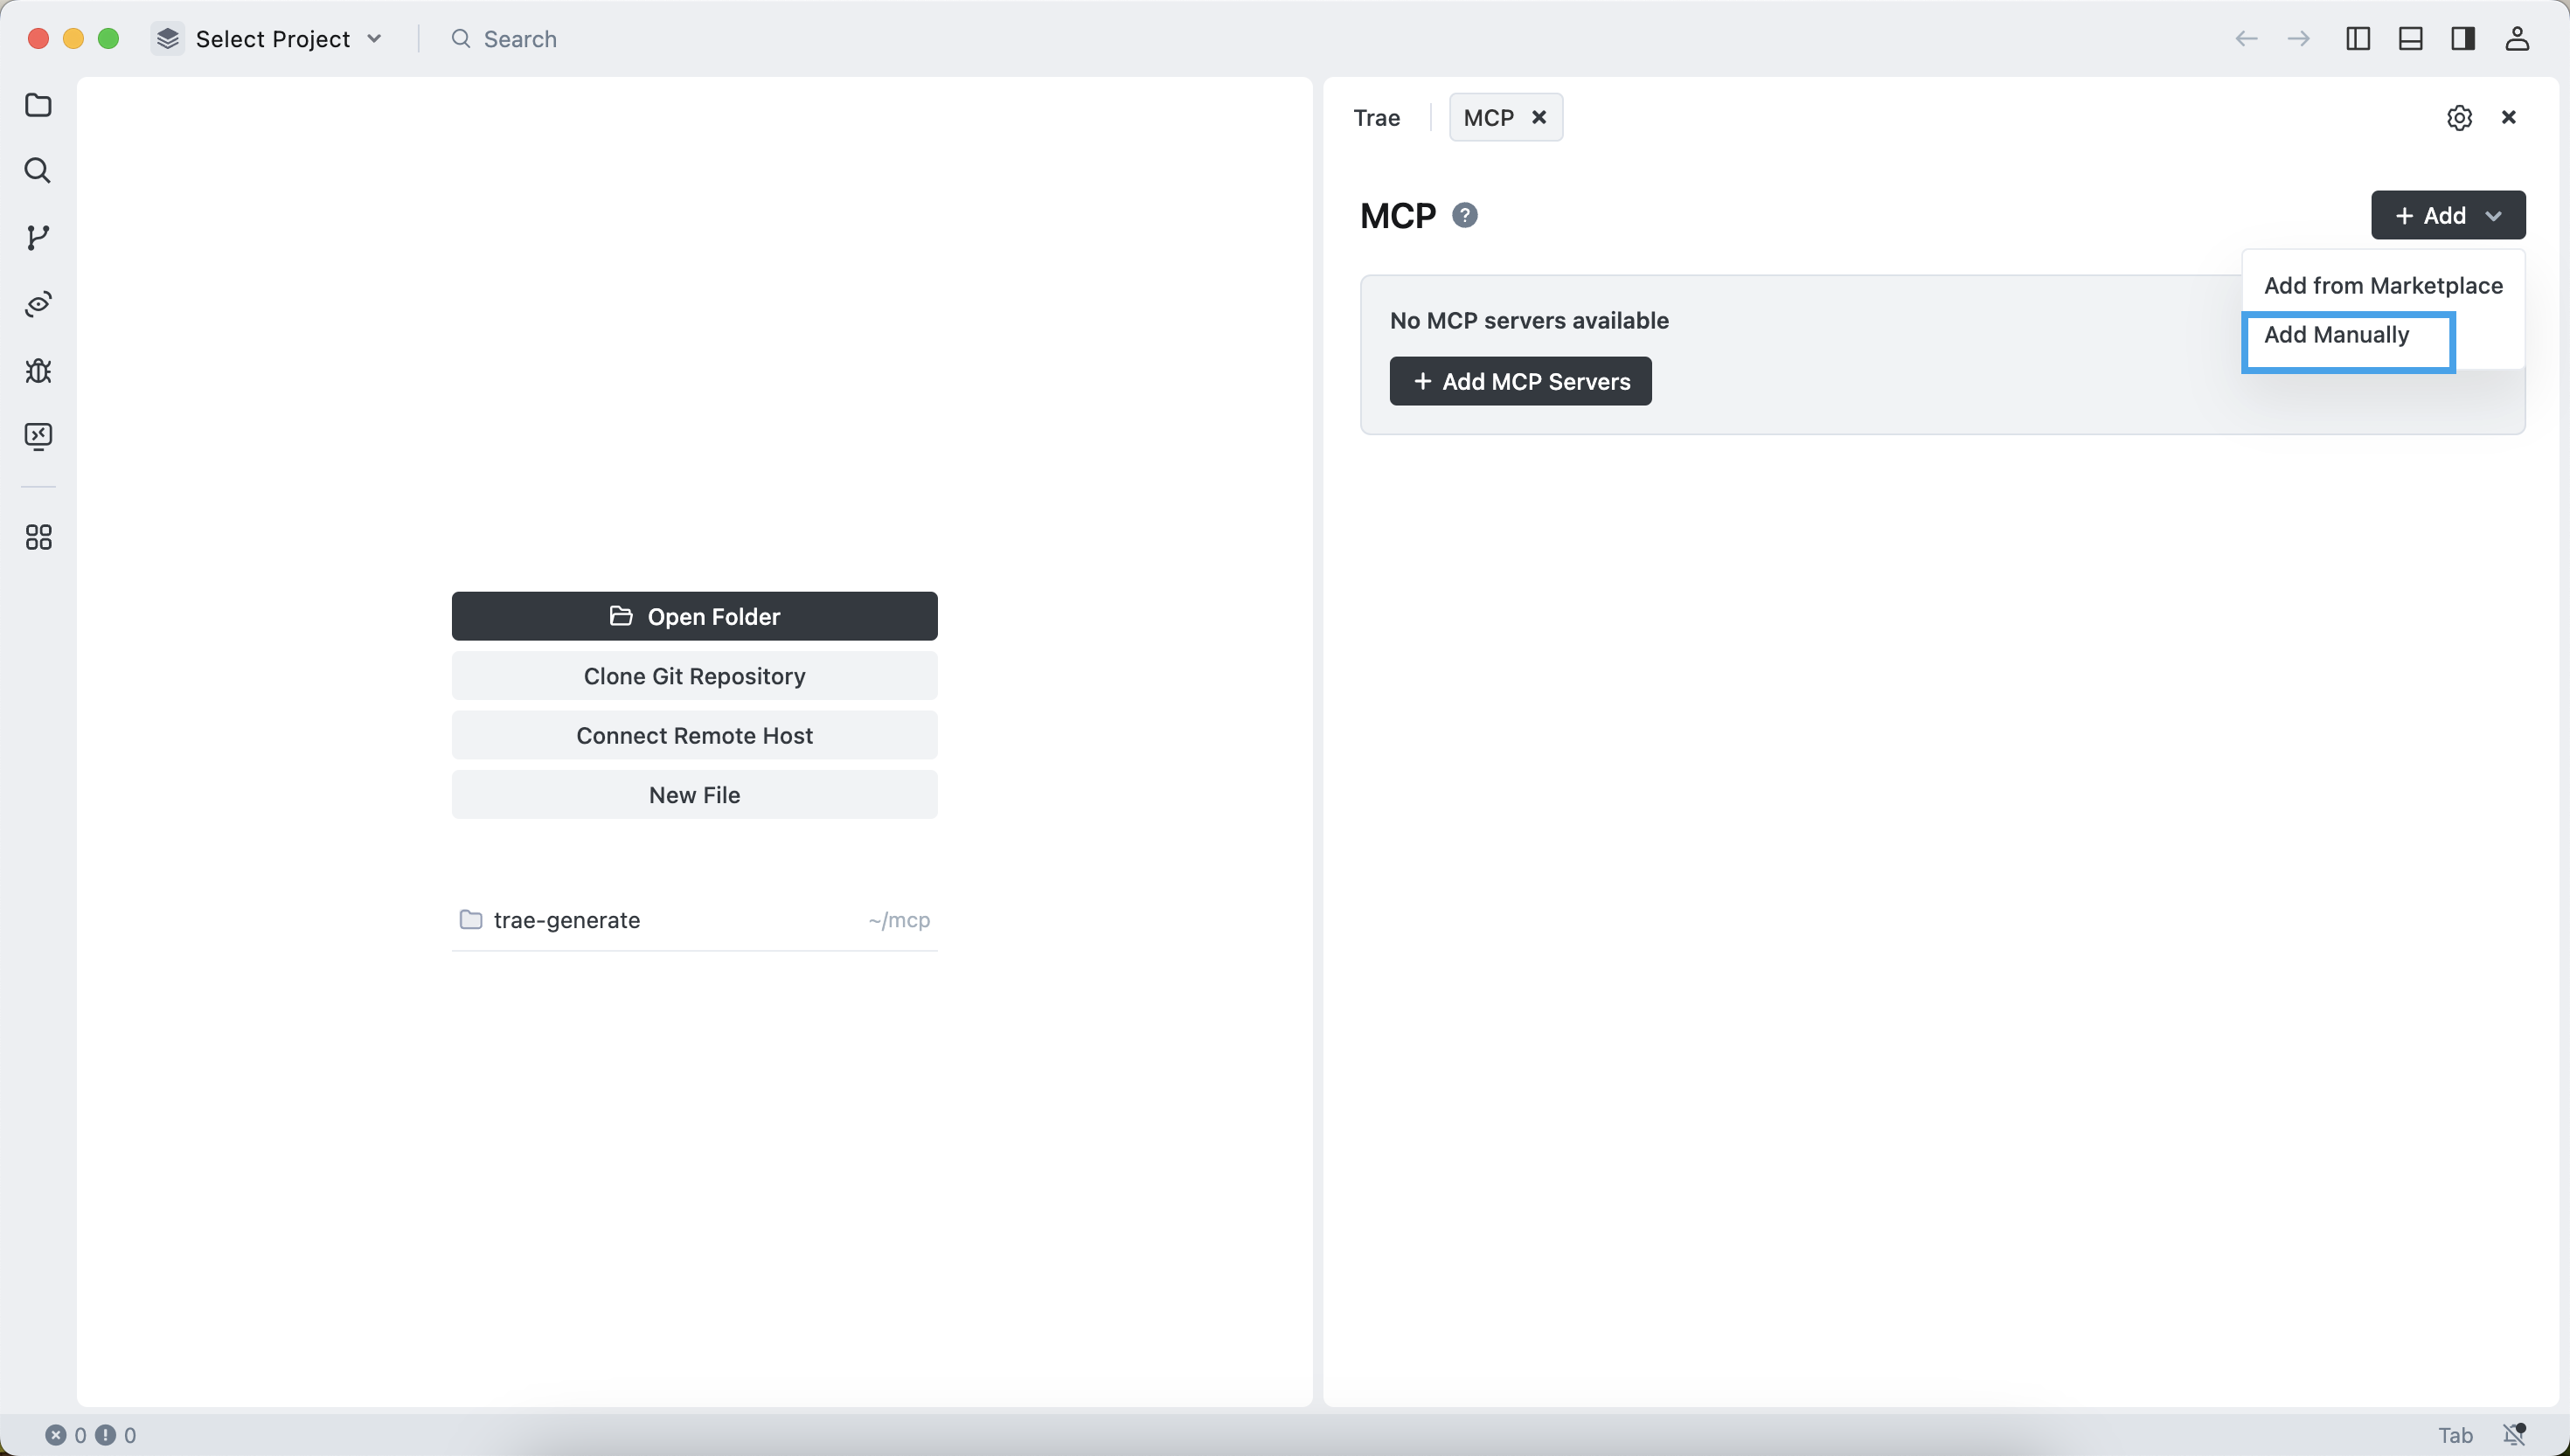
Click Add MCP Servers and select Add Manually.
Delete the sample content in the edit box.
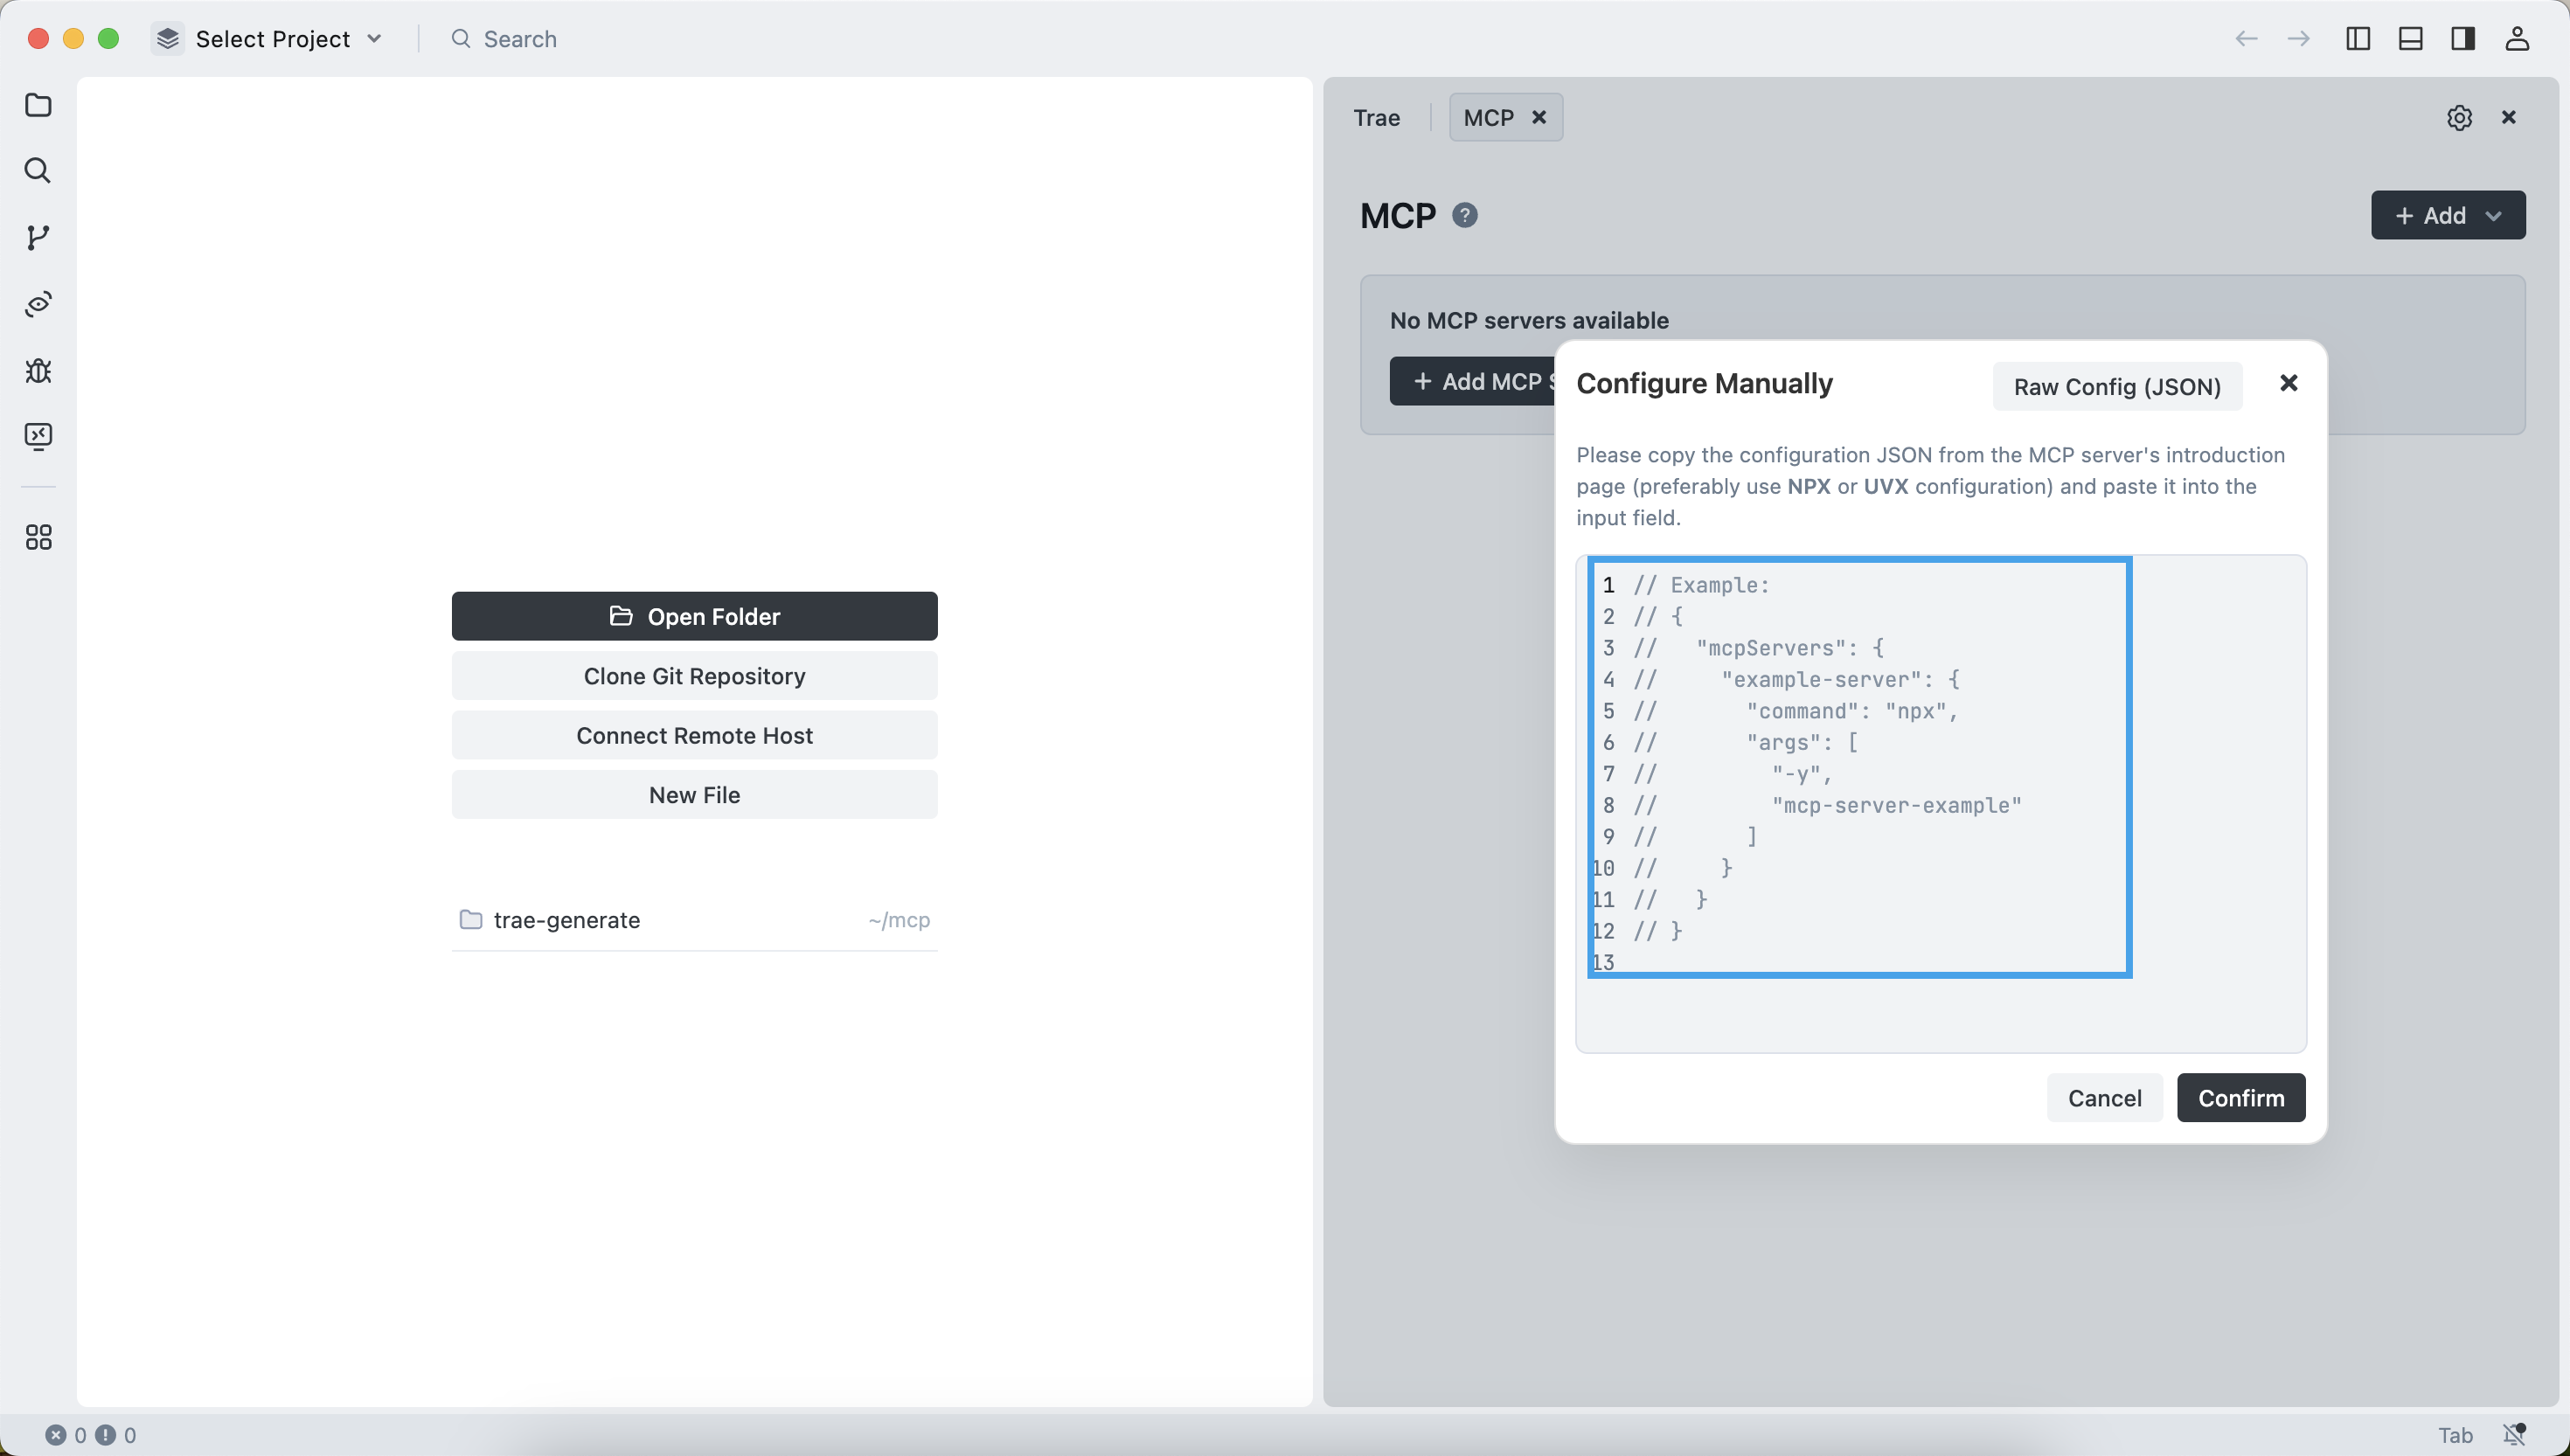
Then enter the following contents:
{
  "mcpServers": {
    "oceanbase": {
      "command": "uv",
      "args": [
        "--directory",
        // Replace with the absolute path of the oceanbase_mcp_server folder.
        "/path/to/your/mcp-oceanbase/src/oceanbase_mcp_server",
        "run",
        "oceanbase_mcp_server"
      ],
      "env": {
        // Replace with your OceanBase Database connection information.
        "OB_HOST": "***",
        "OB_PORT": "***",
        "OB_USER": "***",
        "OB_PASSWORD": "***",
        "OB_DATABASE": "***"
      }
    }
  }
}
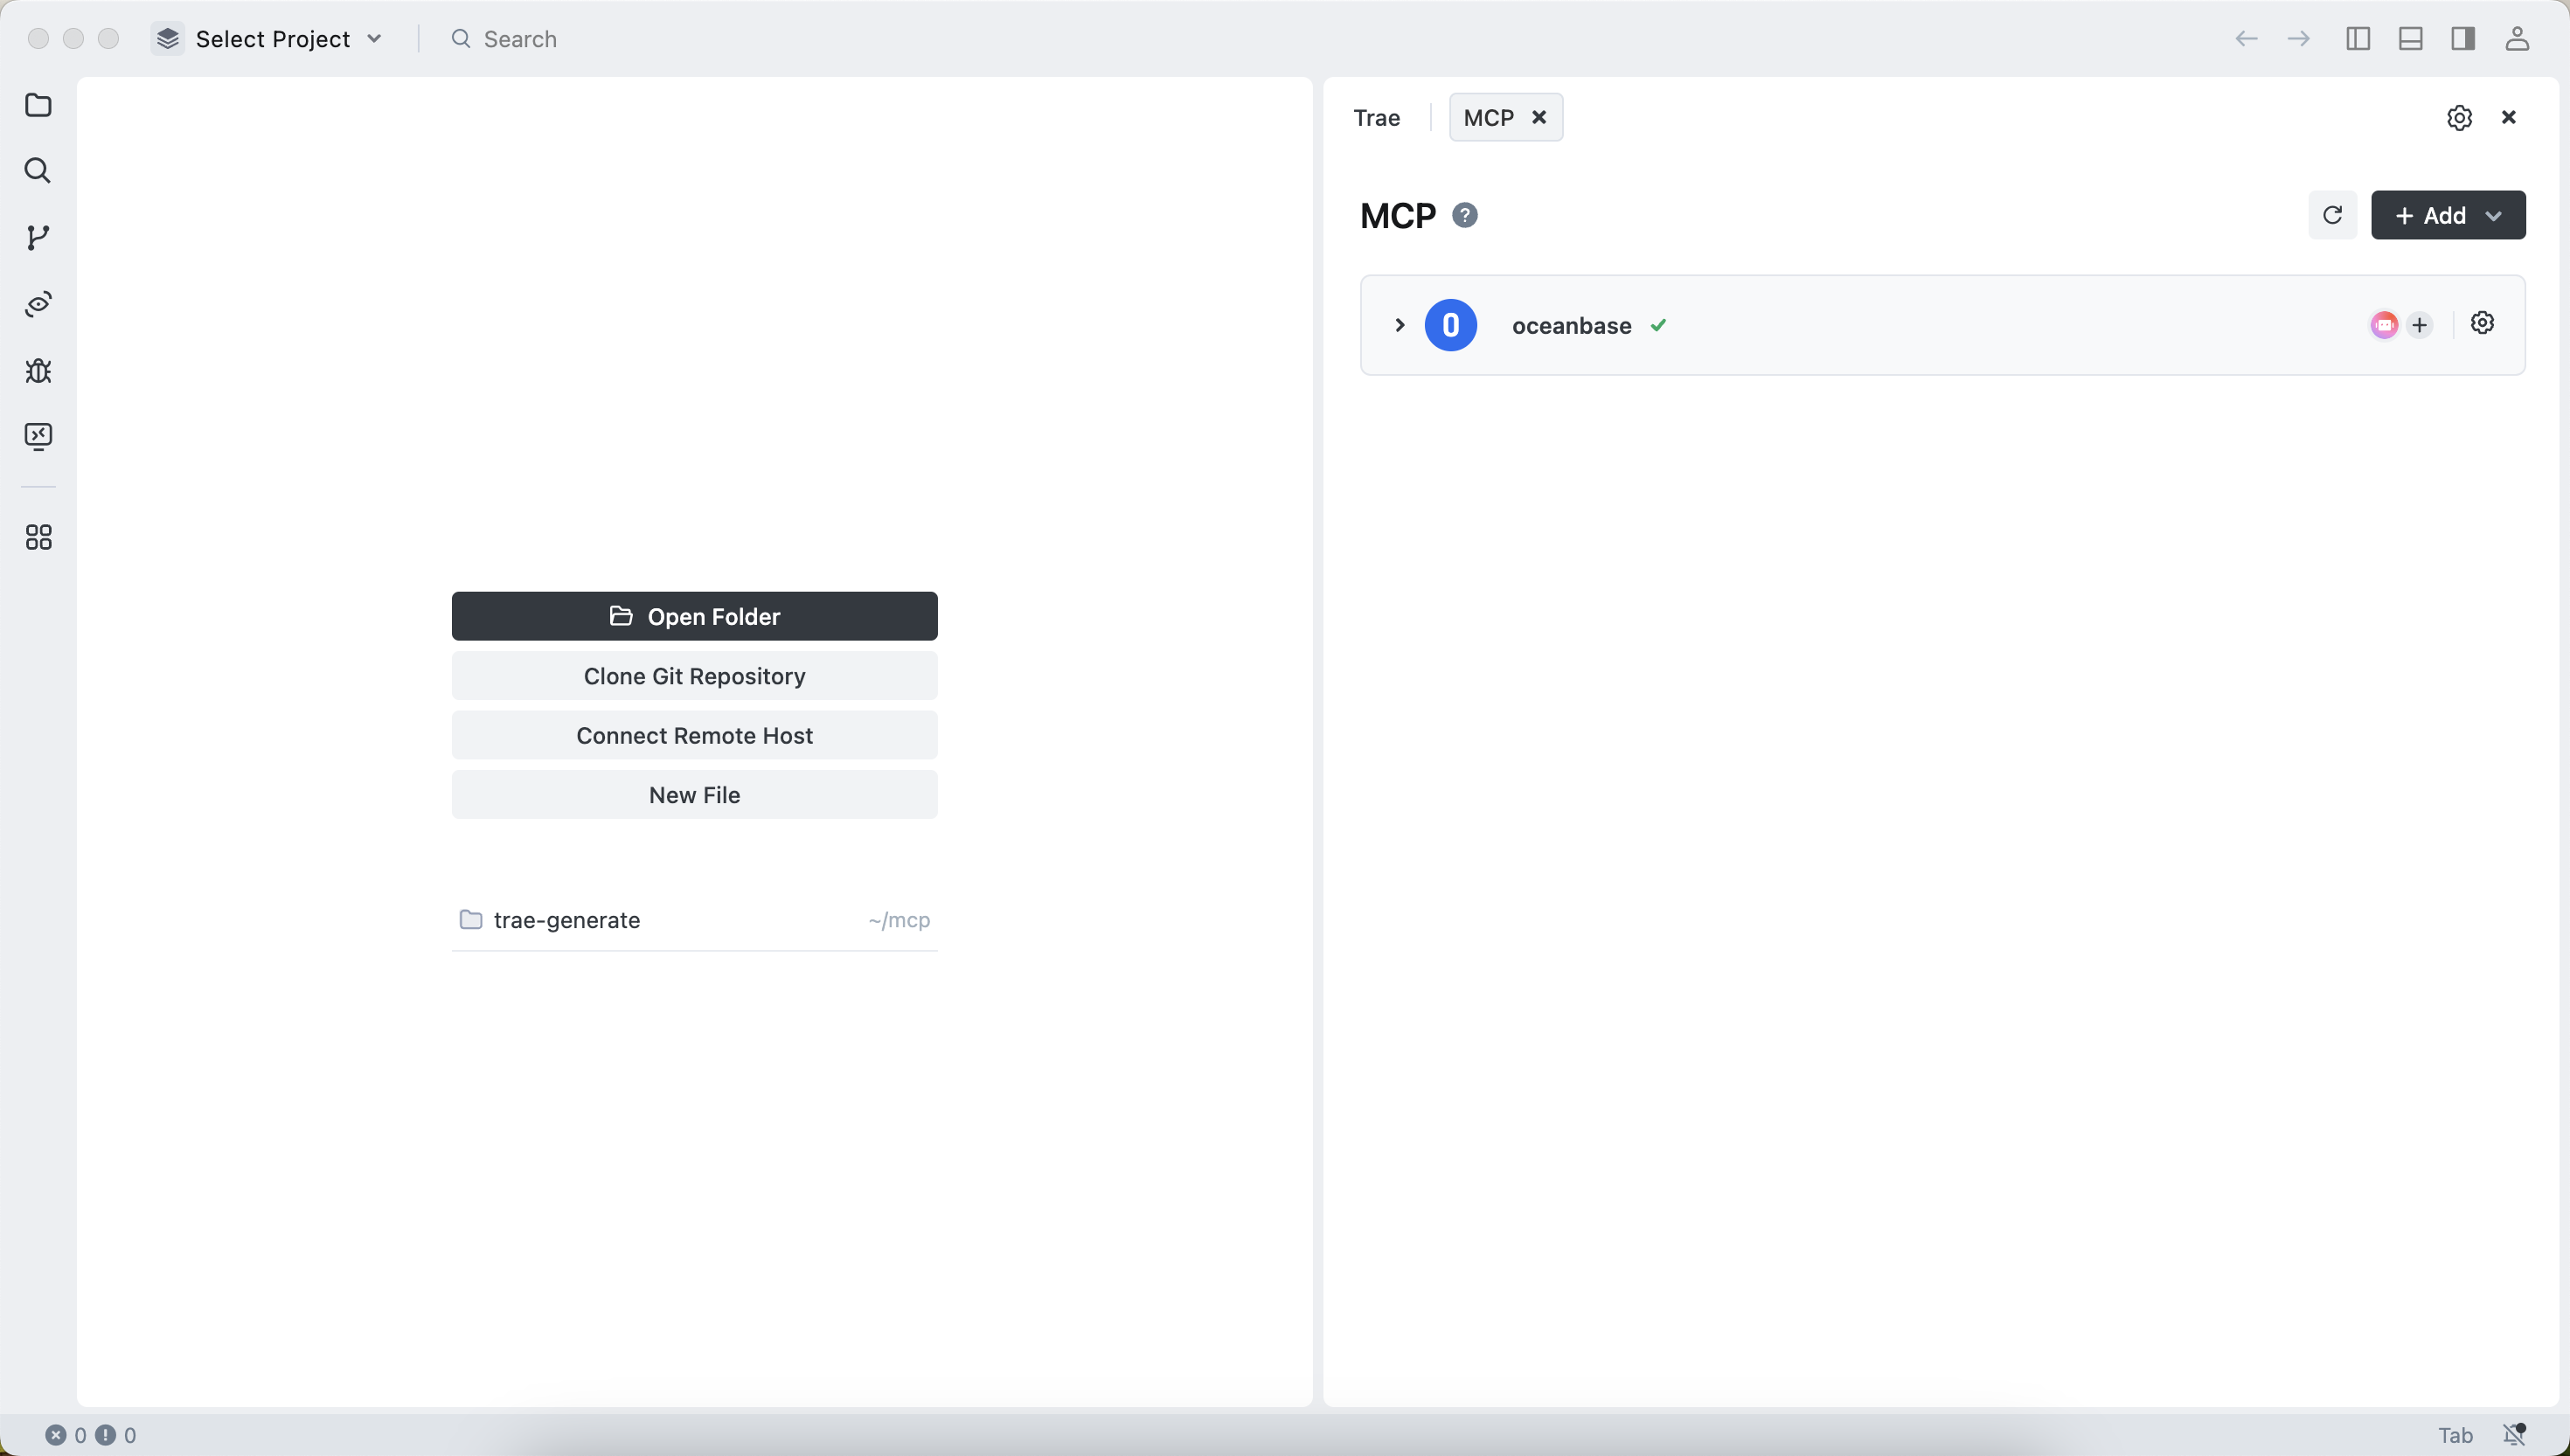
The configuration is successful.
Test the MCP server
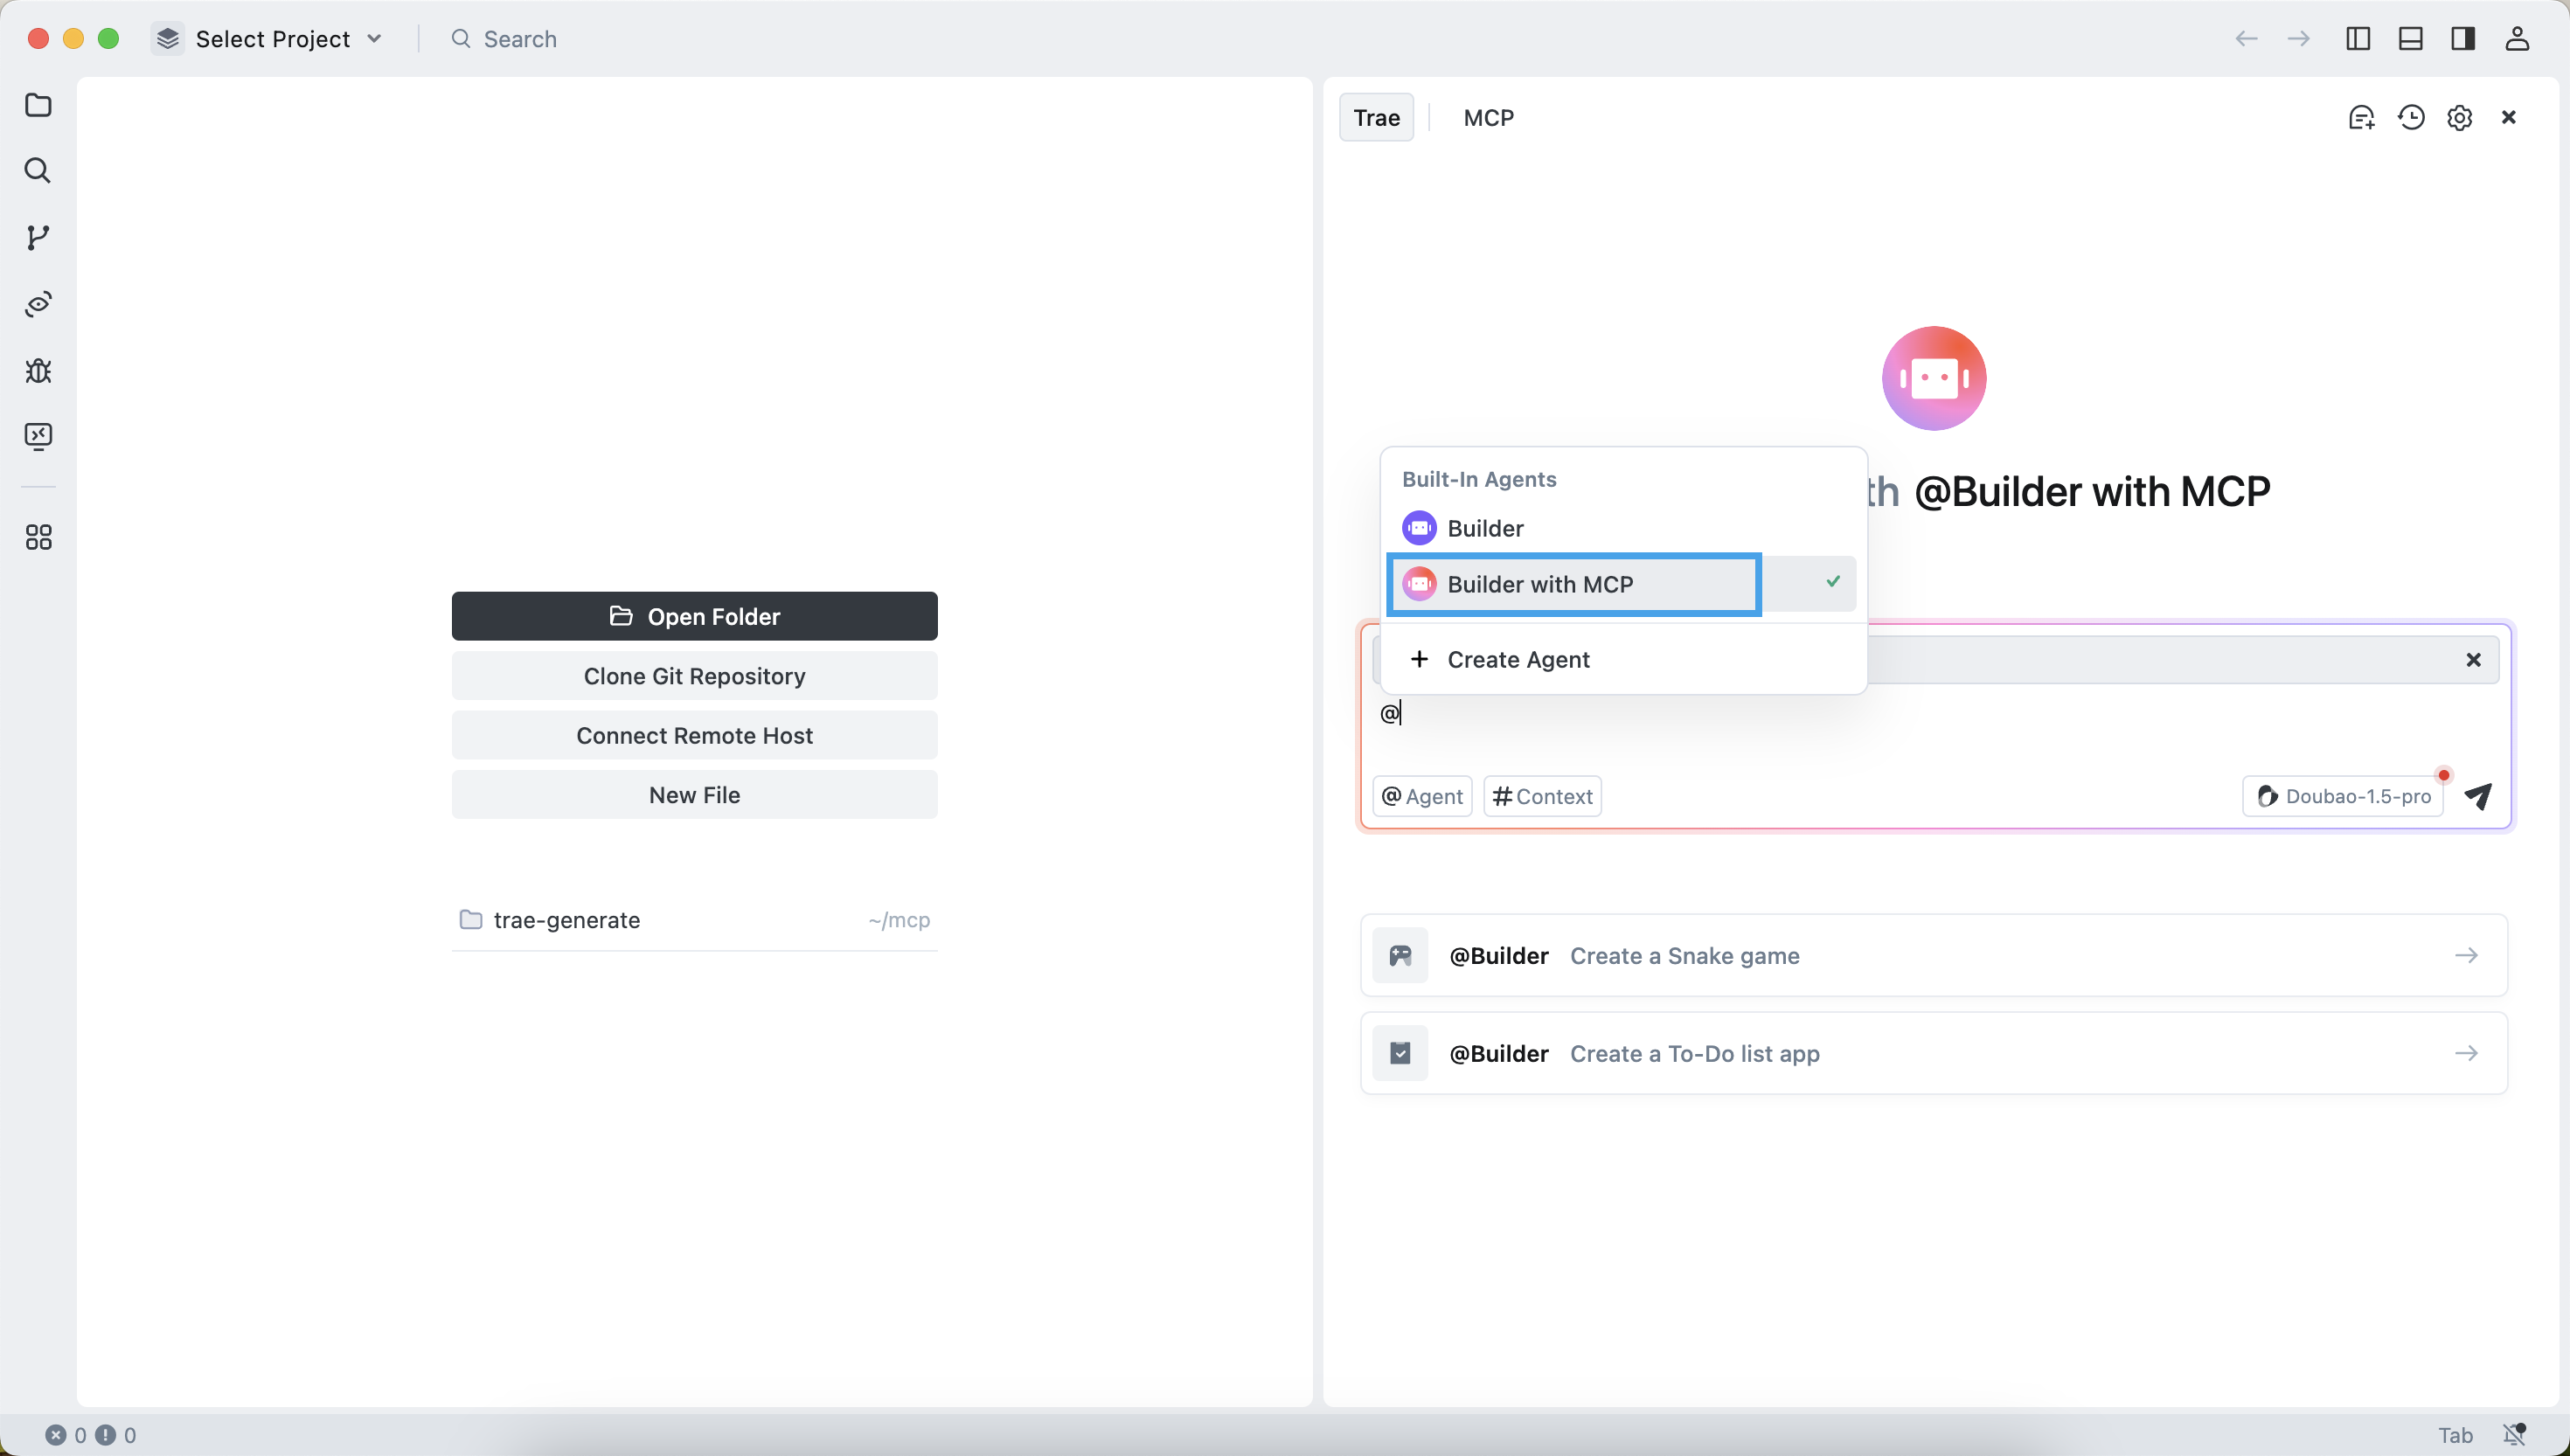
Select the Builder with MCP agent.
In the dialog box, enter
How many tables are there in the test database. The TRAE client will display the SQL statement to be executed. Confirm the SQL statement and click theRunbutton.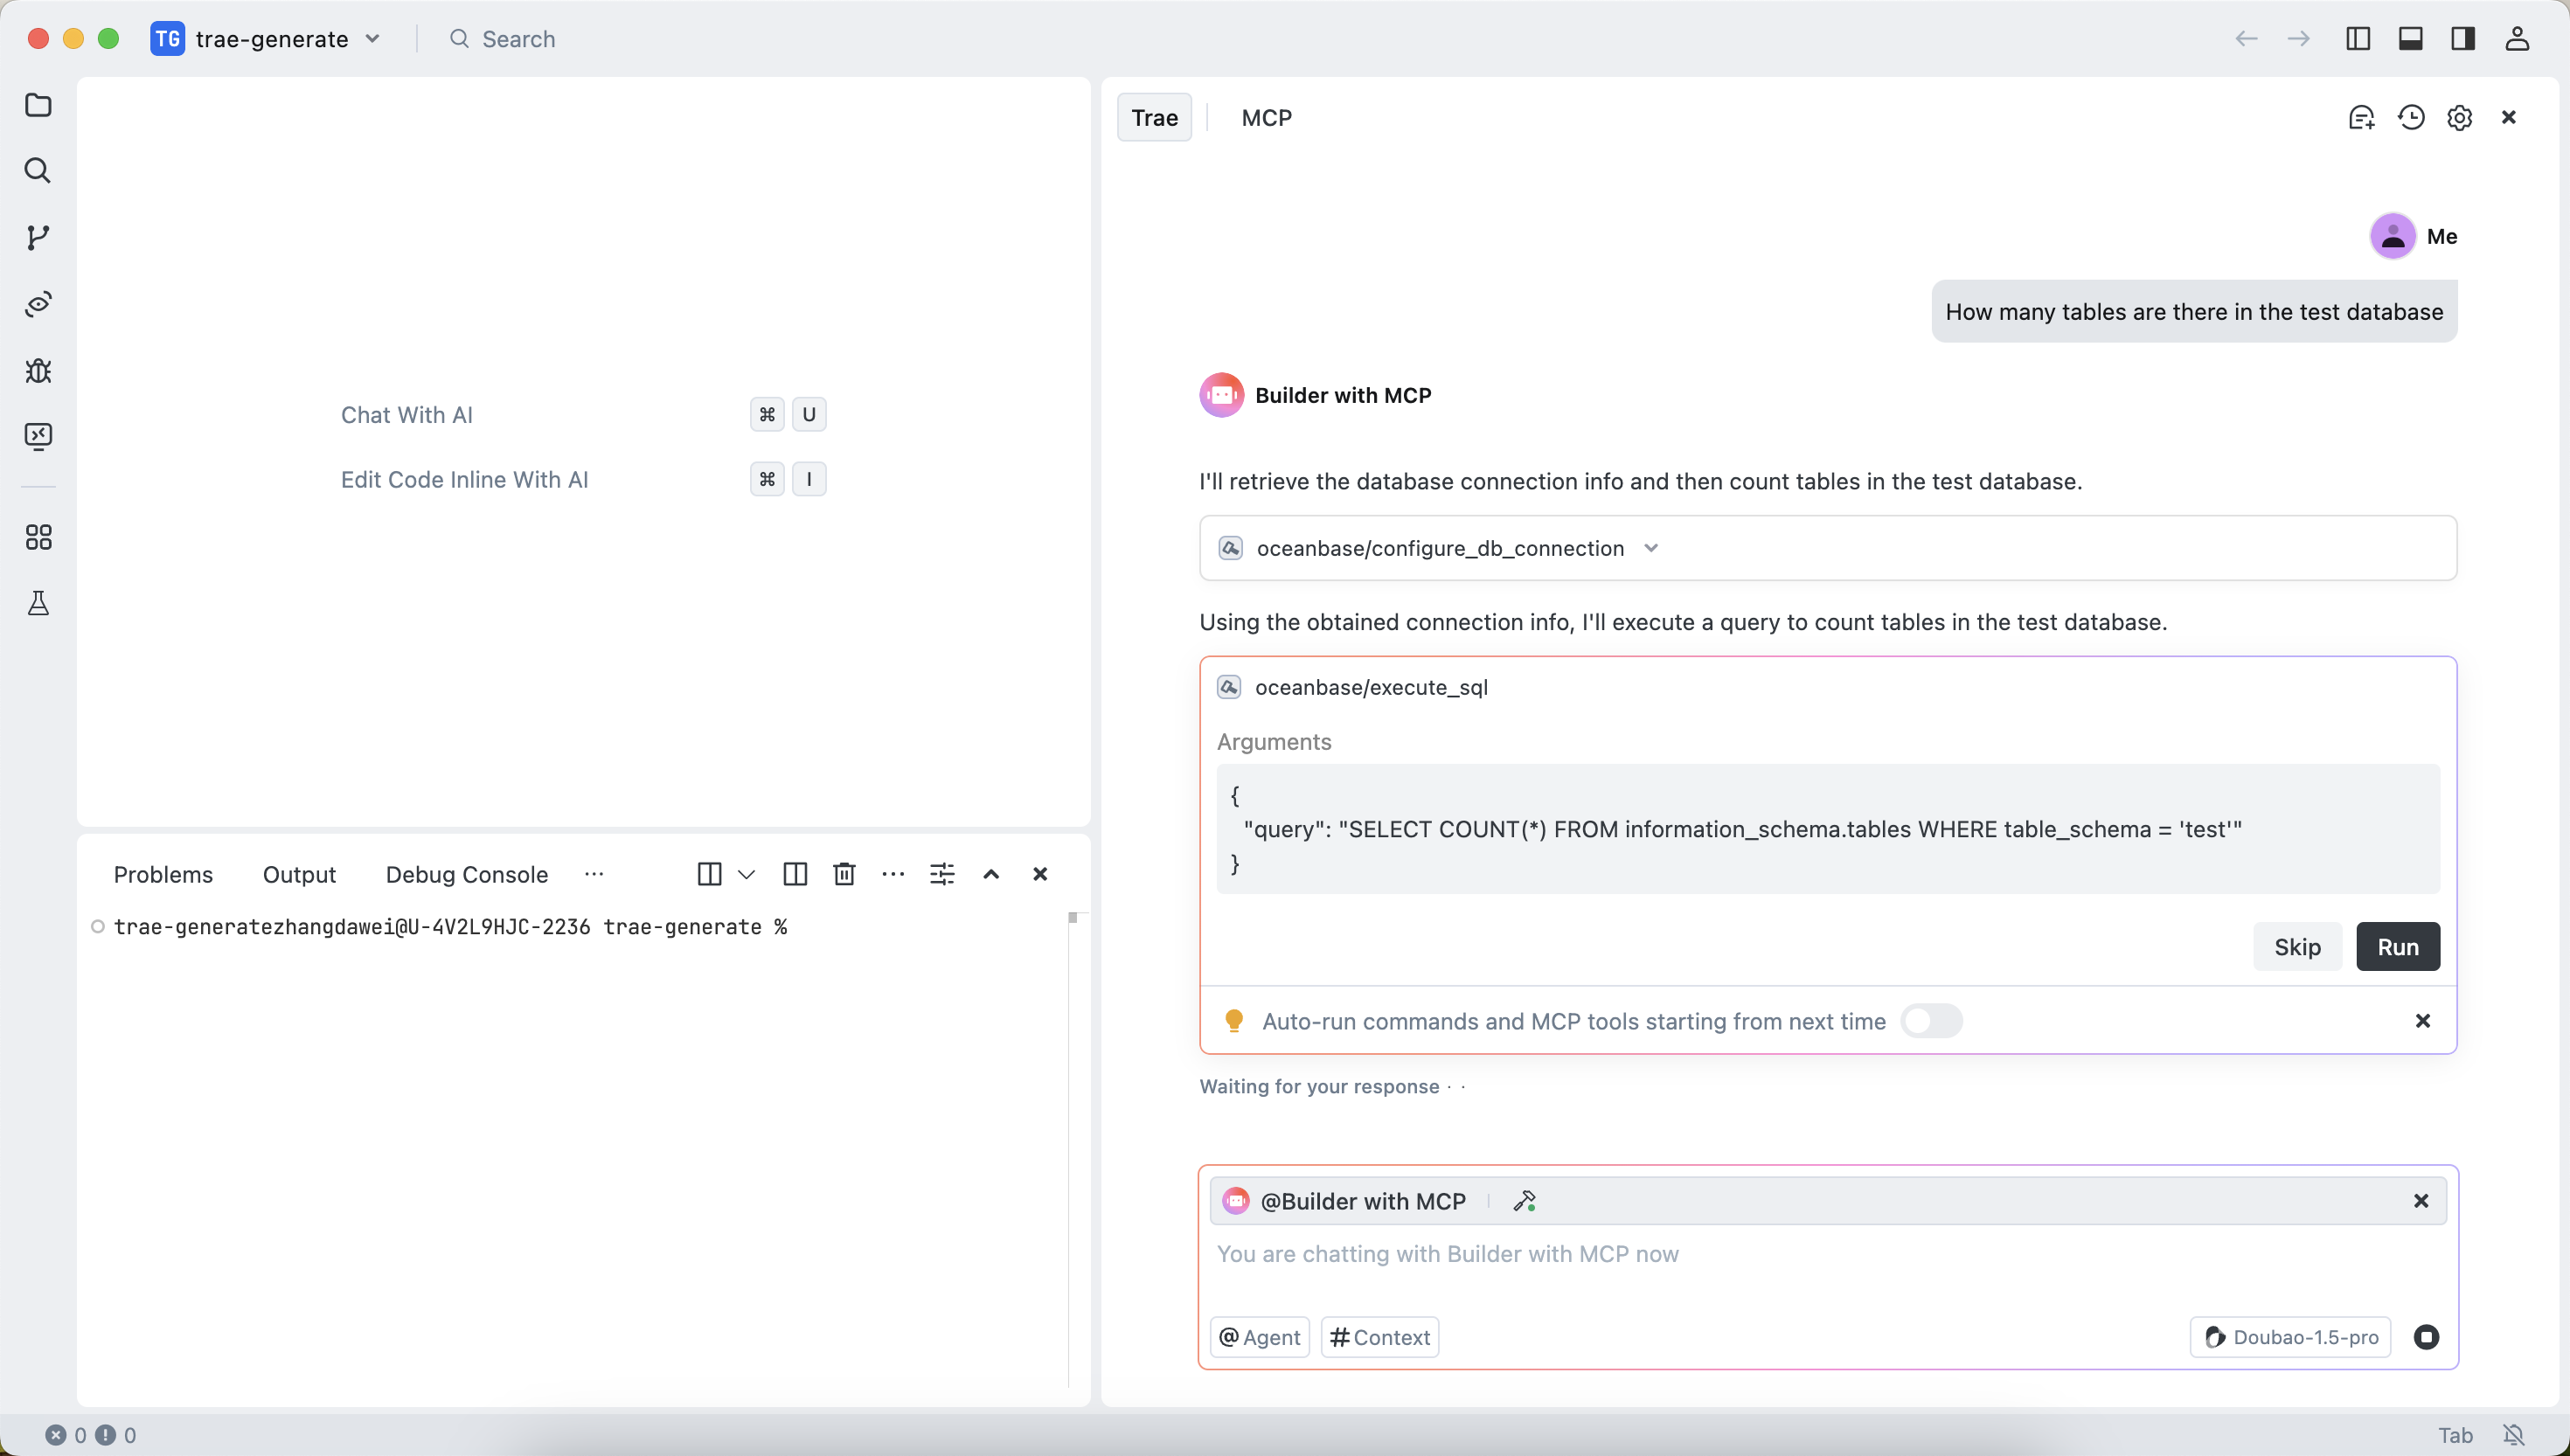
The TRAE client will display the number of tables in the
testdatabase. This indicates that you have successfully connected to OceanBase Database.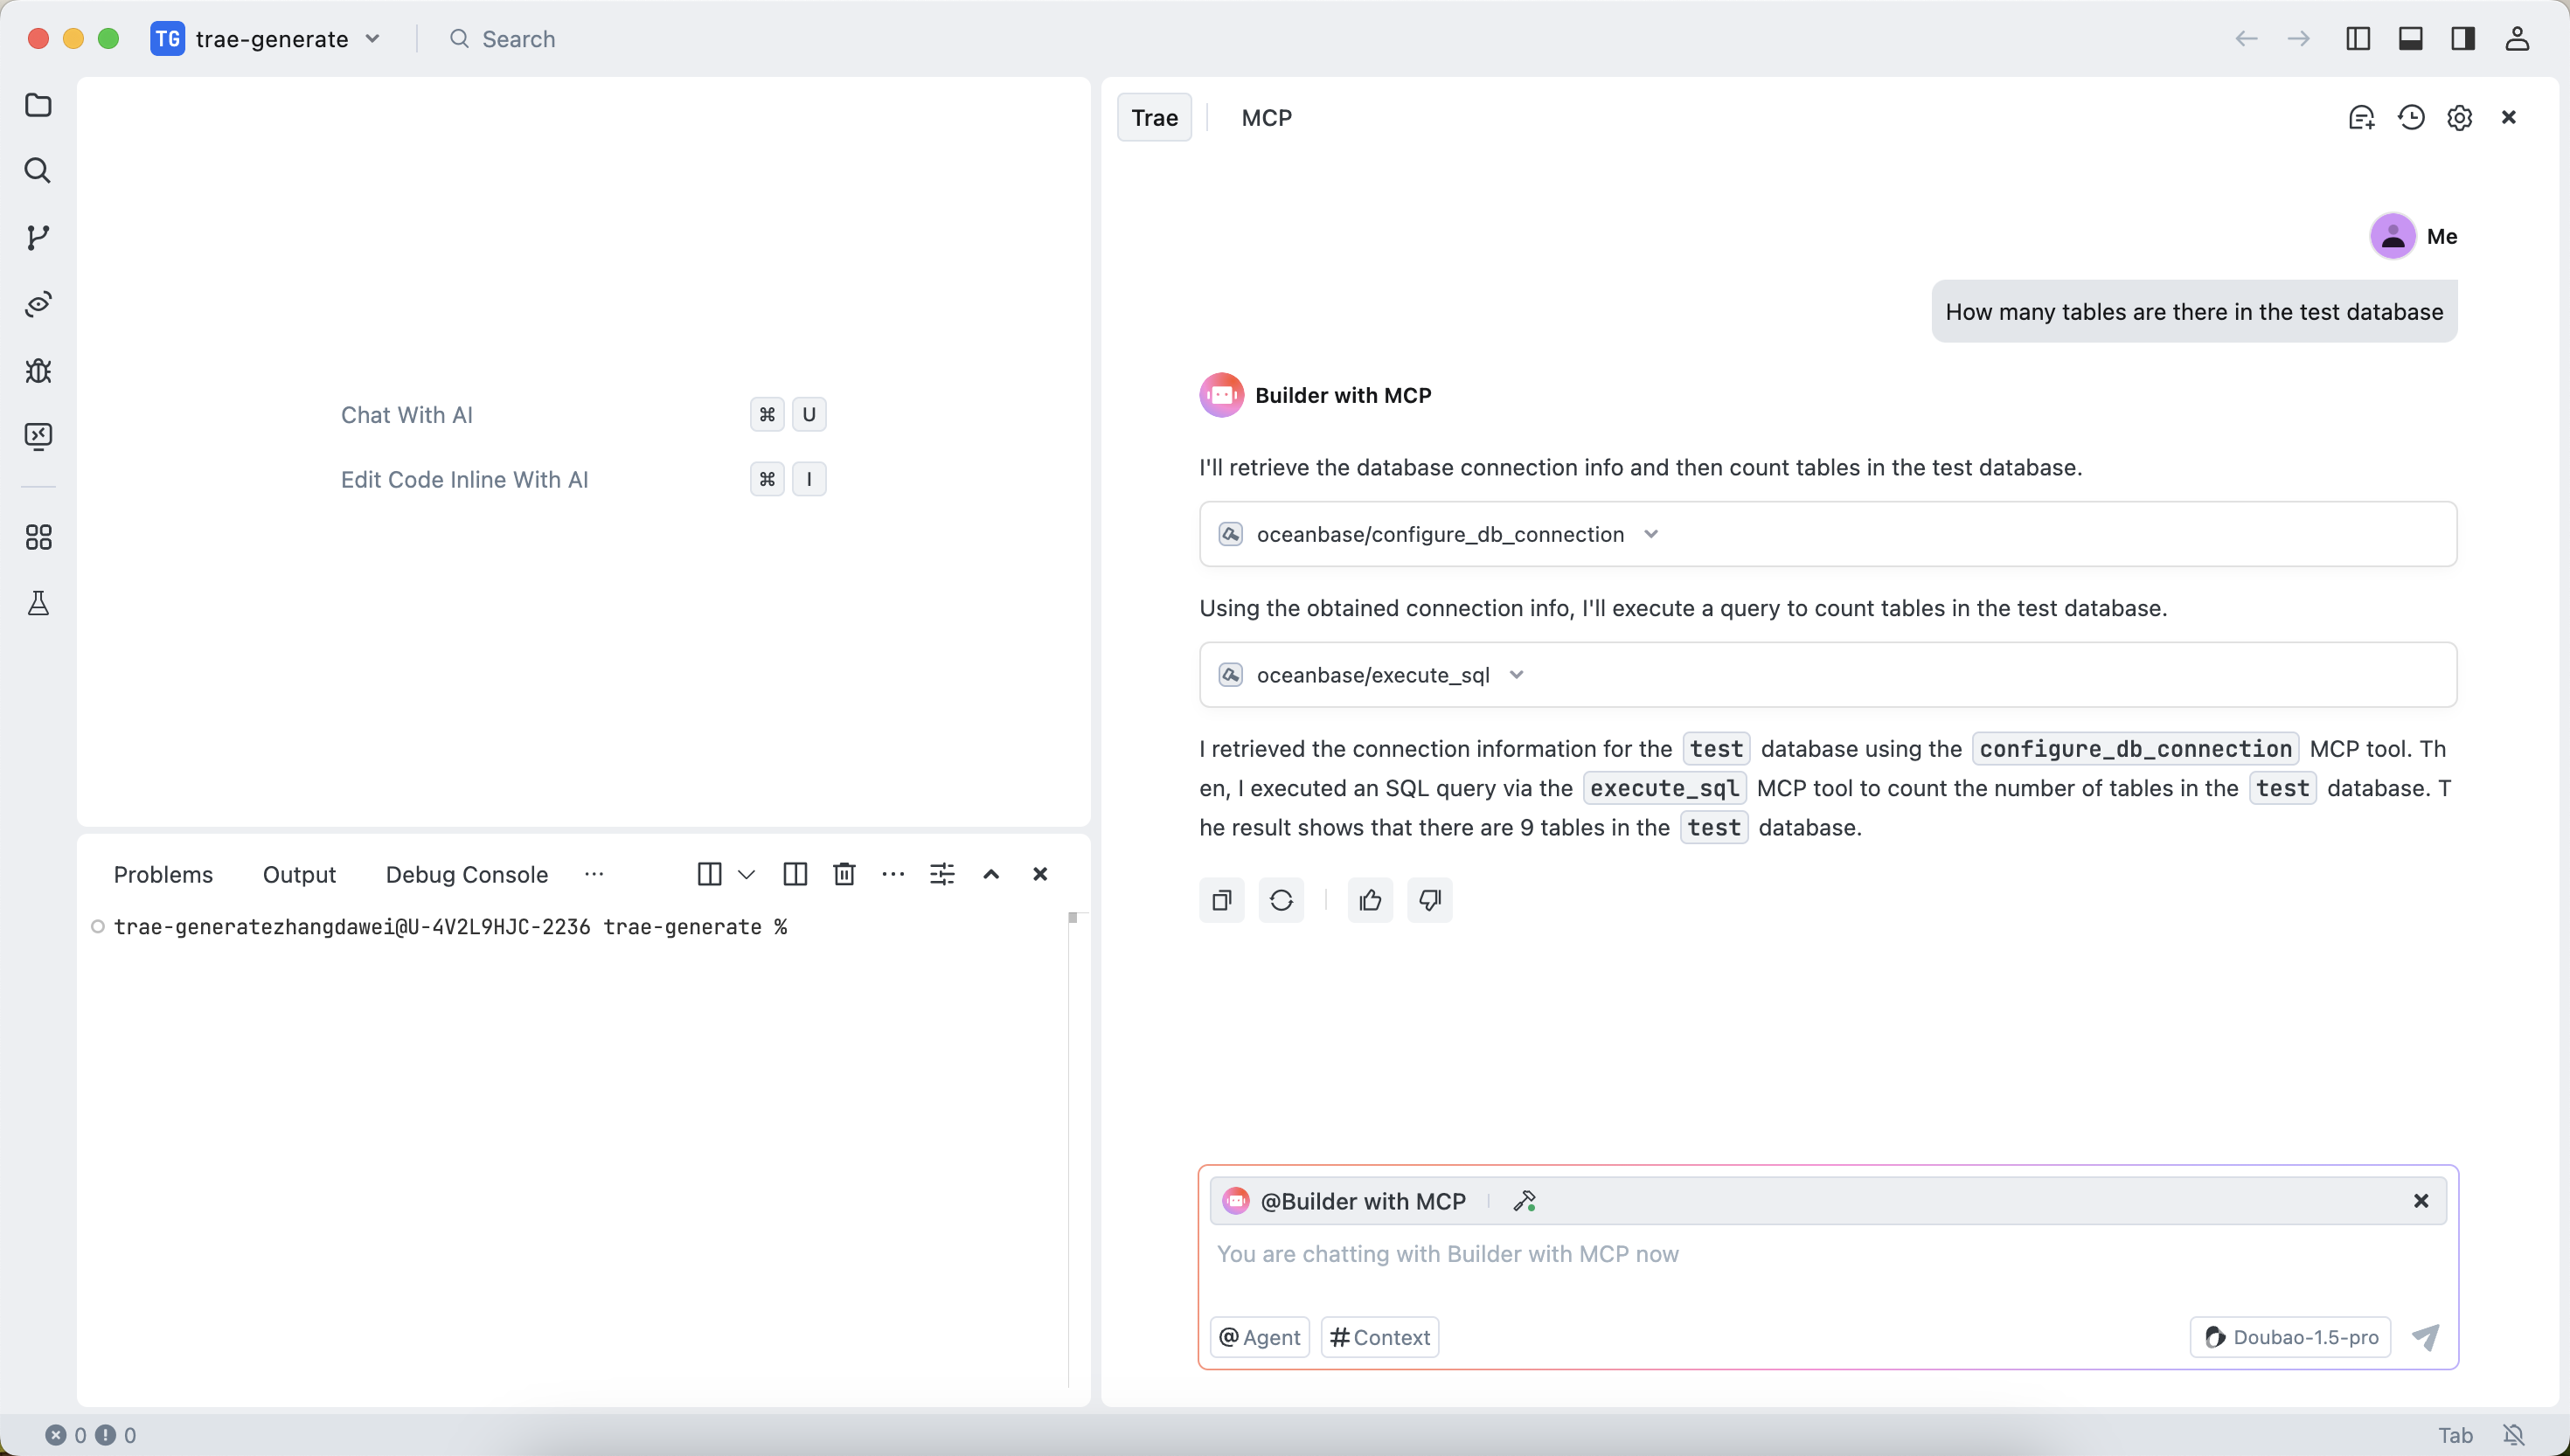
Use FastAPI to quickly create a project that uses the RESTful API style
FastAPI is a Python web framework that allows you to quickly build RESTful APIs.
Create the customer table.
In the dialog box, enter
Create a "customer" table with "Id" as the primary key, including the fields of "name", "age", "telephone", and "location". Confirm the SQL statement and click theRunbutton.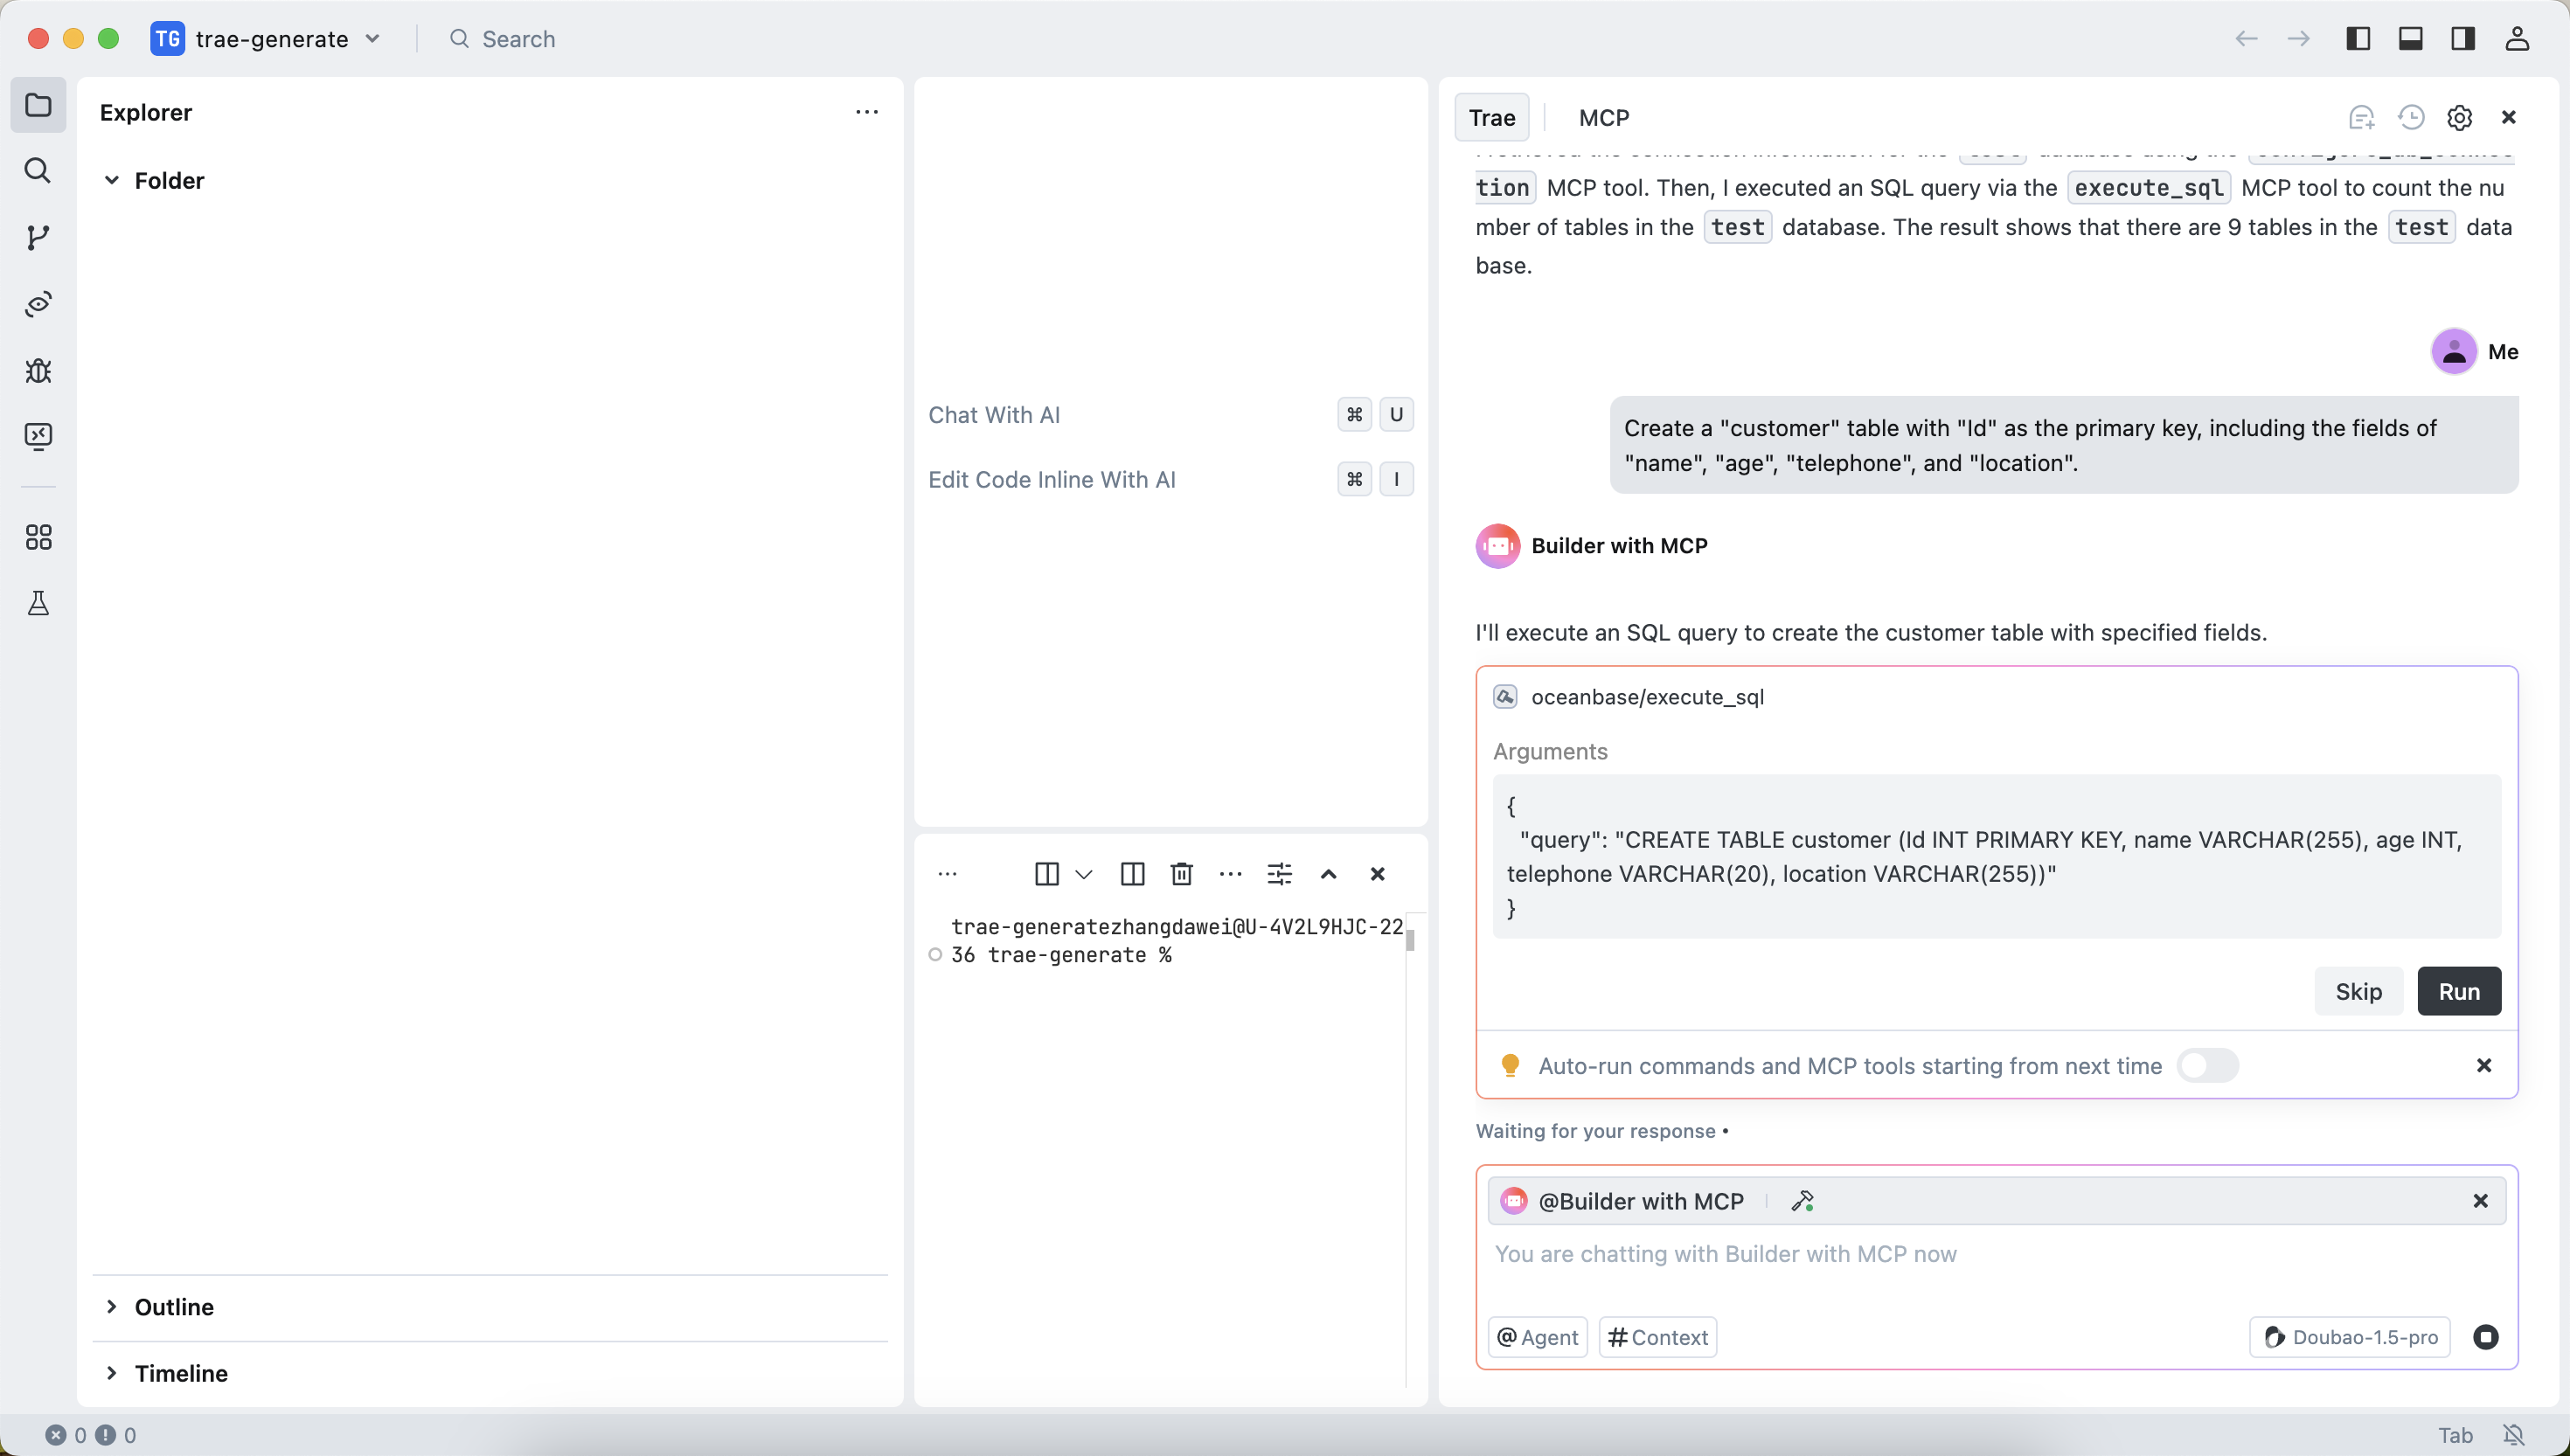
Insert test data.
In the dialog box, enter
Insert 10 test data entries. Confirm the SQL statement and click theRunbutton.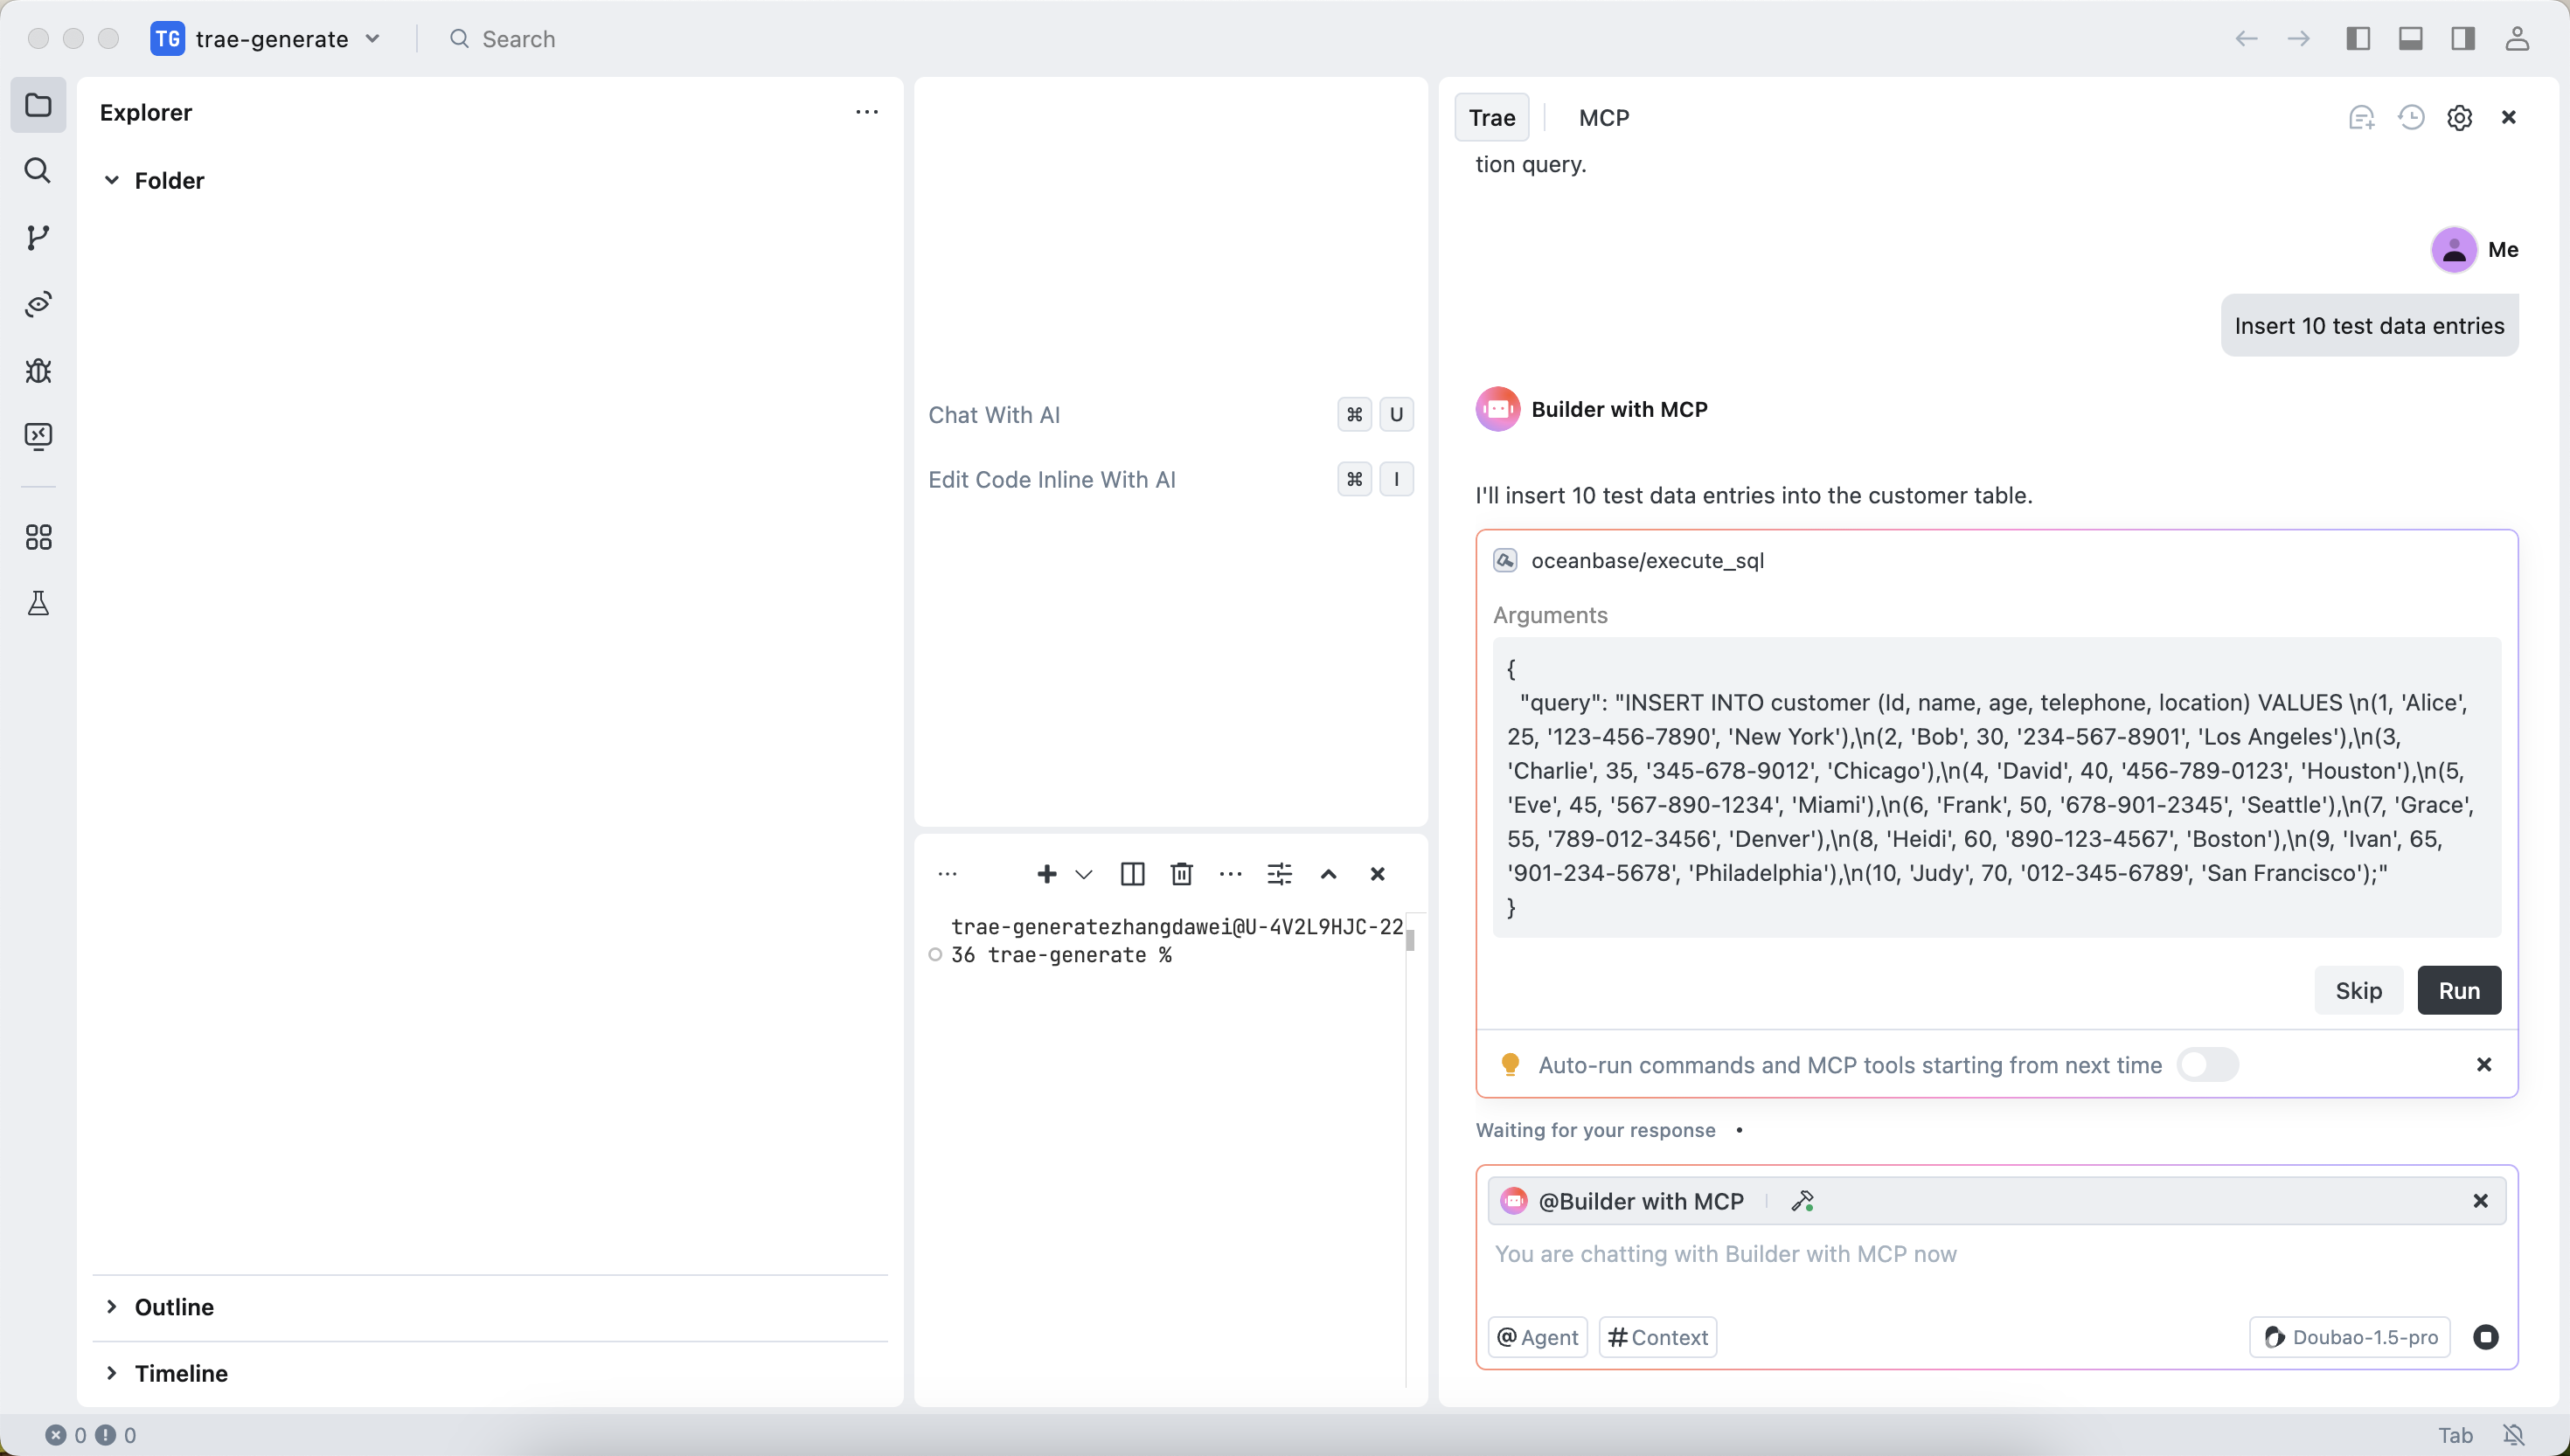
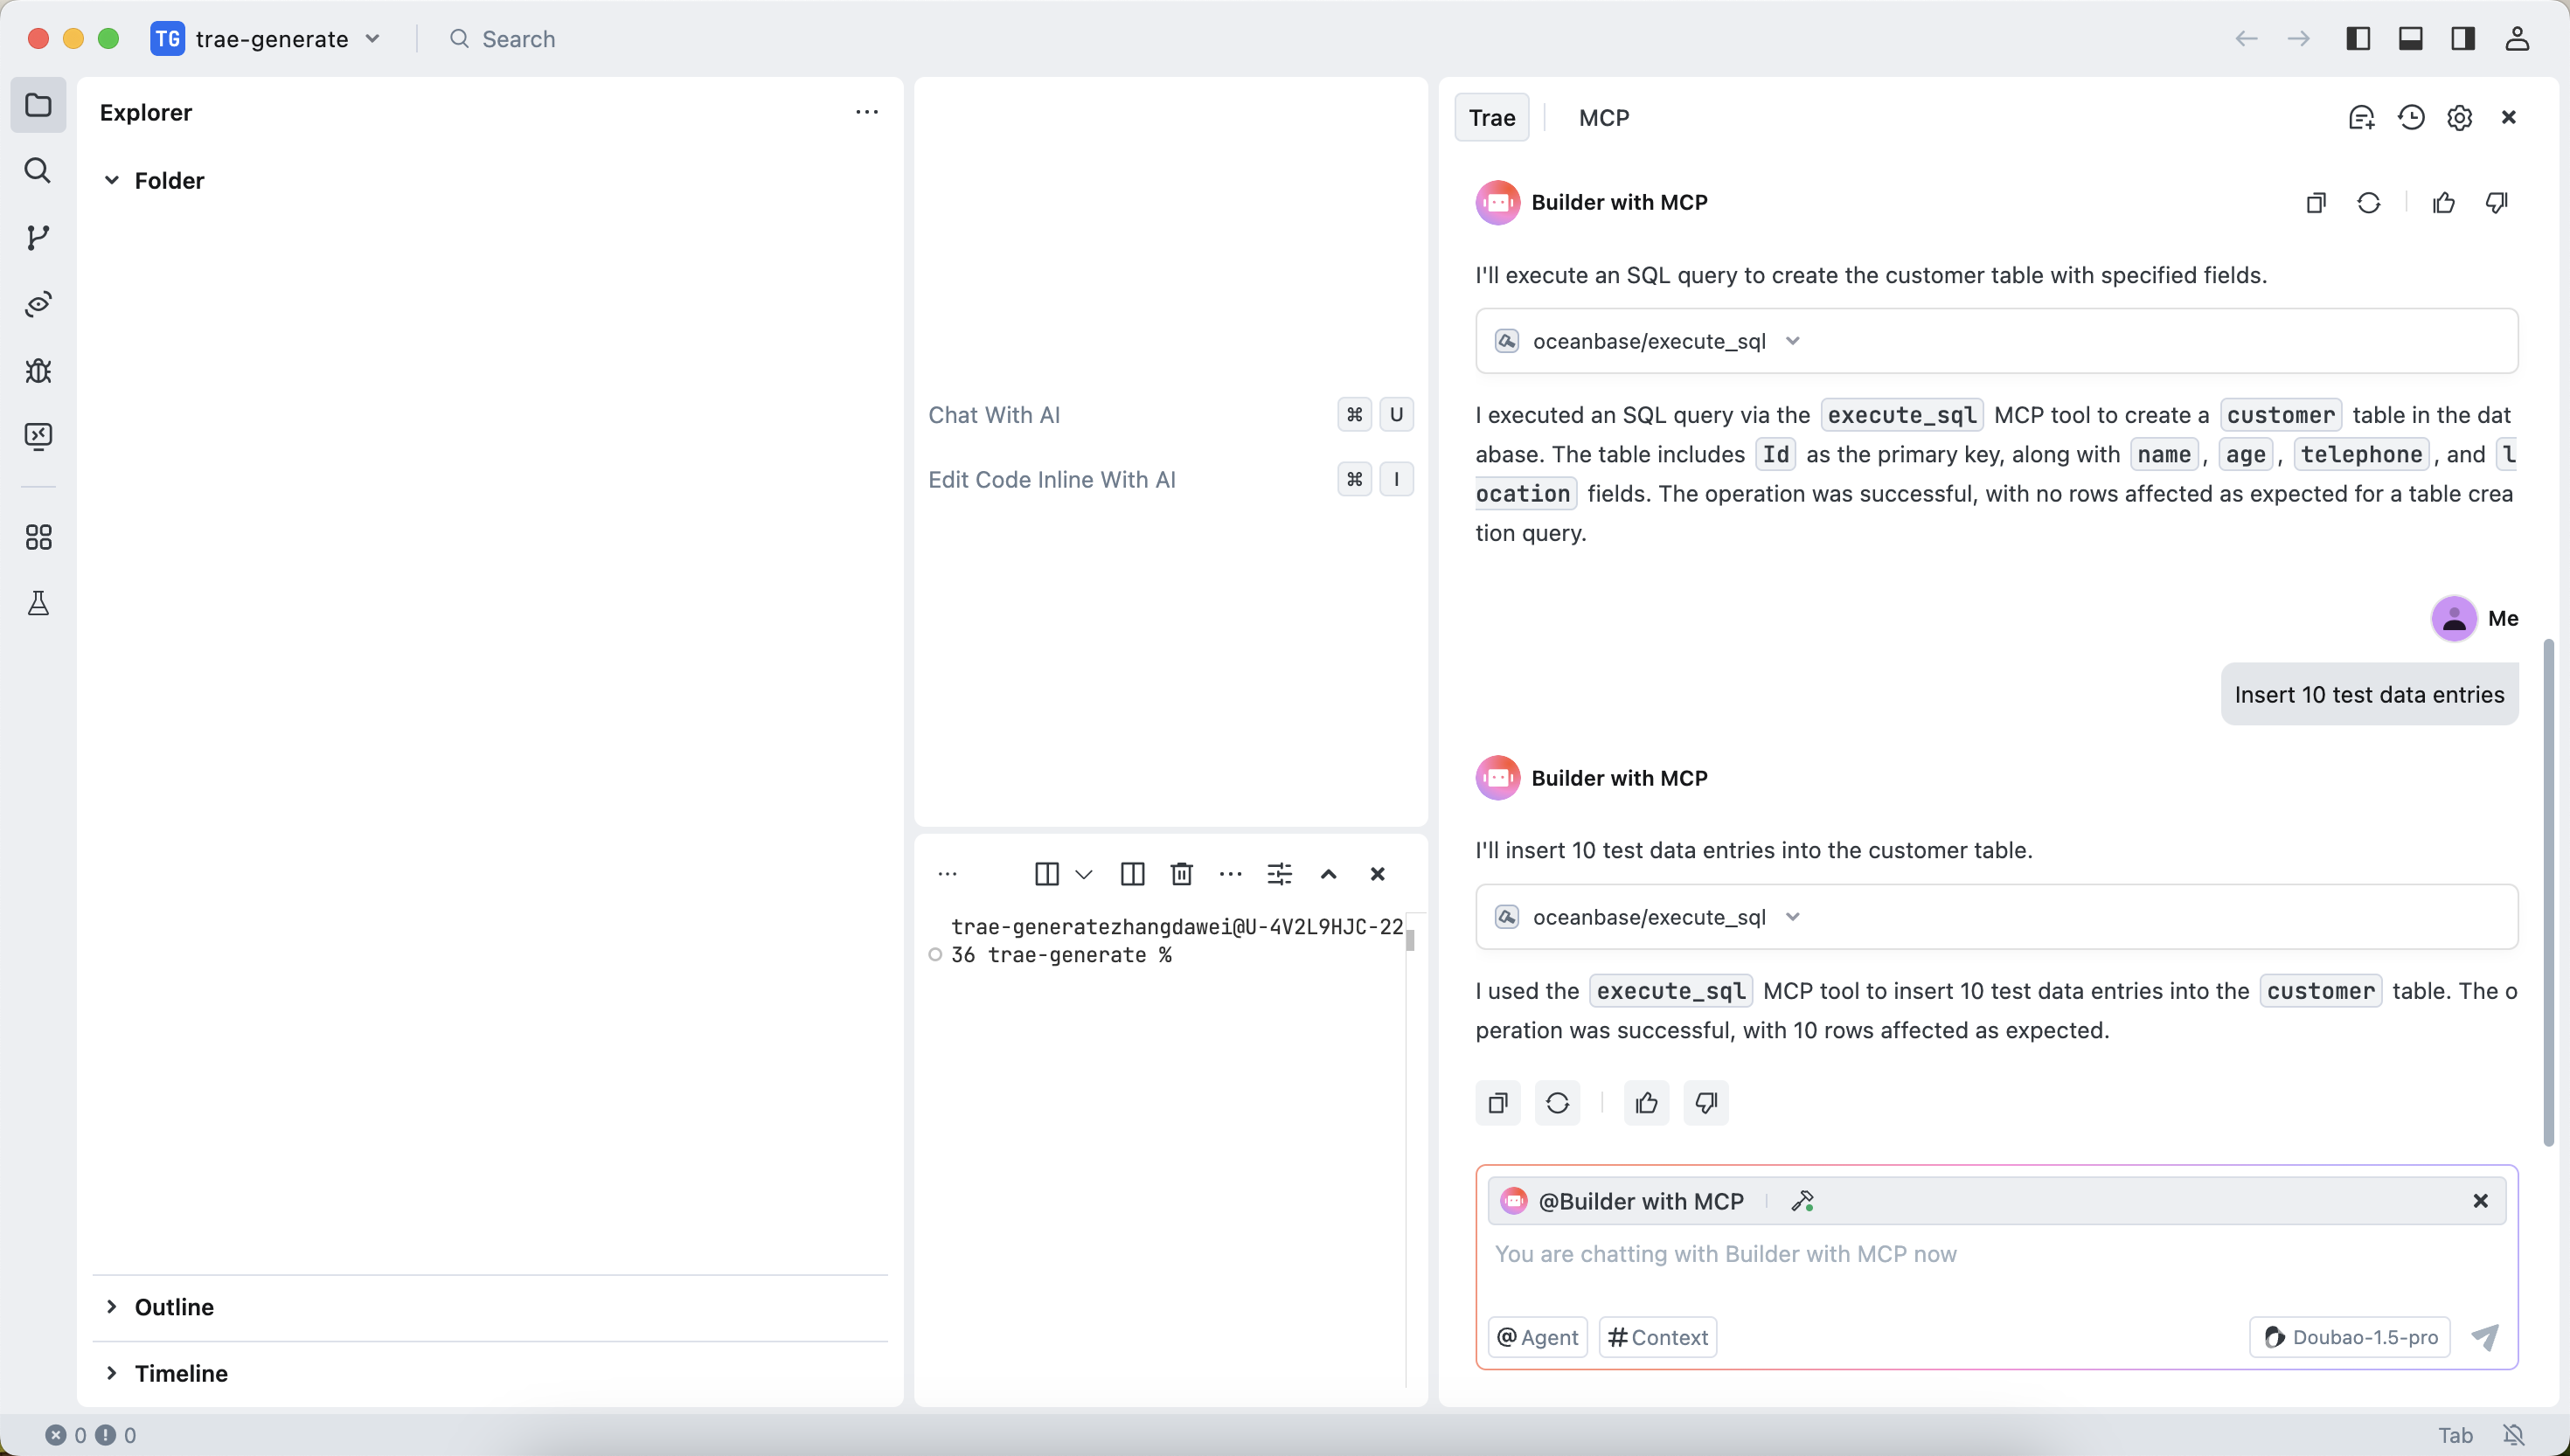
The execution result is displayed after the insertion is successful:
Create a FastAPI project.
In the dialog box, enter
Create a FastAPI project and generate a RESTful API based on the "customer" table. Confirm the SQL statement and click theRunbutton.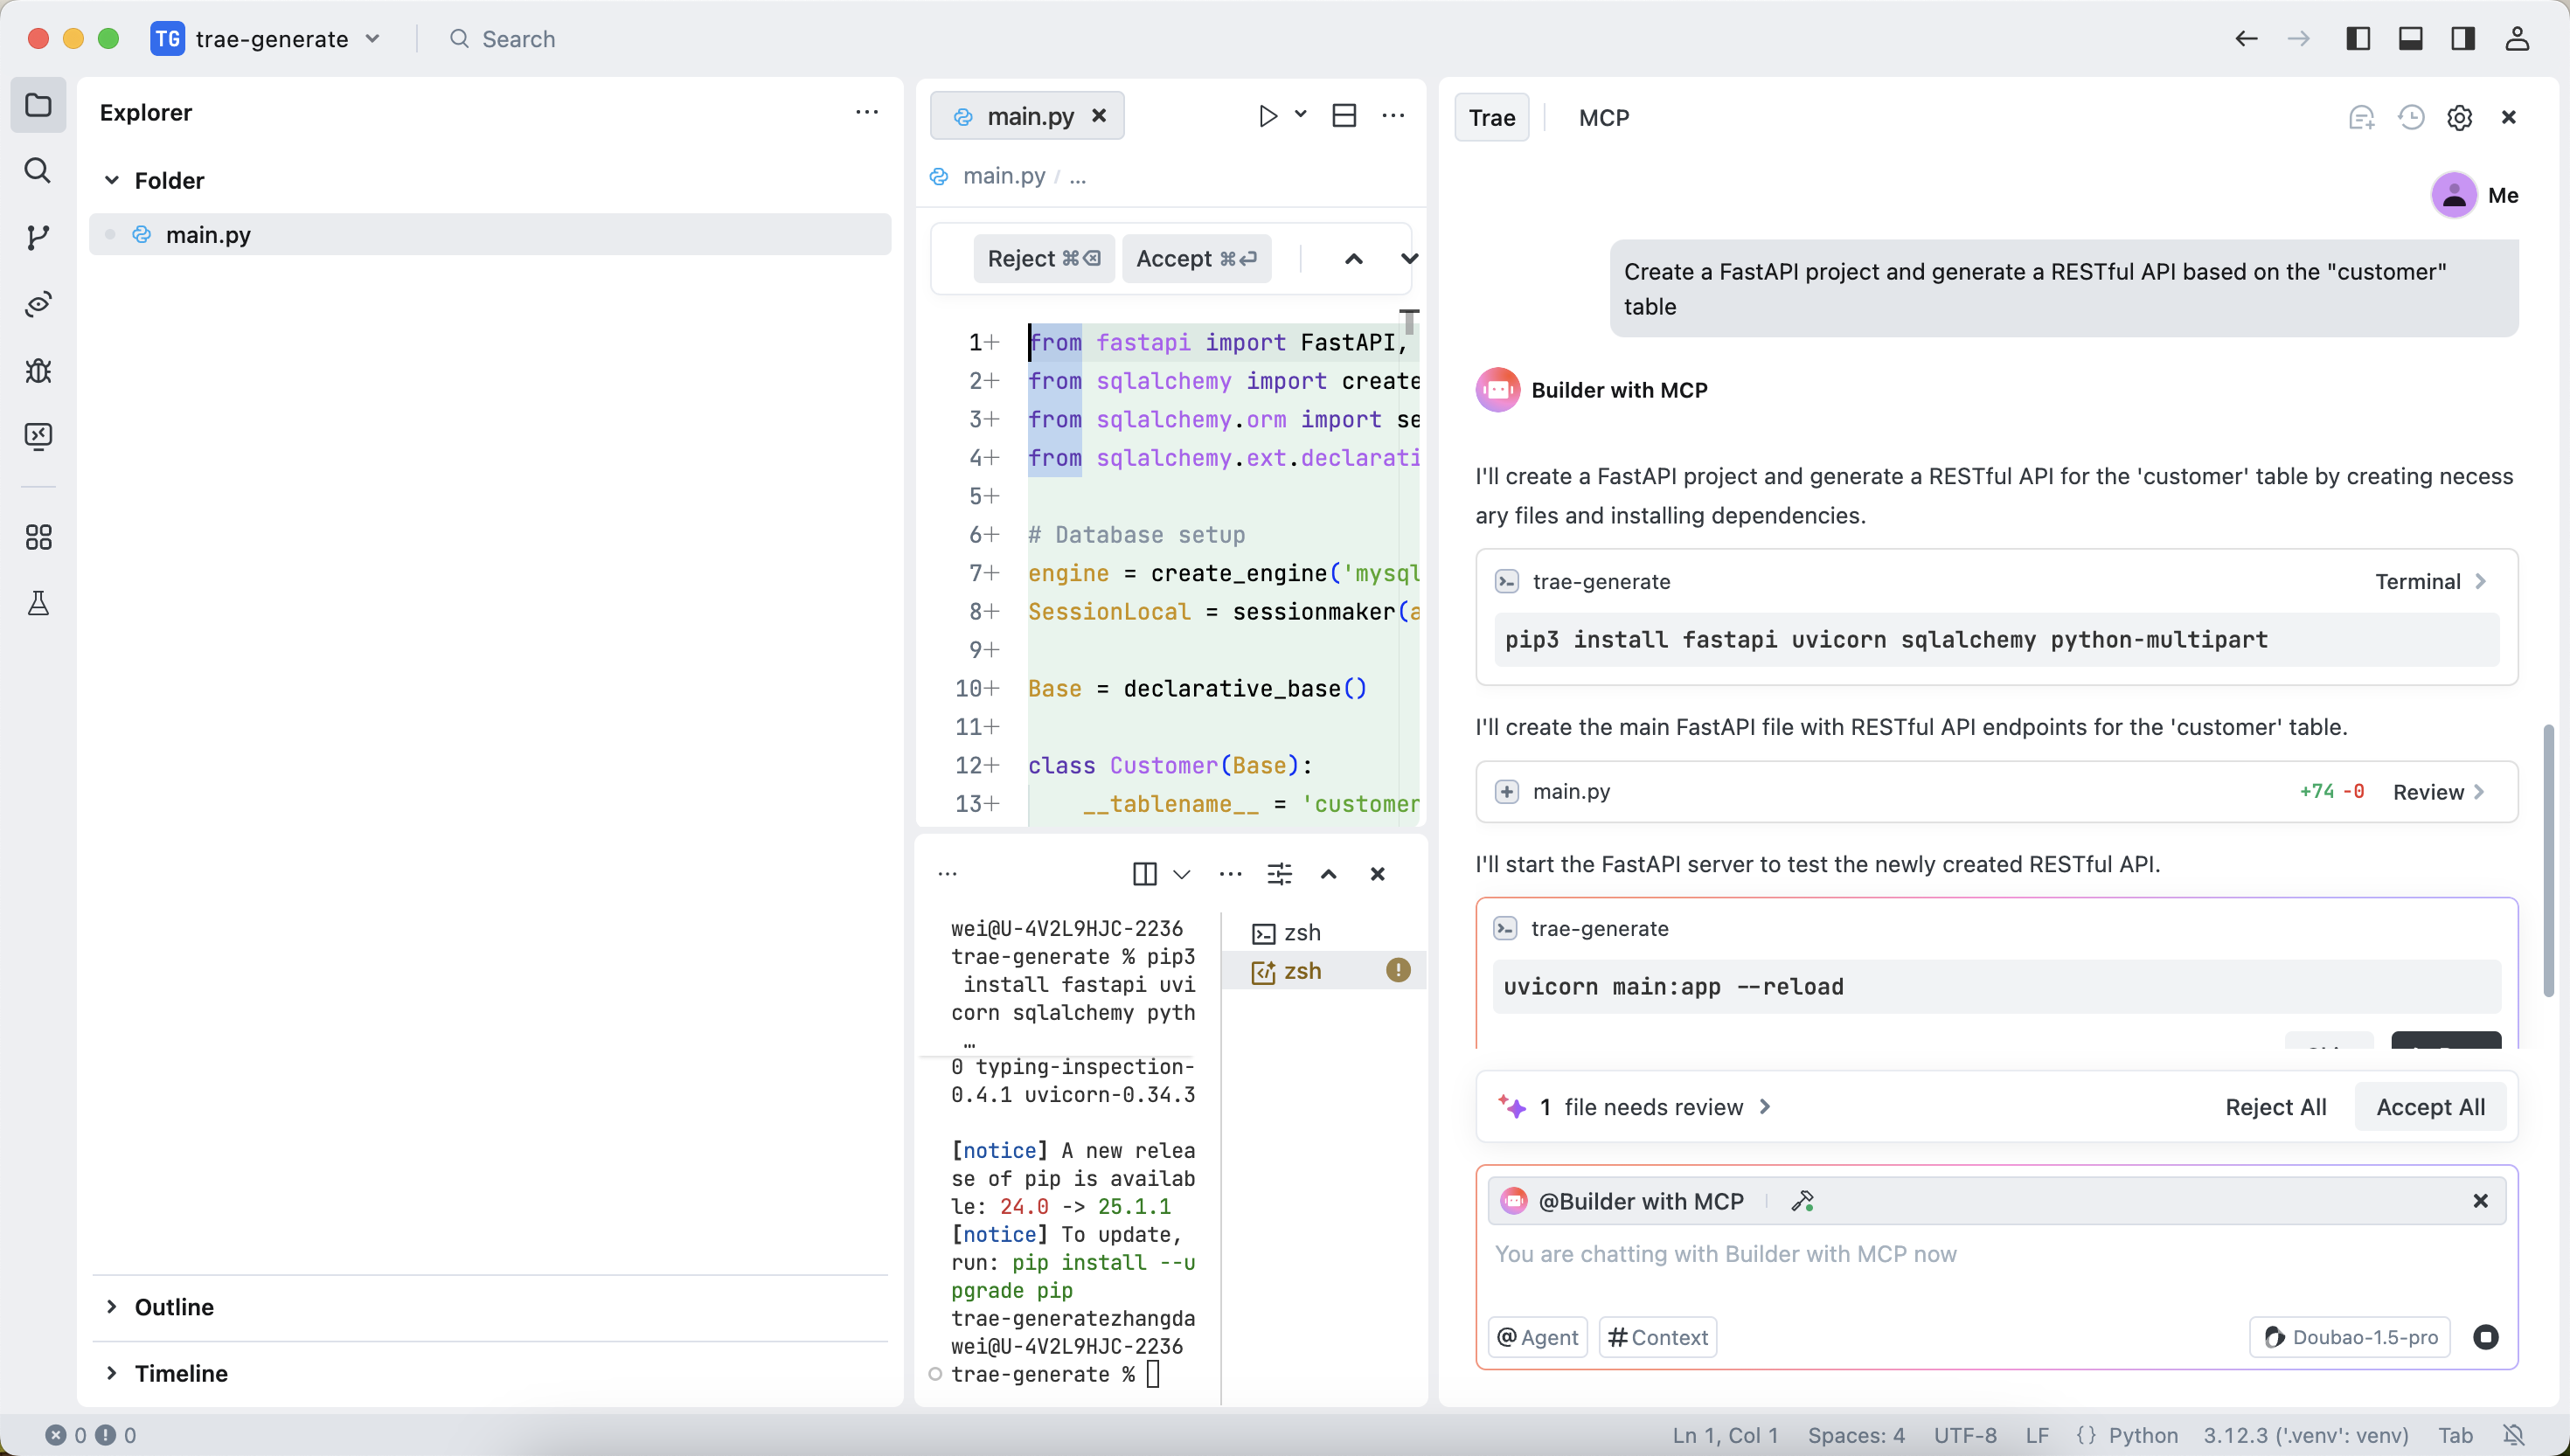
This step will generate three files. We recommend that you select "Accept All" for the first use, because the files generated by AI may contain uncertain contents. You can adjust them based on your actual needs later.
Start the FastAPI project.
Run the following command to start the FastAPI project:
uvicorn main:app --reloadView the data in the table.
Run the following command in the command line or use other request tools to view the data in the table:
curl http://127.0.0.1:8000/customersThe return result is as follows:
[{"Id":1,"name":"Alice","age":25,"telephone":"123-***-7890","location":"New York"},{"Id":2,"name":"Bob","age":30,"telephone":"234-***-8901","location":"Los Angeles"},{"Id":3,"name":"Charlie","age":35,"telephone":"345-***-9012","location":"Chicago"},{"Id":4,"name":"David","age":40,"telephone":"456-***-0123","location":"Houston"},{"Id":5,"name":"Eve","age":45,"telephone":"567-***-1234","location":"Miami"},{"Id":6,"name":"Frank","age":50,"telephone":"678-***-2345","location":"Seattle"},{"Id":7,"name":"Grace","age":55,"telephone":"789-***-3456","location":"Denver"},{"Id":8,"name":"Heidi","age":60,"telephone":"890-***-4567","location":"Boston"},{"Id":9,"name":"Ivan","age":65,"telephone":"901-***-5678","location":"Philadelphia"},{"Id":10,"name":"Judy","age":70,"telephone":"012-***-6789","location":"San Francisco"}]You can see that the RESTful APIs for CRUD operations have been successfully generated:
from fastapi import FastAPI, HTTPException, Depends
from sqlalchemy import create_engine, Column, Integer, String
from sqlalchemy.orm import sessionmaker
from sqlalchemy.ext.declarative import declarative_base
from pydantic import BaseModel

# Database setup
engine = create_engine('mysql+pymysql://username:passoword@host:port/test')
SessionLocal = sessionmaker(autocommit=False, autoflush=False, bind=engine)

Base = declarative_base()

class DBCustomer(Base):
    __tablename__ = 'customer'

    Id = Column(Integer, primary_key=True, index=True)
    name = Column(String(255))
    age = Column(Integer)
    telephone = Column(String(20))
    location = Column(String(255))

class Customer(BaseModel):
    Id: int
    name: str
    age: int
    telephone: str
    location: str

    class Config:
        orm_mode = True

app = FastAPI()

# Dependency

def get_db():
    db = SessionLocal()
    try:
        yield db
    finally:
        db.close()

# Create a customer
@app.post('/customers/', response_model=Customer)
def create_customer(customer: Customer, db: SessionLocal = Depends(get_db)):
    db_customer = DBCustomer(**customer.dict())
    db.add(db_customer)
    db.commit()
    db.refresh(db_customer)
    return db_customer

# Get all customers
@app.get('/customers/', response_model=list[Customer])
def get_all_customers(db: SessionLocal = Depends(get_db)):
    customers = db.query(DBCustomer).all()
    return customers

# Get a single customer
@app.get('/customers/{customer_id}', response_model=Customer)
def get_customer(customer_id: int, db: SessionLocal = Depends(get_db)):
    customer = db.query(DBCustomer).filter(DBCustomer.Id == customer_id).first()
    if not customer:
        raise HTTPException(status_code=404, detail='Customer not found')
    return customer

# Update a customer
@app.put('/customers/{customer_id}', response_model=Customer)
def update_customer(customer_id: int, updated_customer: Customer, db: SessionLocal = Depends(get_db)):
    customer = db.query(DBCustomer).filter(DBCustomer.Id == customer_id).first()
    if not customer:
        raise HTTPException(status_code=404, detail='Customer not found')
    for key, value in updated_customer.dict().items():
        setattr(customer, key, value)
    db.commit()
    db.refresh(customer)
    return customer

# Delete a customer
@app.delete('/customers/{customer_id}')
def delete_customer(customer_id: int, db: SessionLocal = Depends(get_db)):
    customer = db.query(DBCustomer).filter(DBCustomer.Id == customer_id).first()
    if not customer:
        raise HTTPException(status_code=404, detail='Customer not found')
    db.delete(customer)
    db.commit()
    return {'message': 'Customer deleted'}