Model Context Protocol (MCP) is an open-source protocol introduced by Anthropic in November 2024. It allows large language models to interact with external tools or data sources. With MCP, you do not need to manually copy and execute the output of large language models. Instead, the large language model can directly command tools to perform specific actions.
OceanBase MCP Server enables large language models to interact with OceanBase Database through the MCP protocol and execute SQL statements. It allows you to quickly build a project prototype with the help of an appropriate client and has been open-sourced on GitHub.
Continue is an IDE plugin that can integrate with MCP Server. It supports Visual Studio Code and IntelliJ IDEA.
This topic describes how to integrate OceanBase MCP Server with Continue to quickly build backend applications.
Prerequisites
A transactional instance is available in your environment. For instructions on how to create the instance, see Create an transactional instance.
You have created a MySQL-compatible tenant in the instance. For instructions on how to create the tenant, see Create a MySQL-compatible tenant.
You have a MySQL database and account available under the tenant, and you have granted read and write permissions to the database account. For more information, see Create an account and Create a database (MySQL only).
You are a project admin or instance admin and have the permissions required to read and write data in the instance. If not, contact your organization admin to grant the required permissions.
You have installed Python 3.11 or later and pip. If the Python version on your server is low, you can use Miniconda to create a Python 3.11 or later environment. For more information, see Miniconda installation guide.
You have installed Git based on the operating system.
Install uv, a Python package manager. After the installation is complete, run the
uv --versioncommand to verify the installation:pip install uv uv --versionInstall the Continue plugin in Visual Studio Code or IntelliJ IDEA. The plugin name is
Continue.After the plugin is installed, click Add Models and configure the large model API for Continue. A sample API configuration is as follows:
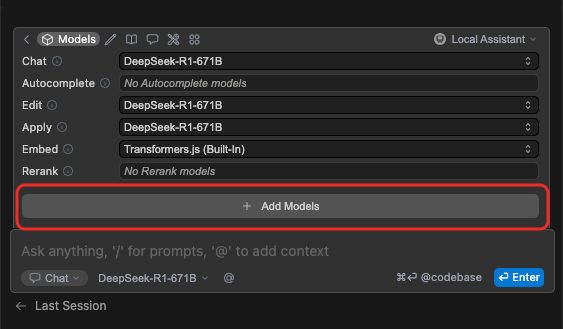
A sample configuration file is as follows:
name: Local Assistant
version: 1.0.0
schema: v1
models:
    # The name of the model.
    - name: DeepSeek-R1-671B
    # The model vendor.
    provider: deepseek
    # The model type.
    model: DeepSeek-R1-671B
    # The URL for accessing the model.
    apiBase: *********
    # The API key for accessing the model.
    apiKey: ********
# The context provider.
context:
    - provider: code
    - provider: docs
    - provider: diff
    - provider: terminal
    - provider: problems
    - provider: folder
    - provider: codebase
Step 1: Obtain the database connection information
Log in to the OceanBase Cloud console.
In the instance list page, expand the the information of the target instance.
Select Connect > Get Connection String under the target tenant.
In the pop-up window, select Public Network as the connection method.
Follow the prompts in the pop-up window to obtain the public endpoint and the connection string.
Step 2: Configure OceanBase MCP Server
Clone the OceanBase MCP Server repository
Run the following command to download the source code to your local device:
git clone https://github.com/oceanbase/mcp-oceanbase.git
Go to the source code directory:
cd mcp-oceanbase
Install dependencies
Run the following command in the mcp-oceanbase directory to create a virtual environment and install dependencies:
uv venv
source .venv/bin/activate
uv pip install .
Add and configure MCP servers
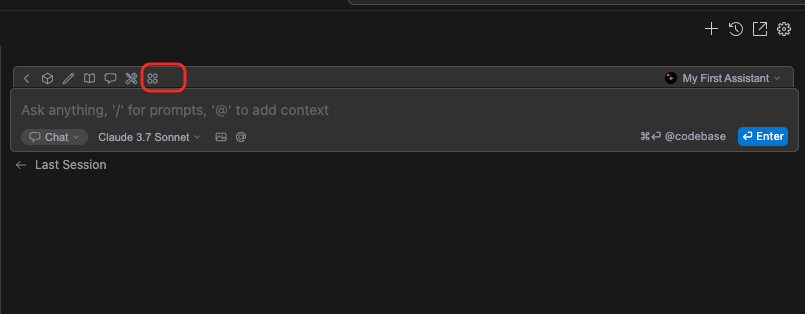
Click the button on the right side of the toolbar at the top of the dialog box to open the MCP panel.
Click Add MCP Servers.
Notice
MCP can be used only in Continue mode of the Agent.
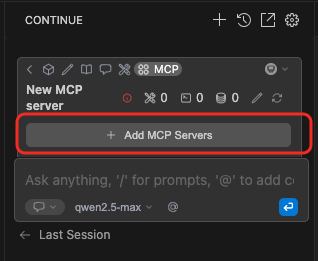
Fill in the configuration file and click OK.
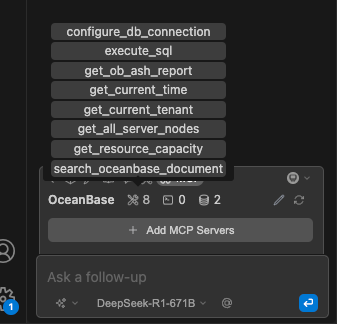
/path/to/your/mcp-oceanbase/src/oceanbase_mcp_serverneeds to be replaced with the absolute path of the mcp-oceanbase folder, andOB_HOST,OB_PORT,OB_USER,OB_PASSWORD, andOB_DATABASEneed to be replaced with the corresponding information of your database:name: OceanBase version: 0.0.1 schema: v1 mcpServers: - name: OceanBase command: uv args: - --directory - /path/to/your/mcp-oceanbase/src/oceanbase_mcp_server - run - oceanbase_mcp_server env: OB_HOST: "****" OB_PORT: "***" OB_USER: "***" OB_PASSWORD: "***" OB_DATABASE: "***"If the configuration is successful, the following message is displayed: