
The Model Context Protocol (MCP) was introduced and open-sourced by Anthropic in November 2024. It lets large language models interact with external tools and data sources. With MCP, you don't have to copy model output and run it manually—the model can instruct tools to perform actions directly.
The OceanBase MCP Server uses MCP to give LLMs access to OceanBase Database so they can run SQL. With an MCP-capable client you can quickly prototype applications. The server is open source on GitHub.
Augment Code is a developer AI platform that helps you understand code, debug issues, and ship faster by understanding your codebase. You can get more done using chat, next-edit suggestions, and code completion.
This topic shows how to use Augment Code with the OceanBase MCP Server to build a backend application quickly.
Prerequisites
You have deployed OceanBase Database and created a MySQL-compatible tenant.
You have Python 3.11 or later and pip installed. If your system Python is older, use Miniconda to create a Python 3.11+ environment.
You have Git installed for your OS:
- Windows: https://git-scm.com/downloads/win
- macOS: https://git-scm.com/download/mac
- Linux: https://git-scm.com/downloads/linux
You have the Python package manager uv installed:
macOS/Linux (standalone script):
curl -LsSf https://astral.sh/uv/install.sh | shWindows (PowerShell):
irm https://astral.sh/uv/install.ps1 | iexOr install with pip on any platform:
pip install uvVerify the installation:
uv --version
Augment Code is installed:
Open VS Code (install it from the official site if needed).
Click the Extensions icon in the sidebar.
Search for Augment Code and install it.
Sign up or log in to your Augment Code account.
Step 1: Get database connection details
Obtain the database connection string from your OceanBase deployment team or administrator. For example:
obclient -h$host -P$port -u$user_name -p$password -D$database_name
Parameters:
$host: The IP for connecting to OceanBase. Use an ODP address when connecting via OceanBase Database Proxy (ODP), or an OBServer IP for direct connection.$port: The connection port. ODP default is2883; direct connection default is2881. Both can be customized at deployment.$database_name: The database to use.Notice
The user connecting to the tenant must have
CREATE,INSERT,DROP, andSELECTprivileges on that database.$user_name: The tenant account. ODP:username@tenant#clusterorcluster:tenant:username. Direct:username@tenant.$password: The account password.
Step 2: Configure the OceanBase MCP Server
Clone the OceanBase MCP Server repository
Download the source:
git clone https://github.com/oceanbase/awesome-oceanbase-mcp.git
Change into the project directory:
cd awesome-oceanbase-mcp
Install dependencies
From the oceanbase_mcp_server directory, create a virtual environment and install dependencies:
uv venv
source .venv/bin/activate
uv pip install .
Add and configure the MCP Server
Configure the OceanBase MCP Server in Augment Code.
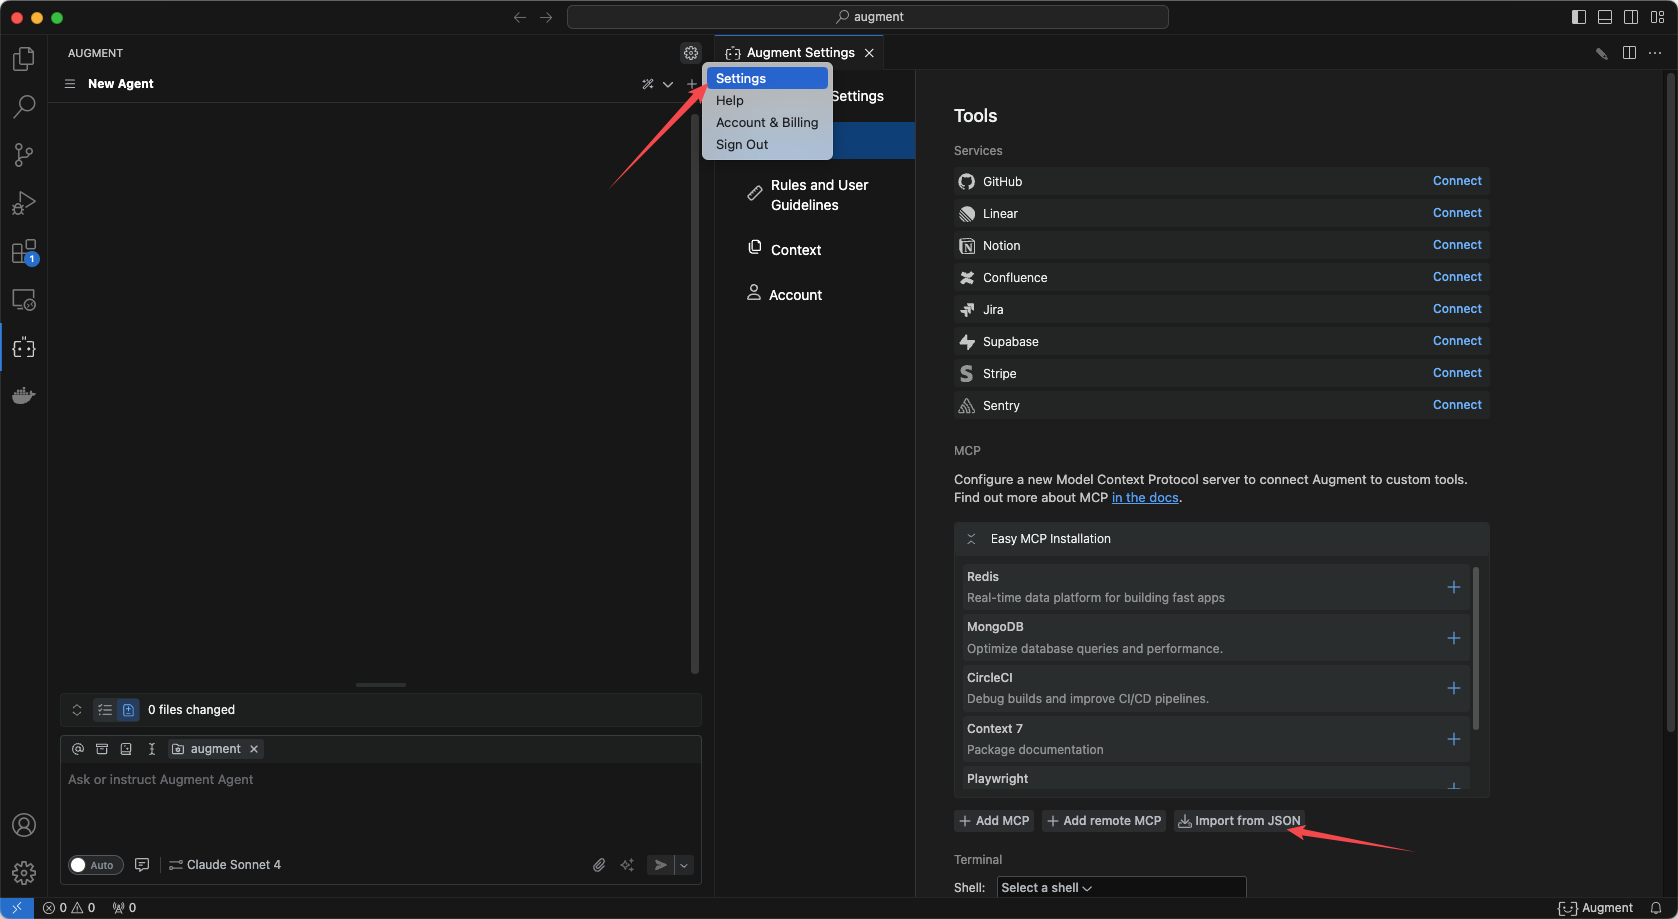
Click Import from json and enter the MCP configuration.
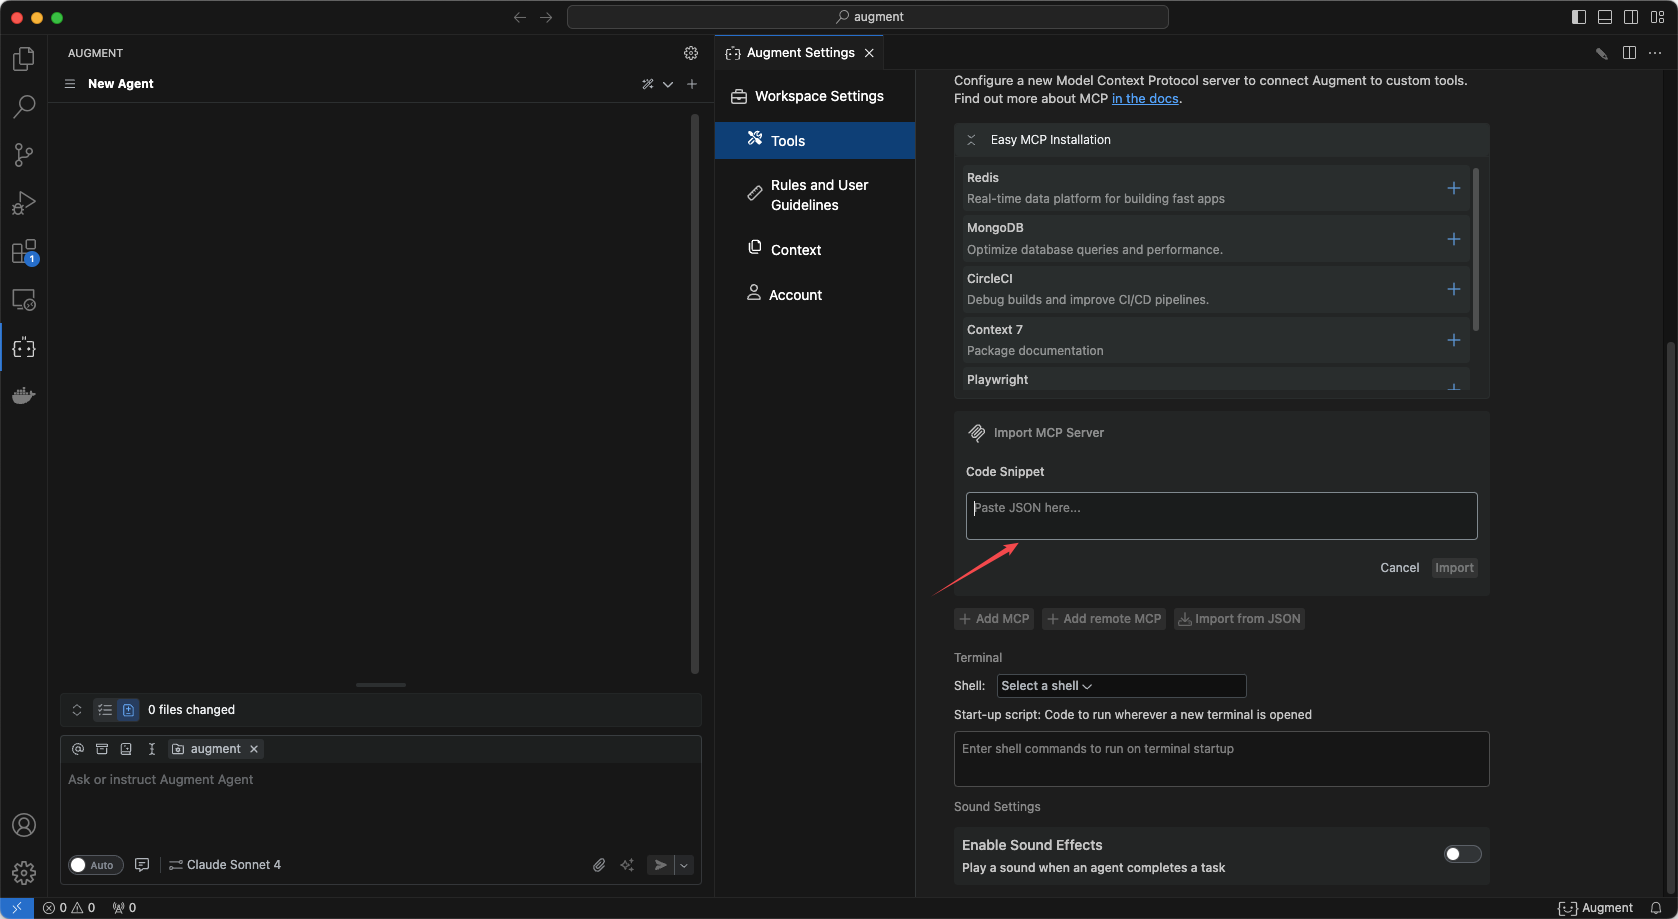
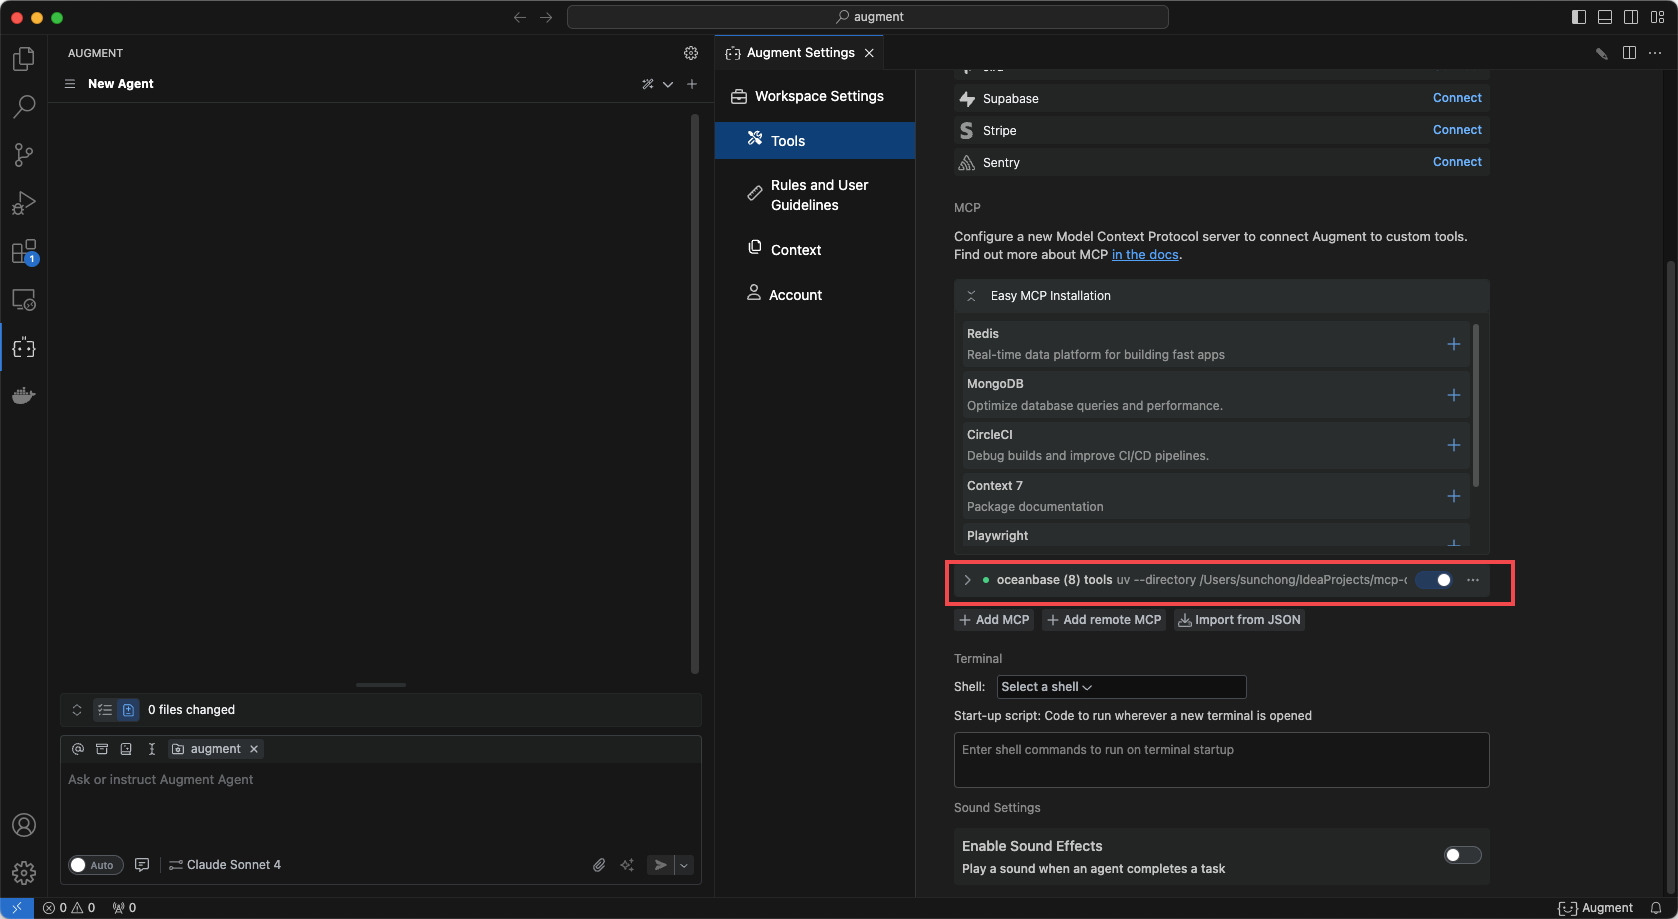
Paste the configuration below and confirm. Replace
/path/to/your/oceanbase_mcp_serverwith the absolute path to theoceanbase_mcp_serverfolder, and setOB_HOST,OB_PORT,OB_USER,OB_PASSWORD, andOB_DATABASEto your database values.{ "mcpServers": { "oceanbase": { "command": "uv", "args": [ "--directory", "/path/to/your/oceanbase_mcp_server/src/oceanbase_mcp_server", "run", "oceanbase_mcp_server" ], "env": { "OB_HOST": "***", "OB_PORT": "***", "OB_USER": "***", "OB_PASSWORD": "***", "OB_DATABASE": "***" } } } }Verify the connection. In the chat, use the prompt: Create a customer table with primary key ID and columns name, age, telephone, and location.
Augment Code will show that the table was created in the
testdatabase, confirming that the connection to OceanBase is working.
Step 3: Build a RESTful API with FastAPI
FastAPI is a Python web framework well-suited for building RESTful APIs.
Create the table. Use the prompt: Create a customer table with primary key ID and columns name, age, telephone, and location.
Insert test data. Use the prompt: Insert 10 rows of test data.
Create the FastAPI project. Use the prompt: Create a FastAPI project that exposes a RESTful API for the customer table. Augment Code will generate the files, apply fixes, and help you start the FastAPI app.
Query the API. From a terminal or any HTTP client, run:
curl http://127.0.0.1:8000/customersThe response will contain the customer records. The generated code implements full CRUD (create, read, update, delete) for the
customertable.Example generated code:
from sqlalchemy.orm import Session
from database import Customer
from schemas import CustomerCreate, CustomerUpdate
from typing import List, Optional

def get_customer(db: Session, customer_id: int) -> Optional[Customer]:
    """Get a single customer by ID."""
    return db.query(Customer).filter(Customer.id == customer_id).first()

def get_customers(db: Session, skip: int = 0, limit: int = 100) -> List[Customer]:
    """Get a list of customers."""
    return db.query(Customer).offset(skip).limit(limit).all()

def create_customer(db: Session, customer: CustomerCreate) -> Customer:
    """Create a new customer."""
    db_customer = Customer(**customer.dict())
    db.add(db_customer)
    db.commit()
    db.refresh(db_customer)
    return db_customer

def update_customer(db: Session, customer_id: int, customer: CustomerUpdate) -> Optional[Customer]:
    """Update customer information."""
    db_customer = db.query(Customer).filter(Customer.id == customer_id).first()
    if db_customer:
        update_data = customer.dict(exclude_unset=True)
        for field, value in update_data.items():
            setattr(db_customer, field, value)
        db.commit()
        db.refresh(db_customer)
    return db_customer

def delete_customer(db: Session, customer_id: int) -> bool:
    """Delete a customer."""
    db_customer = db.query(Customer).filter(Customer.id == customer_id).first()
    if db_customer:
        db.delete(db_customer)
        db.commit()
        return True
    return False

def search_customers_by_name(db: Session, name: str) -> List[Customer]:
    """Search customers by name."""
    return db.query(Customer).filter(Customer.name.contains(name)).all()

def get_customers_by_location(db: Session, location: str) -> List[Customer]:
    """Get customers by location."""
    return db.query(Customer).filter(Customer.location.contains(location)).all()