
Applicability
SpringBatch is applicable to OceanBase Database in MySQL and Oracle modes. This topic provides only an example for the Oracle mode.
This topic describes how to use the SpringBatch framework and OceanBase Database to build an application that can perform basic operations such as creating tables, inserting data, and querying data.
 Download the java-oceanbase-springbatch sample project
 Prerequisites
- You have installed OceanBase Database.
- You have installed JDK 1.8 and Maven.
- You have installed IntelliJ IDEA.
Note
The code in this topic is run in IntelliJ IDEA 2021.3.2 (Community Edition). You can also use other tools that you prefer to run the sample code.
Procedure
Note
The operations described in this topic are performed in a Windows environment. If you are using a different operating system or compiler, the operations may vary.
- Obtain the connection string of OceanBase Database.
- Import the
java-oceanbase-springbatchproject into IntelliJ IDEA. - Modify the database connection information in the
java-oceanbase-springbatchproject. - Run the
java-oceanbase-springbatchproject.
Step 1: Obtain the connection string of OceanBase Database
Contact the OceanBase Database deployment personnel or administrator to obtain the corresponding database connection string.
obclient -hxx.xx.xx.xx -P2883 -uroot@sys#cluster -p**** -AFill in the following URL with the information of the deployed OceanBase Database.
Note
The URL information is required in the
application.propertiesfile.jdbc:oceanbase://host:port/schema_name?user=$user_name&password=$password&characterEncoding=utf-8Parameter description:
host: the IP address for connecting to OceanBase Database. For ODP connection, it is the IP address of an ODP. For direct connection, it is the IP address of an OBServer node.port: the port for connecting to OceanBase Database. For ODP connection, the default value is2883, which can be customized when ODP is deployed. For direct connection, the default value is2881, which can be customized when OceanBase Database is deployed.schema_name: the name of the schema to be accessed.user_name: the username, in the user@tenant#cluster name or username@SERVICE:service name format. If you use the user@tenant#cluster name format, the default tenant issysand the administrator user isroot. When you directly connect to the database, you can omit the cluster name. When you connect through ODP, you must specify the cluster name.password: the password of the account.characterEncoding: the character encoding.
For more information about URL parameters, see Database URL.
Step 2: Import the java-oceanbase-springbatch project into IntelliJ IDEA
Start IntelliJ IDEA and choose File > Open....

In the Open File or Project window that appears, select the project file and click OK.
IntelliJ IDEA automatically identifies various files in the project and displays the project structure, file list, module list, and dependency relationships in the Project tool window. The Project tool window is usually located on the left side of the IntelliJ IDEA interface and is open by default. If it is closed, you can click View > Tool Windows > Project in the menu bar or press the shortcut key Alt + 1 to reopen it.
Note
When you import a project by using IntelliJ IDEA, it automatically detects the pom.xml file in the project, downloads the required dependency libraries based on the described dependencies in the file, and adds them to the project.
View the project.
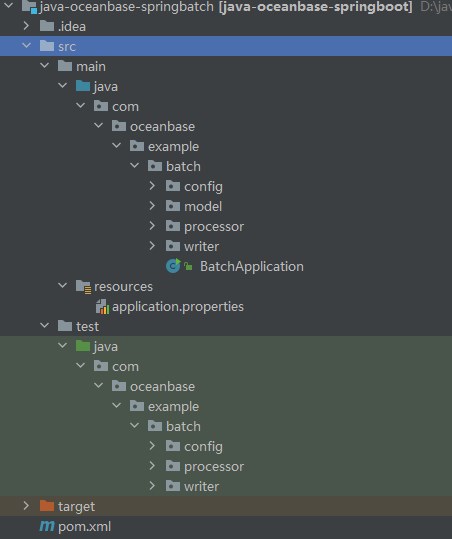
Step 3: Modify the database connection information in the java-oceanbase-springbatch project
Modify the database connection information in the application.properties file based on the information obtained in Step 1: Obtain the connection string of OceanBase Database.
Here is an example:
- The name of the database driver is
com.mysql.cj.jdbc.Driver. - The IP address of the OBServer node is
10.10.10.1. - The access port is 2881.
- The name of the schema to be accessed is
test. - The tenant account is
root@mysql001.mysql001is a MySQL tenant created in OceanBase Database, androotis the username of themysql001tenant. - The password is
******.
Here is the sample code:
spring.datasource.driver-class-name=com.mysql.cj.jdbc.Driver
spring.datasource.url=jdbc:oceanbase://10.10.10.1:2881/test?characterEncoding=utf-8
spring.datasource.username=root@mysql001
spring.datasource.password=******

spring.jpa.show-sql=true
spring.jpa.hibernate.ddl-auto=update

spring.batch.job.enabled=false

logging.level.org.springframework=INFO
logging.level.com.example=DEBUG
Step 4: Run the java-oceanbase-springbatch project
Run the
AddDescPeopleWriterTest.javafile.- Find the
AddDescPeopleWriterTest.javafile in src > test > java in the project structure. - In the tool menu, choose Run > Run... > AddDescPeopleWriterTest.testWrite, or click the green triangle in the upper-right corner to run it.
- View the log information and output results in the console of IntelliJ IDEA.
Data in the people_desc table: PeopleDESC [name=John, age=25, desc=This is John with age 25] PeopleDESC [name=Alice, age=30, desc=This is Alice with age 30] Batch Job execution completed.- Find the
Run the
AddPeopleWriterTest.javafile.- Find the
AddDescPeopleWriterTest.javafile in src > test > java in the project structure. - In the tool menu, choose Run > Run... > AddPeopleWriterTest.testWrite, or click the green triangle in the upper-right corner to run it.
- View the log information and output results in the console of IntelliJ IDEA.
Data in the people table: People [name=zhangsan, age=27] People [name=lisi, age=35] Batch Job execution completed.- Find the
Project code
Click java-oceanbase-springbatch to download the project code, which is a compressed file named java-oceanbase-springbatch.
After decompressing the file, you will find a folder named java-oceanbase-springbatch. The directory structure is as follows:
│  pom.xml
│
├─.idea
│
├─src
│  ├─main
│  │  ├─java
│  │  │  └─com
│  │  │      └─oceanbase
│  │  │          └─example
│  │  │              └─batch
│  │  │                  │──BatchApplication.java
│  │  │                  │
│  │  │                  ├─config
│  │  │                  │   └─BatchConfig.java
│  │  │                  │
│  │  │                  ├─model
│  │  │                  │   ├─People.java
│  │  │                  │   └─PeopleDESC.java
│  │  │                  │
│  │  │                  ├─processor
│  │  │                  │   └─AddPeopleDescProcessor.java
│  │  │                  │
│  │  │                  └─writer
│  │  │                      ├─AddDescPeopleWriter.java
│  │  │                      └─AddPeopleWriter.java
│  │  │
│  │  └─resources
│  │      └─application.properties
│  │
│  └─test
│      └─java
│          └─com
│              └─oceanbase
│                  └─example
│                      └─batch
│                          ├─config
│                          │   └─BatchConfigTest.java
│                          │
│                          ├─processor
│                          │   └─AddPeopleDescProcessorTest.java
│                          │
│                          └─writer
│                              ├─AddDescPeopleWriterTest.java
│                              └─AddPeopleWriterTest.java
│
└─target
File description:
pom.xml: the configuration file of the Maven project, which contains information about the project's dependencies, plugins, and build process..idea: the directory used by the IDE (Integrated Development Environment) to store project-related configuration information.src: the directory typically used to store the source code of the project.main: the directory for storing the main source code and resource files.java: the directory for storing the Java source code.com.oceanbase.example.batch: the package name.BatchApplication.java: the entry class of the application, which contains the main method of the application.config: the folder for storing the configuration class files of the application.BatchConfig.java: the configuration class of the application, used to configure some properties and behaviors of the application.model: the folder for storing the model class files of the application.People.java: the data model class for people.PeopleDESC.java: the data model class for people's description.processor: the folder for storing the processor class files of the application.AddPeopleDescProcessor.java: the processor class for adding people's description information.writer: the folder for storing the writer class files of the application.AddDescPeopleWriter.java: the writer class for writing people's description information.AddPeopleWriter.java: the writer class for writing people's information.resources: the folder for storing the resource files of the application, including the configuration files and other static resources.application.properties: the configuration file of the application, used to configure the properties of the application.test: the directory for storing the test code and resource files.BatchConfigTest.java: the test class of the application configuration class.AddPeopleDescProcessorTest.java: the test class of the processor for adding people's description information.AddDescPeopleWriterTest.java: the test class of the writer for writing people's description information.AddPeopleWriterTest.java: the test class of the writer for writing people's information.target: the directory for storing the compiled Class files, Jar packages, and other files.
Introduction to the pom.xml file
Note
If you only want to verify the sample, use the default code without any modifications. You can also modify the pom.xml file based on your requirements as described below.
The content of the pom.xml configuration file is as follows:
File declaration statement.
Declares that this file is an XML file using XML version
1.0and character encodingUTF-8.Sample code:
<?xml version="1.0" encoding="UTF-8"?>Configure the namespaces and POM model version.
- Use
xmlnsto set the POM namespace tohttp://maven.apache.org/POM/4.0.0. - Use
xmlns:xsito set the XML namespace tohttp://www.w3.org/2001/XMLSchema-instance. - Use
xsi:schemaLocationto set the POM namespace tohttp://maven.apache.org/POM/4.0.0and the location of the POM XSD file tohttps://maven.apache.org/xsd/maven-4.0.0.xsd. - Use the
<modelVersion>element to set the POM model version used by this POM file to4.0.0.
Sample code:
<project xmlns="http://maven.apache.org/POM/4.0.0" xmlns:xsi="http://www.w3.org/2001/XMLSchema-instance" xsi:schemaLocation="http://maven.apache.org/POM/4.0.0 https://maven.apache.org/xsd/maven-4.0.0.xsd"> <modelVersion>4.0.0</modelVersion> </project>- Use
Configure the parent project information.
- Use
<groupId>to set the parent project identifier toorg.springframework.boot. - Use
<artifactId>to set the parent project dependency tospring-boot-starter-parent. - Use
<version>to set the parent project version to2.7.11. - Use
relativePathto set the parent project path to empty.
Sample code:
<parent> <groupId>org.springframework.boot</groupId> <artifactId>spring-boot-starter-parent</artifactId> <version>2.7.11</version> <relativePath/> </parent>- Use
Configure basic information.
- Use
<groupId>to set the project identifier tocom.oceanbase. - Use
<artifactId>to set the project dependency tojava-oceanbase-springboot. - Use
<version>to set the project version to0.0.1-SNAPSHOT. - Use
descriptionto set the project information toDemo project for Spring Batch.
Sample code:
<groupId>com.oceanbase</groupId> <artifactId>java-oceanbase-springboot</artifactId> <version>0.0.1-SNAPSHOT</version> <name>java-oceanbase-springbatch</name> <description>Demo project for Spring Batch</description>- Use
Configure the Java version.
Set the Java version used by the project to 1.8.
Sample code:
  <properties>
      <java.version>1.8</java.version>
  </properties>
Configure core dependencies.
Set the organization of the dependency to
org.springframework.boot, the name tospring-boot-starter, and use this dependency to access the component dependencies supported by Spring Boot by default. This dependency supports features such as Web, data processing, security, and Test.Sample code:
<dependency>
    <groupId>org.springframework.boot</groupId>
    <artifactId>spring-boot-starter</artifactId>
</dependency>
Set the organization of the dependency to
org.springframework.boot, the name tospring-boot-starter-jdbc, and use this dependency to access the JDBC-related features provided by Spring Boot, such as connection pools and data source configurations.Sample code:
<dependency>
    <groupId>org.springframework.boot</groupId>
    <artifactId>spring-boot-starter-jdbc</artifactId>
</dependency>
Set the organization of the dependency to
org.springframework.boot, the name tospring-boot-starter-test, and the scope totest. Use this dependency to access the test framework and tools provided by Spring Boot, such as JUnit, Mockito, and Hamcrest.Sample code:
<dependency>
    <groupId>org.springframework.boot</groupId>
    <artifactId>spring-boot-starter-test</artifactId>
    <scope>test</scope>
</dependency>
Set the organization of the dependency to
com.oceanbase, the name tooceanbase-client, and the version to2.4.12. Use this dependency to access the client features provided by OceanBase, such as connections, queries, and transactions.Sample code:
    <dependency>
        <groupId>com.oceanbase</groupId>
        <artifactId>oceanbase-client</artifactId>
        <version>2.4.12</version>
    </dependency>
Set the organization of the dependency to
org.springframework.boot, the name tospring-boot-starter-batch, and use this dependency to access the batch processing features provided by Spring Boot.Sample code:
<dependency>
    <groupId>org.springframework.boot</groupId>
    <artifactId>spring-boot-starter-batch</artifactId>
</dependency>
Set the organization of the dependency to
org.springframework.boot, the name tospring-boot-starter-data-jpa, and use this dependency to access the necessary dependencies and configurations for data access using JPA. Spring Boot Starter Data JPA is a starter provided by Spring Boot.Sample code:
<dependency>
    <groupId>org.springframework.boot</groupId>
    <artifactId>spring-boot-starter-data-jpa</artifactId>
</dependency>
Set the organization of the dependency to
org.apache.tomcat, the name totomcat-jdbc, and use this dependency to access the JDBC connection pool features provided by Tomcat, including connection pool configuration, connection acquisition and release, and connection management.Sample code:
<dependency>
    <groupId>org.apache.tomcat</groupId>
    <artifactId>tomcat-jdbc</artifactId>
</dependency>
Set the test framework of the dependency to
junit, the name tojunit, the version to4.10, and the scope totest. Use this dependency to add the configuration for the JUnit unit test dependency.Sample code:
<dependency>
    <groupId>junit</groupId>
    <artifactId>junit</artifactId>
    <version>4.10</version>
    <scope>test</scope>
</dependency>
Set the organization of the dependency to
javax.activation, the name tojavax.activation-api, and the version to1.2.0. Use this dependency to introduce the Java Activation Framework (JAF) library.Sample code:
<dependency>
    <groupId>javax.activation</groupId>
    <artifactId>javax.activation-api</artifactId>
    <version>1.2.0</version>
</dependency>
Set the organization of the dependency to
jakarta.persistence, the name tojakarta.persistence-api, and the version to2.2.3. Use this dependency to add the configuration for the Jakarta Persistence API dependency. Sample code:<dependency> <groupId>jakarta.persistence</groupId> <artifactId>jakarta.persistence-api</artifactId> <version>2.2.3</version> </dependency>
Configure Maven plugins.
Set the organization of the dependency to
org.springframework.boot, the name tospring-boot-maven-plugin, and use this plugin to package the Spring Boot application into an executable JAR or WAR file, which can be directly run.Sample code:
<build> <plugins> <plugin> <groupId>org.springframework.boot</groupId> <artifactId>spring-boot-maven-plugin</artifactId> </plugin> </plugins> </build>
Introduction to the application.properties file
The application.properties file is used to configure database connections and other related settings, such as the database driver, connection URL, username, and password. It also includes configurations for JPA (Java Persistence API), Spring Batch, and log levels.
Database connection configuration.
- The
spring.datasource.driverparameter specifies the database driver ascom.mysql.cj.jdbc.Driver, which is used to establish a connection to OceanBase Database. - The
spring.datasource.urlparameter specifies the URL for connecting to the database. - The
spring.datasource.usernameparameter specifies the username for connecting to the database. - The
spring.datasource.passwordparameter specifies the password for connecting to the database.
Sample code:
spring.datasource.driver-class-name=com.mysql.cj.jdbc.Driver spring.datasource.url=jdbc:oceanbase://host:port/schema_name?characterEncoding=utf-8 spring.datasource.username=user_name spring.datasource.password=******- The
JPA configuration.
- The
spring.jpa.show-sqlparameter specifies whether to display SQL statements in the logs. Setting it totruemeans SQL statements will be displayed. - The
spring.jpa.hibernate.ddl-autoparameter specifies the Hibernate DDL operation behavior. Here, it is set toupdate, which means the database structure will be automatically updated when the application starts.
Sample code:
spring.jpa.show-sql=true spring.jpa.hibernate.ddl-auto=update- The
Spring Batch configuration:
The
spring.batch.job.enabledparameter specifies whether to enable Spring Batch jobs. Here, it is set tofalse, indicating that automatic execution of batch jobs is disabled.Sample code:
spring.batch.job.enabled=falseNote
In Spring Batch, the
spring.batch.job.enabledproperty controls the execution behavior of batch jobs.spring.batch.job.enabled=true(default): Indicates that all defined batch jobs will be automatically executed when the Spring Boot application starts. This means that Spring Batch will automatically discover and execute all defined jobs when the application starts.spring.batch.job.enabled=false: Indicates that automatic execution of batch jobs is disabled. This is typically used in development or testing environments, or when you want to manually control job execution. When set tofalse, jobs will not be automatically executed when the application starts. You can manually trigger jobs using other methods, such as REST APIs or command-line tools.
spring.batch.job.enabled=falseallows you to avoid automatically running jobs when the application starts, providing greater flexibility in controlling when batch jobs are executed.Log configuration:
- The
logging.level.org.springframeworkparameter specifies the log level for the Spring framework asINFO. - The
logging.level.com.exampleparameter specifies the log level for custom application code asDEBUG.
Sample code:
logging.level.org.springframework=INFO logging.level.com.example=DEBUG- The
Introduction to the BatchApplication.java file
The BatchApplication.java file is the entry point of the Spring Boot application.
The code in the BatchApplication.java file mainly includes the following parts:
Importing other classes and interfaces.
The current file includes the following interfaces and classes:
SpringApplicationclass: used to start the Spring Boot application.SpringBootApplicationannotation: used to mark the class as the entry point of the Spring Boot application.
Sample code:
import org.springframework.boot.SpringApplication; import org.springframework.boot.autoconfigure.SpringBootApplication;Defining the
BatchApplicationclass.The
@SpringBootApplicationannotation is used to mark theBatchApplicationclass as the entry point of the Spring Boot application. TheBatchApplicationclass defines a staticmainmethod as the entry point of the application. In this method, theSpringApplication.runmethod is used to start the Spring Boot application. A method namedrunBatchJobis also defined to run batch jobs.Sample code:
@SpringBootApplication public class BatchApplication { public static void main(String[] args) { SpringApplication.run(BatchApplication.class, args); } public void runBatchJob() { } }
Introduction to the BatchConfig.java file
The BatchConfig.java file is used to configure components such as steps, readers, processors, and writers for batch processing jobs.
The code in the BatchConfig.java file mainly includes the following parts:
Import other classes and interfaces.
Declare the interfaces and classes included in the current file:
Peopleclass: used to store personnel information read from the database.PeopleDESCclass: used to store description information after the personnel information is converted or processed.AddPeopleDescProcessorclass: converts the readPeopleobject to aPeopleDESCobject. It is an implementation class of theItemProcessorinterface.AddDescPeopleWriterclass: writes thePeopleDESCobject to the target location. It is an implementation class of theItemWriterinterface.Jobinterface: represents a batch processing job.Stepinterface: represents a step in a job.EnableBatchProcessingannotation: a Spring Batch configuration annotation used to enable and configure Spring Batch processing.JobBuilderFactoryclass: used to create and configure jobs.StepBuilderFactoryclass: used to create and configure steps.RunIdIncrementerclass: a Spring Batch run ID (Run ID) incrementer used to increment the run ID each time a job is run.ItemProcessorinterface: used to process or convert read items.ItemReaderinterface: used to read items from a data source.ItemWriterinterface: used to write processed or converted items to the specified target location.JdbcCursorItemReaderclass: used to read data from the database and return a cursor result set.Autowiredannotation: used for dependency injection.Beanannotation: used to create and configure beans.ComponentScanannotation: used to specify the package or class to be scanned for components.Configurationannotation: used to mark a class as a configuration class.EnableAutoConfigurationannotation: used to enable Spring Boot auto-configuration.SpringBootApplicationannotation: used to mark the class as the entry point of a Spring Boot application.DataSourceinterface: used to represent a database connection.
Sample code:
import com.oceanbase.example.batch.model.People; import com.oceanbase.example.batch.model.PeopleDESC; import com.oceanbase.example.batch.processor.AddPeopleDescProcessor; import com.oceanbase.example.batch.writer.AddDescPeopleWriter; import org.springframework.batch.core.Job; import org.springframework.batch.core.Step; import org.springframework.batch.core.configuration.annotation.EnableBatchProcessing; import org.springframework.batch.core.configuration.annotation.JobBuilderFactory; import org.springframework.batch.core.configuration.annotation.StepBuilderFactory; import org.springframework.batch.core.launch.support.RunIdIncrementer; import org.springframework.batch.item.ItemProcessor; import org.springframework.batch.item.ItemReader; import org.springframework.batch.item.ItemWriter; import org.springframework.batch.item.database.JdbcCursorItemReader; import org.springframework.beans.factory.annotation.Autowired; import org.springframework.boot.autoconfigure.EnableAutoConfiguration; import org.springframework.boot.autoconfigure.SpringBootApplication; import org.springframework.context.annotation.Bean; import org.springframework.context.annotation.ComponentScan; import org.springframework.context.annotation.Configuration; import org.springframework.jdbc.core.BeanPropertyRowMapper; import javax.sql.DataSource;Define the
BatchConfigclass.This is a simple Spring Batch batch processing job. It defines the methods for reading, processing, and writing data, and encapsulates these steps into a single job. Using Spring Batch annotations and auto-configuration features, you can create corresponding component instances through the
@Beanmethods in the configuration class and use these components to complete data reading, processing, and writing in thestep1method.- Use the
@Configurationannotation to indicate that this class is a configuration class. - Use the
@EnableBatchProcessingannotation to enable Spring Batch processing. This annotation automatically creates necessarybeans, such asJobRepositoryandJobLauncher. - Use the
@SpringBootApplicationannotation for the main class of a Spring Boot application, which serves as the entry point for the Spring Boot application. - Use the
@ComponentScanannotation to specify the package to be scanned for components, telling Spring to scan and register all components in this package and its subpackages. - Use the
@EnableAutoConfigurationannotation to automatically configure the infrastructure of the Spring Boot application.
Sample code:
@Configuration @EnableBatchProcessing @SpringBootApplication @ComponentScan("com.oceanbase.example.batch.writer") @EnableAutoConfiguration public class BatchConfig { }Define the
@Autowiredannotation.Use the
@Autowiredannotation to inject theJobBuilderFactory,StepBuilderFactory, andDataSourceinto the member variables of theBatchConfigclass. TheJobBuilderFactoryis a factory class used to create and configure jobs (Job), theStepBuilderFactoryis a factory class used to create and configure steps (Step), and theDataSourceis an interface used to obtain a database connection.Sample code:
@Autowired private JobBuilderFactory jobBuilderFactory; @Autowired private StepBuilderFactory stepBuilderFactory; @Autowired private DataSource dataSource;Define the
@Beanannotation.Use the
@Beanannotation to define several methods for creating the reader, processor, writer, step, and job components of a batch processing job.Use the
peopleReadermethod to create anItemReadercomponent instance. This component usesJdbcCursorItemReaderto readPeopleobject data from the database. Set the data source todataSource, set theRowMapperto map database rows toPeopleobjects, and set the SQL query statement toSELECT * FROM people.Use the
addPeopleDescProcessormethod to create anItemProcessorcomponent instance. This component usesAddPeopleDescProcessorto processPeopleobjects and returns the convertedPeopleDESCobjects.Use the
addDescPeopleWritermethod to create anItemWritercomponent instance. This component usesAddDescPeopleWriterto writePeopleDESCobjects to the target location.Use the
step1method to create aStepcomponent instance. The step name isstep1. UsestepBuilderFactory.getto obtain the step builder, set the reader to theItemReadercomponent, set the processor to theItemProcessorcomponent, set the writer to theItemWritercomponent, set thechunksize to10, and finally callbuildto build and return the configuredStep.Use the
importJobmethod to create aJobcomponent instance. The job name isimportJob. UsejobBuilderFactory.getto obtain the job builder, set the incrementer toRunIdIncrementer, set the initial step of the jobflowtoStep, and finally callbuildto build and return the configuredJob.Sample code:
@Bean public ItemReader<People> peopleReader() { JdbcCursorItemReader<People> reader = new JdbcCursorItemReader<>(); reader.setDataSource((javax.sql.DataSource) dataSource); reader.setRowMapper(new BeanPropertyRowMapper<>(People.class)); reader.setSql("SELECT * FROM people"); return reader; } @Bean public ItemProcessor<People, PeopleDESC> addPeopleDescProcessor() { return new AddPeopleDescProcessor(); } @Bean public ItemWriter<PeopleDESC> addDescPeopleWriter() { return new AddDescPeopleWriter(); } @Bean public Step step1(ItemReader<People> reader, ItemProcessor<People, PeopleDESC> processor, ItemWriter<PeopleDESC> writer) { return stepBuilderFactory.get("step1") .<People, PeopleDESC>chunk(10) .reader(reader) .processor(processor) .writer(writer) .build(); } @Bean public Job importJob(Step step1) { return jobBuilderFactory.get("importJob") .incrementer(new RunIdIncrementer()) .flow(step1) .end() .build(); }
- Use the
Introduction to the People.java file
The People.java file defines a data model for the People class, which represents information about a person. This class contains two private member variables, name and age, along with corresponding getter and setter methods. The toString method is overridden to print the information of the object. Here, name represents the person's name, and age represents the person's age. You can use the getter and setter methods to obtain and set the values of these attributes.
The People class is used to store and pass data in the input and output of the batch processing program. In the batch processing program, the People class is used to store data. You can use the setter method to set data and the getter method to obtain data.
Code:
public class People {
private String name;
private int age;
// getters and setters
public String getName() {
return name;
}
public void setName(String name) {
this.name = name;
}
public int getAge() {
return age;
}
public void setAge(int age) {
this.age = age;
}
@Override
public String toString() {
return "People [name=" + name + ", age=" + age + "]";
}
// Getters and setters
}
Introduction to the PeopleDESC.java file
The PeopleDESC.java file defines a data model for the PeopleDESC class, which represents information about a person. The PeopleDESC class has four attributes: name, age, desc, and id, which represent the person's name, age, description, and identifier, respectively. This class contains corresponding getter and setter methods to access and set the values of the attributes. The toString method is overridden to return the string representation of the class, which includes the name, age, and description.
Similar to the People class, the PeopleDESC class is used to store and pass data in the input and output of the batch processing program.
Code:
public class PeopleDESC {
private String name;
private int age;
private String desc;
private int id;
public String getName() {
return name;
}
public void setName(String name) {
this.name = name;
}
public int getAge() {
return age;
}
public void setAge(int age) {
this.age = age;
}
public String getDesc() {
return desc;
}
public void setDesc(String desc) {
this.desc = desc;
}
public int getId() {
return id;
}
public void setId(int id) {
this.id = id;
}
@Override
public String toString() {
return "PeopleDESC [name=" + name + ", age=" + age + ", desc=" + desc + "]";
}
}
Introduction to the AddPeopleDescProcessor.java file
The AddPeopleDescProcessor.java file defines a class named AddPeopleDescProcessor that implements the ItemProcessor interface. This class is used to convert a People object to a PeopleDESC object.
The code in the AddPeopleDescProcessor.java file mainly includes the following parts:
Import other classes and interfaces.
The following interfaces and classes are included in this file:
Peopleclass: used to store the information of a person read from the database.PeopleDESCclass: used to store the description information of a person after the information is converted or processed.ItemProcessorinterface: used to process or convert the read item.
Code:
import com.oceanbase.example.batch.model.People; import com.oceanbase.example.batch.model.PeopleDESC; import org.springframework.batch.item.ItemProcessor;Define the
AddPeopleDescProcessorclass.The
AddPeopleDescProcessorclass of theItemProcessorinterface is used to convert aPeopleobject to aPeopleDESCobject. This class implements the logic for processing the input data in the batch processing program.In the
processmethod of this class, aPeopleDESCobjectdescis first created. Then, theitemparameter is used to obtain thenameandageattributes of thePeopleobject and set these attributes to thedescobject. Thedescattribute of thedescobject is also set. The logic for setting thedescattribute is to generate a description based on the attributes of thePeopleobject. Finally, the processedPeopleDESCobject is returned.Code:
public class AddPeopleDescProcessor implements ItemProcessor<People, PeopleDESC> { @Override public PeopleDESC process(People item) throws Exception { PeopleDESC desc = new PeopleDESC(); desc.setName(item.getName()); desc.setAge(item.getAge()); desc.setDesc("This is " + item.getName() + " with age " + item.getAge()); return desc; } }
Introduction to the AddDescPeopleWriter.java file
The AddDescPeopleWriter.java file implements the AddDescPeopleWriter class that implements the ItemWriter interface. This class is used to write People objects to a database.
The code in the AddDescPeopleWriter.java file mainly includes the following parts:
Import other classes and interfaces.
Declare the following interfaces and classes in the current file:
PeopleDESCclass: used to store the description information of the personnel after conversion or processing.ItemWriterinterface: used to write the processed or converted items to the specified target location.@Autowiredannotation: used for dependency injection.JdbcTemplateclass: provides methods for executing SQL statements.Listinterface: used to operate on the query result set.
Code:
import com.oceanbase.example.batch.model.PeopleDESC; import org.springframework.batch.item.ItemWriter; import org.springframework.beans.factory.annotation.Autowired; import org.springframework.jdbc.core.JdbcTemplate; import java.util.List;Define the
AddDescPeopleWriterclass.Use the
@Autowiredannotation to automatically inject theJdbcTemplateinstance. This instance is used to execute database operations when writing data.Code:
@Autowired private JdbcTemplate jdbcTemplate;In the
writemethod, traverse the inputList<? extends PeopleDESC>and extract eachPeopleDESCobject. First, execute the SQL statementDROP TABLE people_descto delete the table namedpeople_descif it exists. Then, execute the SQL statementCREATE TABLE people_desc (id INT PRIMARY KEY, name VARCHAR2(255), age INT, description VARCHAR2(255))to create a table namedpeople_descwith four columns:id,name,age, anddescription. Finally, use the SQL statementINSERT INTO people_desc (id, name, age, description) VALUES (?, ?, ?, ?)to insert the attribute values of eachPeopleDESCobject into thepeople_desctable.Code:
@Override public void write(List<? extends PeopleDESC> items) throws Exception { // Drop the table if it exists jdbcTemplate.execute("DROP TABLE people_desc"); // Create the table String createTableSql = "CREATE TABLE people_desc (id INT PRIMARY KEY, name VARCHAR2(255), age INT, description VARCHAR2(255))"; jdbcTemplate.execute(createTableSql); for (PeopleDESC item : items) { String sql = "INSERT INTO people_desc (id, name, age, description) VALUES (?, ?, ?, ?)"; jdbcTemplate.update(sql, item.getId(), item.getName(), item.getAge(), item.getDesc()); } }
AddPeopleWriter.java file
The AddPeopleWriter.java file implements the AddDescPeopleWriter class of the ItemWriter interface. It is used to write PeopleDESC objects to a database.
The AddPeopleWriter.java file contains the following code:
Import other classes and interfaces.
The following interfaces and classes are declared in this file:
Peopleclass: used to store personnel information read from a database.ItemWriterinterface: used to write processed or converted items to a specified target location.@Autowiredannotation: used for dependency injection.JdbcTemplateclass: provides methods for executing SQL statements.@Componentannotation: used to mark the class as a Spring component.Listinterface: used to operate on query result sets.
Sample code:
import com.oceanbase.example.batch.model.People; import org.springframework.batch.item.ItemWriter; import org.springframework.beans.factory.annotation.Autowired; import org.springframework.jdbc.core.JdbcTemplate; import org.springframework.stereotype.Component; import java.util.List;Define the
AddPeopleWriterclass.Use the
@Autowiredannotation to automatically inject theJdbcTemplateinstance. This instance is used to execute database operations when data is written.Sample code:
@Autowired private JdbcTemplate jdbcTemplate;In the
writemethod, traverse the inputList<? extends People>and extract eachPeopleobject. First, execute the SQL statementDROP TABLE peopleto delete thepeopletable if it exists. Then, execute the SQL statementCREATE TABLE people (name VARCHAR2(255), age INT)to create apeopletable withnameandagecolumns. Finally, use the SQL statementINSERT INTO people (name, age) VALUES (?, ?)to insert the attribute values of eachPeopleobject into thepeopletable.Sample code:
@Override public void write(List<? extends People> items) throws Exception { // Drop the table if it exists jdbcTemplate.execute("DROP TABLE people"); // Create the table String createTableSql = "CREATE TABLE people (name VARCHAR2(255), age INT)"; jdbcTemplate.execute(createTableSql); for (People item : items) { String sql = "INSERT INTO people (name, age) VALUES (?, ?)"; jdbcTemplate.update(sql, item.getName(), item.getAge()); } }
BatchConfigTest.java file
The BatchConfigTest.java file is a class that uses JUnit for testing. It is used to test the job configuration of Spring Batch.
The BatchConfigTest.java file contains the following code:
Import other classes and interfaces.
The following interfaces and classes are declared in this file:
Assertclass: used to assert test results.@Testannotation: used to mark a method as a test method.@RunWithannotation: used to specify the test runner.Jobinterface: represents a batch processing job.JobExecutionclass: used to represent the execution of a batch processing job.JobParametersclass: used to represent the parameters of a batch processing job.JobParametersBuilderclass: used to build the parameters of a batch processing job.JobLauncherinterface: used to start a batch processing job.@Autowiredannotation: used for dependency injection.@SpringBootTestannotation: used to specify the test class as a Spring Boot test.SpringRunnerclass: used to specify the test runner as SpringRunner.
Sample code:
import org.junit.Assert; import org.junit.jupiter.api.Test; import org.junit.runner.RunWith; import org.springframework.batch.core.Job; import org.springframework.batch.core.JobExecution; import org.springframework.batch.core.JobParameters; import org.springframework.batch.core.JobParametersBuilder; import org.springframework.batch.core.launch.JobLauncher; import org.springframework.beans.factory.annotation.Autowired; import org.springframework.boot.test.context.SpringBootTest; import org.springframework.test.context.junit4.SpringRunner; import javax.batch.runtime.BatchStatus; import java.util.UUID;Define the
BatchConfigTestclass.By using the
@SpringBootTestannotation and theSpringRunnerrunner, you can perform integration tests for Spring Boot. In thetestJobmethod, use theJobLauncherTestUtilshelper class to start the batch processing job and use assertions to verify the job's execution status.Use the
@Autowiredannotation to automatically inject theJobLauncherTestUtilsinstance.Sample code:
@Autowired private JobLauncherTestUtils jobLauncherTestUtils;Use the
@Testannotation to mark thetestJobmethod as a test method. In this method, first create aJobParametersobject, then use thejobLauncherTestUtils.launchJobmethod to start the batch processing job, and use theAssert.assertEqualsmethod to assert that the job's execution status isCOMPLETED.Sample code:
@Test public void testJob() throws Exception { JobParameters jobParameters = new JobParametersBuilder() .addString("jobParam", "paramValue") .toJobParameters(); JobExecution jobExecution = jobLauncherTestUtils.launchJob(jobParameters); Assert.assertEquals(BatchStatus.COMPLETED, jobExecution.getStatus()); }Use the
@Autowiredannotation to automatically inject theJobLauncherinstance.Sample code:
@Autowired private JobLauncher jobLauncher;Use the
@Autowiredannotation to automatically inject theJobinstance.Sample code:
@Autowired private Job job;Define an internal class named
JobLauncherTestUtilsto assist in starting the batch processing job. In this class, define alaunchJobmethod to start the batch processing job. In this method, use thejobLauncher.runmethod to start the job and return the job's execution result.Sample code:
private class JobLauncherTestUtils { public JobExecution launchJob(JobParameters jobParameters) throws Exception { return jobLauncher.run(job, jobParameters); } }
AddPeopleDescProcessorTest.java file
The AddPeopleDescProcessorTest.java file is a class that uses JUnit for testing Spring Batch job configurations.
The AddPeopleDescProcessorTest.java file contains the following code:
Import other classes and interfaces.
The following interfaces and classes are declared in this file:
Peopleclass: used to store the information of a person read from the database.PeopleDESCclass: used to store the description information of a person after conversion or processing.Assertclass: used to verify whether the expected results and actual results in the test are consistent.Testannotation: used to mark a method as a test method.RunWithannotation: used to specify the test runner.Autowiredannotation: used for dependency injection.SpringBootTestannotation: used to specify the test class as a Spring Boot test class.SpringRunnerclass: used to specify the test runner as SpringRunner.
Sample code:
import com.oceanbase.example.batch.model.People; import com.oceanbase.example.batch.model.PeopleDESC; import org.junit.Assert; import org.junit.jupiter.api.Test; import org.junit.runner.RunWith; import org.springframework.beans.factory.annotation.Autowired; import org.springframework.boot.test.context.SpringBootTest; import org.springframework.test.context.junit4.SpringRunner;Define the
AddPeopleDescProcessorTestclass.Use the
SpringBootTestannotation andSpringRunnerrunner to perform Spring Boot integration testing.Use the
@Autowiredannotation to automatically inject theAddPeopleDescProcessorinstance.Sample code:
@Autowired private AddPeopleDescProcessor processor;Use the
@Testannotation to mark thetestProcessmethod as a test method. In this method, first create aPeopleobject, then use theprocessor.processmethod to process this object, and assign the result to aPeopleDESCobject.Sample code:
@Test public void testProcess() throws Exception { People people = new People(); people.setName("John"); people.setAge(25); PeopleDESC desc = processor.process(people); }
File description: AddDescPeopleWriterTest.java
The AddDescPeopleWriterTest.java file is a class that uses JUnit to test the write logic of the AddDescPeopleWriter class.
The AddDescPeopleWriterTest.java file contains the following code segments:
Import another class or interface.
Declares that the current file contains the following interfaces and classes:
PeopleDESCclass: stores description information after personnel information has been converted or processed.Assertclass: Used to assert test results.Testannotation: This annotation is used to mark test methods.RunWith: specifies the runner to be used for running the test.@Autowiredannotation: used for dependency injection.@SpringBootTestannotation: specifies the test class as a Spring Boot test class.JdbcTemplateclass: Provides methods to execute SQL statements.SpringRunnerclass: specifies SpringRunner as the test runner.ArrayListClass to create an empty list.Listinterface: Operations that you can perform on query result sets.
Sample code:
import com.oceanbase.example.batch.model.PeopleDESC; import org.junit.Assert; import org.junit.jupiter.api.Test; import org.junit.runner.RunWith; import org.springframework.beans.factory.annotation.Autowired; import org.springframework.boot.test.context.SpringBootTest; import org.springframework.jdbc.core.JdbcTemplate; import org.springframework.test.context.junit4.SpringRunner; import java.util.ArrayList; import java.util.List;Define the
AddDescPeopleWriterTestclass.You can perform integration tests for Spring Boot by using the
SpringBootTestannotation and theSpringRunnerrunner.Inject the instance with the
@Autowiredannotation. Autowire theAddPeopleDescProcessorandJdbcTemplateinstances by using the@Autowiredannotation.Sample code:
@Autowired private AddDescPeopleWriter writer; @Autowired private JdbcTemplate jdbcTemplate;Run test cases by using the
@Testmethod. ThetestWritemethod is marked as a test method with the@Testannotation. In this method, an emptypeopleDescListlist is first created and twoPeopleDESCobjects are added to the list. Then, thewriter.writemethod is used to write the list data to the database. Subsequently, thejdbcTemplateis used to execute a query statement to retrieve data from thepeople_desctable, and assertion statements are used to verify the correctness of the data. Finally, the query results are output to the console, along with a message indicating that the job has been completed.Insert data into the
people_desctable. First, an emptyPeopleDESCobject list namedpeopleDescListis created. Then, twoPeopleDESCobjects nameddesc1anddesc2are created, and their attribute values are set.desc1anddesc2are added topeopleDescList. Then, thewritemethod ofwriteris called to write the objects inpeopleDescListto thepeople_desctable in the database. Next, aJdbcTemplateis used to execute a query statementSELECT COUNT(*) FROM people_descto get the number of records in thepeople_desctable and assign the result to thecountvariable. Finally, theAssert.assertEqualsmethod is used to verify that the value ofcountis 2.The code is as follows:
List<PeopleDESC> peopleDescList = new ArrayList<>(); PeopleDESC desc1 = new PeopleDESC(); desc1.setId(1); desc1.setName("John"); desc1.setAge(25); desc1.setDesc("This is John with age 25"); peopleDescList.add(desc1); PeopleDESC desc2 = new PeopleDESC(); desc2.setId(2); desc2.setName("Alice"); desc2.setAge(30); desc2.setDesc("This is Alice with age 30"); peopleDescList.add(desc2); writer.write(peopleDescList); String selectSql = "SELECT COUNT(*) FROM people_desc"; int count = jdbcTemplate.queryForObject(selectSql, Integer.class); Assert.assertEquals(2, count);Output the data in the
people_desctable. First, aJdbcTemplateis used to execute the query statementSELECT * FROM people_desc, andlambdaexpressions are used to process the query results. In thelambdaexpression, methods such asrs.getIntandrs.getStringare used to retrieve field values from the query result set, and these values are set in a newly createdPeopleDESCobject. Each newPeopleDESCobject is added to a result listresultDesc. Then, a line of prompt informationpeople_desc table data:is printed. Theforloop is used to iterate through eachPeopleDESCobject in theresultDesclist, andSystem.out.printlnis used to print the contents of each object. Finally, a message indicating the completion of the job is printed.Code example:
List<PeopleDESC> resultDesc = jdbcTemplate.query("SELECT * FROM people_desc", (rs, rowNum) -> { PeopleDESC desc = new PeopleDESC(); desc.setId(rs.getInt("id")); desc.setName(rs.getString("name")); desc.setAge(rs.getInt("age")); desc.setDesc(rs.getString("description")); return desc; }); System.out.println("Data in the people_desc table:"); for (PeopleDESC desc : resultDesc) { System.out.println(desc); } // Output information after the job finishes. System.out.println("Batch Job execution completed.");
AddPeopleWriterTest.java File Description
The AddPeopleWriterTest.java file is a class that uses JUnit for testing the write logic of AddPeopleWriterTest.
The AddPeopleWriterTest.java file mainly contains the following code:
Import other classes and interfaces.
This file contains the following interfaces and classes:
Peopleclass: Stores the information of people retrieved from the database.Testannotation: Marks a method as a test method.RunWithannotation: specifies the test runner.Autowiredannotation: used for dependency injection.SpringBootApplicationannotation: This annotation identifies the class as an entry point of a Spring Boot application.SpringBootTestannotation: specifies a test class as a Spring Boot test class.ComponentScanannotation: specifies the package or class for component scan.JdbcTemplateclass: provides methods to execute SQL statements.SpringRunnerclass: specifiesSpringRunneras the test runner.ArrayListclass, which is used to create an empty list.- The
Listinterface is used for handling the result set of a query.
Sample code:
import com.oceanbase.example.batch.model.People; import org.junit.jupiter.api.Test; import org.junit.runner.RunWith; import org.springframework.beans.factory.annotation.Autowired; import org.springframework.boot.autoconfigure.SpringBootApplication; import org.springframework.boot.test.context.SpringBootTest; import org.springframework.context.annotation.ComponentScan; import org.springframework.jdbc.core.JdbcTemplate; import org.springframework.test.context.junit4.SpringRunner; import java.util.ArrayList; import java.util.List;Define the
AddPeopleWriterTestclass.Spring Boot integration tests are performed using
SpringBootTestannotation andSpringRunnerrunner and@ComponentScanannotation is used to specify the package path to be scanned.Use
@Autowiredto inject an instance. Use the@Autowiredannotation to automatically inject instances ofaddPeopleWriterandJdbcTemplate.Sample code:
@Autowired private AddPeopleWriter addPeopleWriter; @Autowired private JdbcTemplate jdbcTemplate;Insert and query test data by using the
@Testmethod.Insert data to the
peopletable. First, create an empty list ofPeopleobjects calledpeopleList. Then, create twoPeopleobjects namedperson1andperson2, and set their name and age properties. Next, add these twoPeopleobjects to thepeopleListlist. Finally, call thewritemethod ofaddPeopleWriterand pass thepeopleListlist as the parameter to the method to write thePeopleobjects to the database.Here is the code:
List<People> peopleList = new ArrayList<>(); People person1 = new People(); person1.setName("zhangsan"); person1.setAge(27); peopleList.add(person1); People person2 = new People(); person2.setName("lisi"); person2.setAge(35); peopleList.add(person2); addPeopleWriter.write(peopleList);Output the data in the
peopletable.JdbcTemplateis first used to execute a query statementSELECT * FROM people. The result is processed by using a lambda expression. In the lambda expression, thers.getStringandrs.getIntmethods are used to obtain field values in the query result set. The field values are set to a newPeopleobject. Each newPeopleobject is added to a result listresult. Then, a prompt messagepeople table data:is printed. Theforloop is used to traverse eachPeopleobject in theresultlist, and theSystem.out.printlnmethod is used to output the contents of each object. Finally, a message indicating that the task is completed is printed.Code example:
List<People> result = jdbcTemplate.query("SELECT * FROM people", (rs, rowNum) -> { People person = new People(); person.setName(rs.getString("name")); person.setAge(rs.getInt("age")); return person; }); System.out.println("people table:"); for (People person : result) { System.out.println(person); } // Outputs information after the job is executed. System.out.println("Batch Job execution completed.");
Complete code
<?xml version="1.0" encoding="UTF-8"?>
<project xmlns="http://maven.apache.org/POM/4.0.0" xmlns:xsi="http://www.w3.org/2001/XMLSchema-instance"
xsi:schemaLocation="http://maven.apache.org/POM/4.0.0 https://maven.apache.org/xsd/maven-4.0.0.xsd">
<modelVersion>4.0.0</modelVersion>
<parent>
<groupId>org.springframework.boot</groupId>
<artifactId>spring-boot-starter-parent</artifactId>
<version>2.7.11</version>
<relativePath/> <!-- lookup parent from repository -->
</parent>
<groupId>com.oceanbase</groupId>
<artifactId>java-oceanbase-springboot</artifactId>
<version>0.0.1-SNAPSHOT</version>
<name>java-oceanbase-springbatch</name>
<description>Demo project for Spring Batch</description>
<properties>
<java.version>1.8</java.version>
</properties>
<dependencies>
<dependency>
<groupId>org.springframework.boot</groupId>
<artifactId>spring-boot-starter</artifactId>
</dependency>
<dependency>
<groupId>com.oceanbase</groupId>
<artifactId>oceanbase-client</artifactId>
<version>2.4.3</version>
</dependency>
<dependency>
<groupId>org.springframework.boot</groupId>
<artifactId>spring-boot-starter-jdbc</artifactId>
</dependency>
<dependency>
<groupId>org.springframework.boot</groupId>
<artifactId>spring-boot-starter-test</artifactId>
<scope>test</scope>
</dependency>
<dependency>
<groupId>org.springframework.boot</groupId>
<artifactId>spring-boot-starter-batch</artifactId>
</dependency>
<dependency>
<groupId>org.springframework.boot</groupId>
<artifactId>spring-boot-starter-data-jpa</artifactId>
</dependency>
<dependency>
<groupId>org.apache.tomcat</groupId>
<artifactId>tomcat-jdbc</artifactId>
</dependency>
<dependency>
<groupId>junit</groupId>
<artifactId>junit</artifactId>
<version>4.10</version>
<scope>test</scope>
</dependency>
<dependency>
<groupId>javax.activation</groupId>
<artifactId>javax.activation-api</artifactId>
<version>1.2.0</version>
</dependency>
<dependency>
    <groupId>jakarta.persistence</groupId>
    <artifactId>jakarta.persistence-api</artifactId>
    <version>2.2.3</version>
</dependency>
</dependencies>
 <build>
     <plugins>
         <plugin>
             <groupId>org.springframework.boot</groupId>
             <artifactId>spring-boot-maven-plugin</artifactId>
         </plugin>
     </plugins>
 </build>
</project>
#configuration database
spring.datasource.driver-class-name=com.mysql.cj.jdbc.Driver
spring.datasource.url=jdbc:oceanbase://host:port/schema_name?characterEncoding=utf-8
spring.datasource.username=user_name
spring.datasource.password=
# JPA
spring.jpa.show-sql=true
spring.jpa.hibernate.ddl-auto=update
# Spring Batch
spring.batch.job.enabled=false
#
logging.level.org.springframework=INFO
logging.level.com.example=DEBUG
package com.oceanbase.example.batch;
    import org.springframework.boot.SpringApplication;
    import org.springframework.boot.autoconfigure.SpringBootApplication;
    @SpringBootApplication
    public class BatchApplication {
        public static void main(String[] args) {
            SpringApplication.run(BatchApplication.class, args);
        }

        public void runBatchJob() {
        }
    }
package com.oceanbase.example.batch.config;
import com.oceanbase.example.batch.model.People;
import com.oceanbase.example.batch.model.PeopleDESC;
import com.oceanbase.example.batch.processor.AddPeopleDescProcessor;
import com.oceanbase.example.batch.writer.AddDescPeopleWriter;
import org.springframework.batch.core.Job;
import org.springframework.batch.core.Step;
import org.springframework.batch.core.configuration.annotation.EnableBatchProcessing;
import org.springframework.batch.core.configuration.annotation.JobBuilderFactory;
import org.springframework.batch.core.configuration.annotation.StepBuilderFactory;
import org.springframework.batch.core.launch.support.RunIdIncrementer;
import org.springframework.batch.item.ItemProcessor;
import org.springframework.batch.item.ItemReader;
import org.springframework.batch.item.ItemWriter;
import org.springframework.batch.item.database.JdbcCursorItemReader;
import org.springframework.beans.factory.annotation.Autowired;
import org.springframework.boot.autoconfigure.EnableAutoConfiguration;
import org.springframework.boot.autoconfigure.SpringBootApplication;
import org.springframework.context.annotation.Bean;
import org.springframework.context.annotation.ComponentScan;
import org.springframework.context.annotation.Configuration;
import org.springframework.jdbc.core.BeanPropertyRowMapper;

import javax.sql.DataSource;
//import javax.activation.DataSource;
@Configuration
@EnableBatchProcessing
@SpringBootApplication
@ComponentScan("com.oceanbase.example.batch.writer")
@EnableAutoConfiguration
public class BatchConfig {
@Autowired
private JobBuilderFactory jobBuilderFactory;

@Autowired
private StepBuilderFactory stepBuilderFactory;

@Autowired
private DataSource dataSource;// Use the default dataSource provided by Spring Boot auto-configuration.
@Bean
public ItemReader<People> peopleReader() {
    JdbcCursorItemReader<People> reader = new JdbcCursorItemReader<>();
    reader.setDataSource((javax.sql.DataSource) dataSource);
    reader.setRowMapper(new BeanPropertyRowMapper<>(People.class));
    reader.setSql("SELECT * FROM people");
    return reader;
}

@Bean
public ItemProcessor<People, PeopleDESC> addPeopleDescProcessor() {
    return new AddPeopleDescProcessor();
}

@Bean
public ItemWriter<PeopleDESC> addDescPeopleWriter() {
    return new AddDescPeopleWriter();
}

@Bean
public Step step1(ItemReader<People> reader, ItemProcessor<People, PeopleDESC> processor,
                ItemWriter<PeopleDESC> writer) {
    return stepBuilderFactory.get("step1")
            .<People, PeopleDESC>chunk(10)
            .reader(reader)
            .processor(processor)
            .writer(writer)
            .build();
}

@Bean
public Job importJob(Step step1) {
    return jobBuilderFactory.get("importJob")
            .incrementer(new RunIdIncrementer())
            .flow(step1)
            .end()
            .build();
}
}
package com.oceanbase.example.batch.model;
    public class People {
        private String name;
        private int age;

            // getters and setters

        public String getName() {
            return name;
        }

        public void setName(String name) {
            this.name = name;
        }

        public int getAge() {
            return age;
        }

        public void setAge(int age) {
            this.age = age;
        }
        @Override
        public String toString() {
            return "People [name=" + name + ", age=" + age + "]";
        }
        // Getters and setters
    }
package com.oceanbase.example.batch.model;
    public class PeopleDESC {
        private String name;
        private int age;
        private String desc;
        private int id;

        public String getName() {
            return name;
        }

        public void setName(String name) {
            this.name = name;
        }

        public int getAge() {
            return age;
        }

        public void setAge(int age) {
            this.age = age;
        }

        public String getDesc() {
            return desc;
        }

        public void setDesc(String desc) {
            this.desc = desc;
        }

        public int getId() {
            return id;
        }

        public void setId(int id) {
            this.id = id;
        }

        @Override
        public String toString() {
            return "PeopleDESC [name=" + name + ", age=" + age + ", desc=" + desc + "]";
        }
    }
package com.oceanbase.example.batch.processor;
import com.oceanbase.example.batch.model.People;
import com.oceanbase.example.batch.model.PeopleDESC;
import org.springframework.batch.item.ItemProcessor;
public class AddPeopleDescProcessor implements ItemProcessor<People, PeopleDESC> {
    @Override
    public PeopleDESC process(People item) throws Exception {
        PeopleDESC desc = new PeopleDESC();
        desc.setName(item.getName());
        desc.setAge(item.getAge());
        desc.setDesc("This is " + item.getName() + " with age " + item.getAge());
        return desc;
    }
}
package com.oceanbase.example.batch.writer;
import com.oceanbase.example.batch.model.PeopleDESC;
import org.springframework.batch.item.ItemWriter;
import org.springframework.beans.factory.annotation.Autowired;
import org.springframework.jdbc.core.JdbcTemplate;

import java.util.List;
public class AddDescPeopleWriter implements ItemWriter<PeopleDESC> {
    @Autowired
    private JdbcTemplate jdbcTemplate;
@Override
public void write(List<? extends PeopleDESC> items) throws Exception {
// Drop the table if it exists.
jdbcTemplate.execute("DROP TABLE people_desc");
// Create the table.
String createTableSql = "CREATE TABLE people_desc (id INT PRIMARY KEY, name VARCHAR2(255), age INT, description VARCHAR2(255))";
jdbcTemplate.execute(createTableSql);
for (PeopleDESC item : items) {
String sql = "INSERT INTO people_desc (id, name, age, description) VALUES (?, ?, ?, ?)";
jdbcTemplate.update(sql, item.getId(), item.getName(), item.getAge(), item.getDesc());
}
}
}
package com.oceanbase.example.batch.writer;
import com.oceanbase.example.batch.model.People;
import org.springframework.batch.item.ItemWriter;
import org.springframework.beans.factory.annotation.Autowired;
import org.springframework.jdbc.core.JdbcTemplate;
import org.springframework.stereotype.Component;

import java.util.List;
@Component
public class AddPeopleWriter implements ItemWriter<People> {
    @Autowired
    private JdbcTemplate jdbcTemplate;
@Override
public void write(List<? extends People> items) throws Exception {
// Drop the table if it exists.
jdbcTemplate.execute("DROP TABLE people");
// Create the table.
String createTableSql = "CREATE TABLE people (name VARCHAR2(255), age INT)";
jdbcTemplate.execute(createTableSql);
for (People item : items) {
String sql = "INSERT INTO people (name, age) VALUES (?, ?)";
jdbcTemplate.update(sql, item.getName(), item.getAge());
}
}
}
package com.oceanbase.example.batch.config;
import com.oceanbase.example.batch.writer.AddDescPeopleWriter;
import org.junit.Assert;
import org.junit.jupiter.api.Test;
import org.junit.runner.RunWith;
import org.springframework.batch.core.Job;
import org.springframework.batch.core.JobExecution;
import org.springframework.batch.core.JobParameters;
import org.springframework.batch.core.JobParametersBuilder;
import org.springframework.batch.core.launch.JobLauncher;
import org.springframework.beans.factory.annotation.Autowired;
import org.springframework.boot.test.context.SpringBootTest;
import org.springframework.test.context.junit4.SpringRunner;
import javax.annotation.Resource;
import javax.batch.runtime.BatchStatus;
import java.util.UUID;
@RunWith(SpringRunner.class)
@SpringBootTest
public class BatchConfigTest {
@Test
public void testJob() throws Exception {
JobParameters jobParameters = new JobParametersBuilder()
.addString("jobParam", UUID.randomUUID().toString())
.toJobParameters();
JobLauncherTestUtils jobLauncherTestUtils = new JobLauncherTestUtils();
JobExecution jobExecution = jobLauncherTestUtils.launchJob(jobParameters);
Assert.assertEquals(BatchStatus.COMPLETED.toString(), jobExecution.getStatus().toString());
}
@Autowired
private JobLauncher jobLauncher;
@Autowired
private Job job;
private class JobLauncherTestUtils {
    public JobExecution launchJob(JobParameters jobParameters) throws Exception {
        return jobLauncher.run(job, jobParameters);
    }
}
}
package com.oceanbase.example.batch.processor;
import com.oceanbase.example.batch.model.People;
import com.oceanbase.example.batch.model.PeopleDESC;
import org.junit.jupiter.api.Test;
import org.junit.runner.RunWith;
import org.springframework.beans.factory.annotation.Autowired;
import org.springframework.boot.test.context.SpringBootTest;
import org.springframework.test.context.junit4.SpringRunner;
@RunWith(SpringRunner.class)
@SpringBootTest
public class AddPeopleDescProcessorTest {
@Autowired
private AddPeopleDescProcessor processor;
@Test
public void testProcess() throws Exception {
People people = new People();
// people.setName("John");
// people.setAge(25);
PeopleDESC desc = processor.process(people);
// Assert.assertEquals("John", desc.getName());
// Assert.assertEquals(25, desc.getAge());
// Assert.assertEquals("This is John with age 25", desc.getDesc());
}
}
package com.oceanbase.example.batch.writer;
import com.oceanbase.example.batch.model.PeopleDESC;
import org.junit.Assert;
import org.junit.jupiter.api.Test;
import org.junit.runner.RunWith;
import org.springframework.beans.factory.annotation.Autowired;
import org.springframework.boot.test.context.SpringBootTest;
import org.springframework.jdbc.core.JdbcTemplate;
import org.springframework.test.context.junit4.SpringRunner;

import java.util.ArrayList;
import java.util.List;
@RunWith(SpringRunner.class)
@SpringBootTest
public class AddDescPeopleWriterTest {
@Autowired
private AddDescPeopleWriter writer;
@Autowired
private JdbcTemplate jdbcTemplate;
@Test
public void testWrite() throws Exception {
// Insert data into the people_desc table.
   List<PeopleDESC> peopleDescList = new ArrayList<>();
   PeopleDESC desc1 = new PeopleDESC();
   desc1.setId(1);
   desc1.setName("John");
   desc1.setAge(25);
   desc1.setDesc("This is John with age 25");
   peopleDescList.add(desc1);
   PeopleDESC desc2 = new PeopleDESC();
   desc2.setId(2);
   desc2.setName("Alice");
   desc2.setAge(30);
   desc2.setDesc("This is Alice with age 30");
   peopleDescList.add(desc2);
   writer.write(peopleDescList);

   String selectSql = "SELECT COUNT(*) FROM people_desc";
   int count = jdbcTemplate.queryForObject(selectSql, Integer.class);
   Assert.assertEquals(2, count);
// Output the data in the people_desc table.
List<PeopleDESC> resultDesc = jdbcTemplate.query("SELECT * FROM people_desc", (rs, rowNum) -> {
PeopleDESC desc = new PeopleDESC();
desc.setId(rs.getInt("id"));
desc.setName(rs.getString("name"));
desc.setAge(rs.getInt("age"));
desc.setDesc(rs.getString("description"));
return desc;
});
System.out.println("people_desc table data:");
for (PeopleDESC desc : resultDesc) {
System.out.println(desc);
}
// Output information after the job is completed.
System.out.println("Batch Job execution completed.");
}
}
package com.oceanbase.example.batch.writer;
import com.oceanbase.example.batch.model.People;
import org.junit.jupiter.api.Test;
import org.junit.runner.RunWith;
import org.springframework.beans.factory.annotation.Autowired;
import org.springframework.boot.autoconfigure.SpringBootApplication;
import org.springframework.boot.test.context.SpringBootTest;
import org.springframework.context.annotation.ComponentScan;
import org.springframework.jdbc.core.JdbcTemplate;
import org.springframework.test.context.junit4.SpringRunner;

import java.util.ArrayList;
import java.util.List;
@RunWith(SpringRunner.class)
@SpringBootTest
@SpringBootApplication
@ComponentScan("com.oceanbase.example.batch.writer")
public class AddPeopleWriterTest {
@Autowired
private AddPeopleWriter addPeopleWriter;
@Autowired
private JdbcTemplate jdbcTemplate;
@Test
public void testWrite() throws Exception {
// Insert data into the people table.
   List<People> peopleList = new ArrayList<>();
   People person1 = new People();
   person1.setName("zhangsan");
   person1.setAge(27);
   peopleList.add(person1);
   People person2 = new People();
   person2.setName("lisi");
   person2.setAge(35);
   peopleList.add(person2);
   addPeopleWriter.write(peopleList);
// Query and output the result.
List<People> result = jdbcTemplate.query("SELECT * FROM people", (rs, rowNum) -> {
People person = new People();
person.setName(rs.getString("name"));
person.setAge(rs.getInt("age"));
return person;
});
System.out.println("people table data:");
for (People person : result) {
System.out.println(person);
}
// Output information after the job is completed.
System.out.println("Batch Job execution completed.");
}
}
References
For more information about OceanBase Connector/J, see OceanBase JDBC driver.