
Applicability
Spring JDBC is applicable to OceanBase Database in MySQL and Oracle modes. This topic provides only an example for the MySQL mode.
This topic describes how to build an application by using the Spring JDBC framework, MySQL Connector/J, and OceanBase Database. The application implements basic database operations, including table creation, data insertion, and data query.
 Download the spring-jdbc-mysql-client sample project
  Use Spring JDBC to connect to OceanBase Database (MySQL mode)
 Prerequisites
You have installed OceanBase Database and created a MySQL tenant.
You have installed JDK 1.8 and Maven.
You have installed Eclipse.
Note
The code examples in this topic are run in Eclipse IDE for Java Developers 2022-03. You can also use any other tool of your choice to run the code examples.
Procedure
Note
The following steps are for compiling and running the project in the Windows environment by using Eclipse IDE for Java Developers 2022-03. If you are using a different operating system or compiler, the steps may vary slightly.
- Import the
spring-jdbc-mysql-clientproject into Eclipse. - Obtain the URL of OceanBase Database.
- Modify the database connection information in the
spring-jdbc-mysql-clientproject. - Run the
spring-jdbc-mysql-clientproject.
Step 1: Import the spring-jdbc-mysql-client project into Eclipse
Start Eclipse and choose File > Open Projects from File System.
In the dialog box that appears, click Directory to select the project directory, and then click Finish.
Note
When you import a Maven project into Eclipse, it automatically detects the
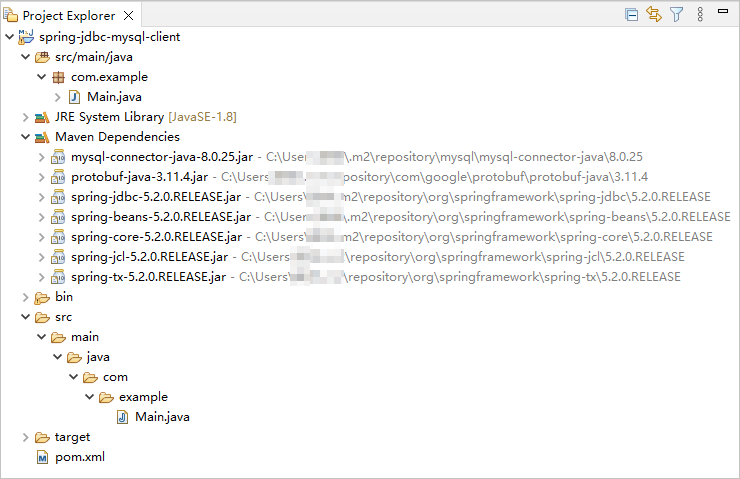
pom.xmlfile in the project, downloads the required dependency libraries based on the described dependencies, and adds them to the project.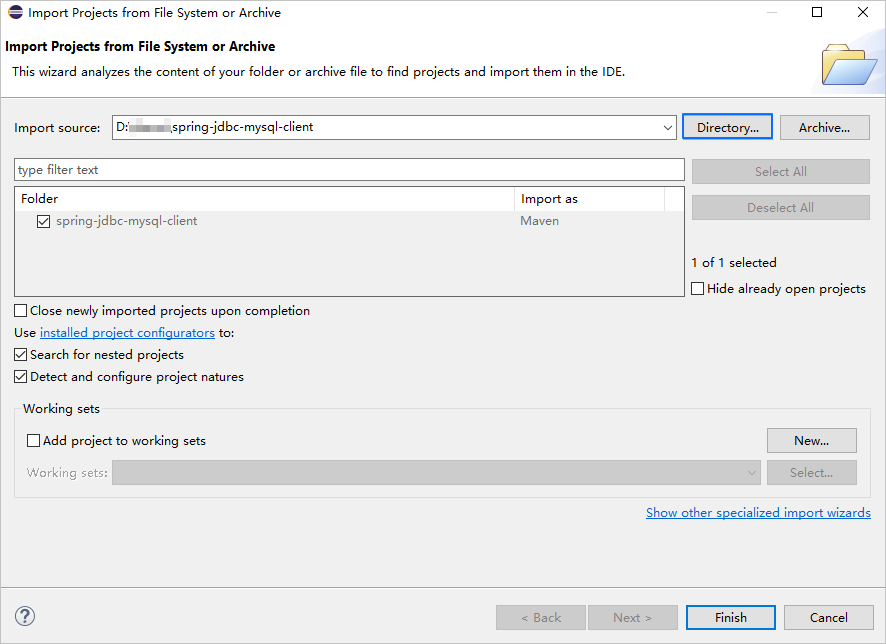
View the project.
Step 2: Obtain the URL of OceanBase Database
Contact the OceanBase Database deployment personnel or administrator to obtain the database connection string.
Example:
obclient -hxxx.xxx.xxx.xxx -P2881 -utest_user001@mysql001 -p****** -DtestFill in the corresponding information in the URL based on the OceanBase Database connection string.
jdbc:mysql://$host:$port/$database_name?user=$user_name&password=$password&useSSL=falseParameter description:
$host: the IP address for connecting to OceanBase Database. For connection through OceanBase Database Proxy (ODP), use the IP address of an ODP. For direct connection, use the IP address of an OBServer node.$port: the port for connecting to OceanBase Database. For connection through ODP, the default port is2883, which can be customized when ODP is deployed. For direct connection, the default port is2881, which can be customized when OceanBase Database is deployed.$database_name: the name of the database to be accessed.Notice
The user for connecting to the tenant must have the
CREATE,INSERT,UPDATE,DELETE,SELECT, andDROPprivileges on the database.$user_name: the tenant account. For connection through ODP, the common format isusername@tenant name#cluster nameorcluster name:tenant name:username. For direct connection, the format isusername@tenant name.$password: the account password.
For more information about the connection properties of MySQL Connector/J, see Configuration Properties.
Example:
jdbc:mysql://xxx.xxx.xxx.xxx:2881/test?user=test_user001@mysql001&password=******&useSSL=false
Step 3: Modify the database connection information in the spring-jdbc-mysql-client project
Modify the database connection information in the spring-jdbc-mysql-client/src/main/java/com/example/Main.java file based on the information obtained in Step 2: Obtain the URL of OceanBase Database.
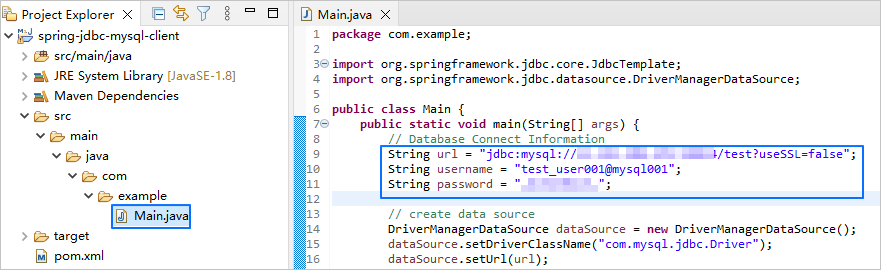
Example:
- The IP address of the OBServer node is
xxx.xxx.xxx.xxx. - The access port is 2881.
- The name of the database to be accessed is
test. - The tenant account is
test_user001@mysql001.mysql001is a MySQL user tenant created in OceanBase Database, andtest_user001is the username of themysql001tenant. - The password is
******.
Sample code:
...
        String url = "jdbc:mysql://xxx.xxx.xxx.xxx:2881/test?useSSL=false";
        String username = "test_user001@mysql001";
        String password = "******";
...
Step 4: Run the spring-jdbc-mysql-client project
In the Project Explorer view, find and expand the src/main/java directory.
Right-click the Main.java file and choose Run As > Java Application.
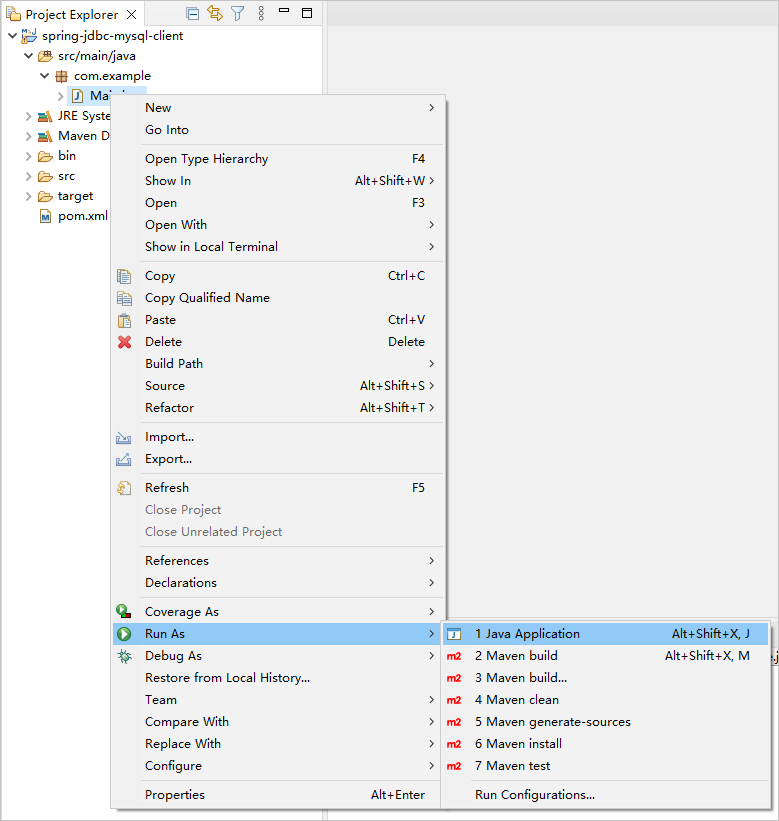
View the output in the console window of Eclipse.

Project code introduction
Click spring-jdbc-mysql-client to download the project code, which is a compressed file named spring-jdbc-mysql-client.zip.
After decompressing it, you will find a folder named spring-jdbc-mysql-client. The directory structure is as follows:
spring-jdbc-mysql-client
├── src
│   └── main
│       └── java
│           └── com
│                └── example
│                   └── Main.java
└── pom.xml
File description:
src: the root directory for source code.main: the main code directory, containing the core logic of the application.java: the directory for Java source code.com: the directory for Java packages.example: the directory for packages of the sample project.Main.java: the main class, containing logic for creating tables and inserting data.pom.xml: the configuration file for the Maven project, used to manage project dependencies and build settings.
Code in pom.xml
The pom.xml file is a configuration file for a Maven project. It defines the project's dependencies, plugins, and build rules. Maven is a Java project management tool that can automatically download dependencies, compile, and package projects.
The pom.xml file in this topic contains the following main parts:
The file declaration statement.
This statement declares the file as an XML file using XML version
1.0and character encodingUTF-8.Sample code:
<?xml version="1.0" encoding="UTF-8"?>The POM namespace and model version.
- The
xmlnsattribute specifies the POM namespace ashttp://maven.apache.org/POM/4.0.0. - The
xmlns:xsiattribute specifies the XML namespace ashttp://www.w3.org/2001/XMLSchema-instance. - The
xsi:schemaLocationattribute specifies the POM namespace ashttp://maven.apache.org/POM/4.0.0and the location of the POM XSD file ashttp://maven.apache.org/xsd/maven-4.0.0.xsd. - The
<modelVersion>element specifies the POM model version as4.0.0.
Sample code:
<project xmlns="http://maven.apache.org/POM/4.0.0" xmlns:xsi="http://www.w3.org/2001/XMLSchema-instance" xsi:schemaLocation="http://maven.apache.org/POM/4.0.0 http://maven.apache.org/xsd/maven-4.0.0.xsd"> <modelVersion>4.0.0</modelVersion> <!-- Other configurations --> </project>- The
Basic information configuration.
- The
<groupId>element specifies the project's organization ascom.example. - The
<artifactId>element specifies the project name asspring-jdbc-mysql-client. - The
<version>element specifies the project version as1.0-SNAPSHOT.
Sample code:
<groupId>com.example</groupId> <artifactId>spring-jdbc-mysql-client</artifactId> <version>1.0-SNAPSHOT</version>- The
Project source file properties configuration.
The Maven compiler plugin is set to
maven-compiler-plugin, and both the source and target Java versions are set to 8. This means that the project's source code is written using Java 8 features, and the compiled bytecode will be compatible with the Java 8 runtime environment. This configuration ensures that the project can correctly handle Java 8 syntax and features during compilation and runtime.Note
Java 1.8 and Java 8 are different names for the same version.
Sample code:
    <build>
        <plugins>
            <plugin>
                <groupId>org.apache.maven.plugins</groupId>
                <artifactId>maven-compiler-plugin</artifactId>
                <configuration>
                    <source>8</source>
                    <target>8</target>
                </configuration>
            </plugin>
        </plugins>
    </build>
Project dependency configuration.
Add the
mysql-connector-javadependency library for database interaction:Note
This section of code defines the project's dependency as MySQL Connector/J V5.1.40. For information about other versions, see MySQL Connector/J.
- The
<groupId>element specifies the dependency's organization asmysql. - The
<artifactId>element specifies the dependency name asmysql-connector-java. - The
<version>element specifies the dependency version as5.1.40.
Sample code:
<dependency> <groupId>mysql</groupId> <artifactId>mysql-connector-java</artifactId> <version>5.1.40</version> </dependency>- The
Add the
spring-jdbcdependency library:- The
<groupId>element specifies the dependency's organization asorg.springframework. - The
<artifactId>element specifies the dependency name asspring-jdbc. - The
<version>element specifies the dependency version as5.2.0.RELEASE.
Sample code:
<dependency> <groupId>org.springframework</groupId> <artifactId>spring-jdbc</artifactId> <version>5.2.0.RELEASE</version> </dependency>- The
Main.java code introduction
The Main.java file is part of the sample program, and the code demonstrates how to use the Spring JDBC framework to perform database operations. It first configures the database connection information and then creates a JdbcTemplate object to execute database operations. The code also includes examples of creating tables, inserting data, and querying data.
The code in the Main.java file in this topic mainly includes the following parts:
Define the package and import the necessary classes.
- Declare the package name of the current code as
com.example. - Import the
JdbcTemplateclass, which is the core class of the Spring JDBC framework and is used to execute database operations. - Import the
DriverManagerDataSourceclass, which is a data source class provided by Spring that implements theDataSourceinterface and is used to configure database connection information.
Sample code:
package com.example; import org.springframework.jdbc.core.JdbcTemplate; import org.springframework.jdbc.datasource.DriverManagerDataSource;- Declare the package name of the current code as
Create a
Mainclass and define themainmethod.- Define a public class named
Mainas the entry point of the program. The class name must be consistent with the file name. - Define a public static method
mainas the starting point of the program. - Other database operations.
Sample code:
public class Main { public static void main(String[] args) { // Database connection information // Create a data source // Create a JdbcTemplate object // Create a table // Insert data // Update data // Delete data // Query data // Delete a table } }- Define a public class named
Define the database connection information.
Define the URL, username, and password for connecting to the database. You need to replace
$host,$port,$database_name,$user_name, and$passwordwith the actual database connection information.Sample code:
        String url = "jdbc:mysql://$host:$port/$database_name?useSSL=false";
        String username = "$user_name";
        String password = "$password";
Parameter description:
$host: the IP address for connecting to OceanBase Database. For ODP connection, use an ODP address. For direct connection, use the IP address of an OBServer node.$port: the port for connecting to OceanBase Database. For ODP connection, the default port is2883, which can be customized when ODP is deployed. For direct connection, the default port is2881, which can be customized when OceanBase Database is deployed.$database_name: the name of the database to be accessed.$user_name: specified by the-uparameter, in the format of user@tenant#cluster name or username@SERVICE:service name. When the format user@tenant#cluster name is used, the default tenant issysand the administrator user isroot. When directly connecting to the database, the cluster name can be omitted. When connecting through ODP, the cluster name must be specified.$password: the account password.
Create a data source.
Create a
DriverManagerDataSourceobject and configure the database connection information, including the driver class name, database URL, username, and password. The specific steps are as follows:- Create a
DriverManagerDataSourceobject to configure the database connection information. - Set the driver class name: call the
setDriverClassNamemethod to set the database driver class name tocom.mysql.jdbc.Driver. - Set the database URL: call the
setUrlmethod to set the database URL. - Set the username: call the
setUsernamemethod to set the database username. - Set the password: call the
setPasswordmethod to set the database password.
Sample code:
DriverManagerDataSource dataSource = new DriverManagerDataSource(); dataSource.setDriverClassName("com.mysql.jdbc.Driver"); dataSource.setUrl(url); dataSource.setUsername(username); dataSource.setPassword(password);- Create a
Create a
JdbcTemplateobject.Create a
JdbcTemplateobject, which is one of the core classes of the Spring JDBC framework. TheJdbcTemplateclass provides methods for performing database operations, such as executing SQL statements, updating data, and querying data.Sample code:
JdbcTemplate jdbcTemplate = new JdbcTemplate(dataSource);Create a table.
- Define an SQL statement for creating a table. The SQL statement specifies the table name as
test_springjdbcand defines two columns: one is anINTtype column namedid, and the other is aVARCHAR(20)type column namedname. - Execute the SQL statement for creating a table. The
jdbcTemplateobject calls theexecutemethod to execute the SQL statement defined above. - Output a message indicating that the table was successfully created.
Sample code:
String createTableSql = "CREATE TABLE test_springjdbc (id INT, name VARCHAR(20))"; jdbcTemplate.execute(createTableSql); System.out.println("Create table successfully.");- Define an SQL statement for creating a table. The SQL statement specifies the table name as
Insert data.
- Define an SQL statement for inserting data. The SQL statement specifies the table to insert data into as
test_springjdbc, with columnsidandname, and inserts three rows of data:(1,'A1'),(2,'A2'), and(3,'A3'). - Execute the SQL statement for inserting data. The
jdbcTemplateobject calls theupdatemethod to execute the SQL statement defined above. - Output a message indicating that the data was successfully inserted.
Sample code:
String insertDataSql = "INSERT INTO test_springjdbc (id,name) VALUES (1,'A1'), (2,'A2'), (3,'A3')"; jdbcTemplate.update(insertDataSql); System.out.println("Insert data successfully.");- Define an SQL statement for inserting data. The SQL statement specifies the table to insert data into as
Update data.
- Define an SQL statement for updating the
namefield of the record withidequal to1in thetest_springjdbctable toA11. - Execute the SQL statement through the
jdbcTemplateobject to apply the update operation to the database. - Output a message indicating that the data was successfully updated.
Sample code:
String updateDataSql = "UPDATE test_springjdbc SET name = 'A11' WHERE id = 1"; jdbcTemplate.update(updateDataSql); System.out.println("Update data successfully.");- Define an SQL statement for updating the
Delete data.
- Define an SQL statement for deleting the record with
idequal to2from thetest_springjdbctable. - Execute the SQL statement through the
jdbcTemplateobject to apply the delete operation to the database. - Output a message indicating that the data was successfully deleted.
Sample code:
String deleteDataSql = "DELETE FROM test_springjdbc WHERE id = 2"; jdbcTemplate.update(deleteDataSql); System.out.println("Delete data successfully.");- Define an SQL statement for deleting the record with
Query data.
- Define an SQL statement to query data from the
test_springjdbctable. The SQL statement usesSELECT *to select all columns. - Execute the SQL statement to query data. The
jdbcTemplateobject calls thequerymethod to execute the SQL statement and receives a callback function as a parameter. - In the callback function, use the
ResultSetobject (rs) to obtain each row of data from the query result and process it. The callback function uses thegetIntandgetStringmethods to obtain the values of theidandnamecolumns from theResultSetobject and prints them to the console. Finally, the callback function returnsnull. - Output a message indicating that the data query was successful.
Sample code:
String selectDataSql = "SELECT * FROM test_springjdbc"; jdbcTemplate.query(selectDataSql, (rs, rowNum) -> { int id = rs.getInt("id"); String name = rs.getString("name"); System.out.println("id: " + id + ", name: " + name); return null; }); System.out.println("Query data successfully.");- Define an SQL statement to query data from the
Delete the table.
- Define an SQL statement to delete the
test_springjdbctable from the database. - Execute the SQL statement using the
jdbcTemplateobject to apply the table deletion operation to the database. - Output a message indicating that the table was successfully deleted.
Sample code:
String deleteTableSql = "DROP TABLE test_springjdbc"; jdbcTemplate.execute(deleteTableSql); System.out.println("Table drop successfully.");- Define an SQL statement to delete the
Complete code
<?xml version="1.0" encoding="UTF-8"?>
<project xmlns="http://maven.apache.org/POM/4.0.0"
         xmlns:xsi="http://www.w3.org/2001/XMLSchema-instance"
         xsi:schemaLocation="http://maven.apache.org/POM/4.0.0 http://maven.apache.org/xsd/maven-4.0.0.xsd">
    <modelVersion>4.0.0</modelVersion>

    <groupId>com.example</groupId>
    <artifactId>spring-jdbc-mysql-client</artifactId>
    <version>1.0-SNAPSHOT</version>

    <build>
        <plugins>
            <plugin>
                <groupId>org.apache.maven.plugins</groupId>
                <artifactId>maven-compiler-plugin</artifactId>
                <configuration>
                    <source>8</source>
                    <target>8</target>
                </configuration>
            </plugin>
        </plugins>
    </build>

    <dependencies>
        <dependency>
            <groupId>mysql</groupId>
            <artifactId>mysql-connector-java</artifactId>
            <version>5.1.40</version>
        </dependency>
        <dependency>
            <groupId>org.springframework</groupId>
            <artifactId>spring-jdbc</artifactId>
            <version>5.2.0.RELEASE</version>
        </dependency>
    </dependencies>

</project>
package com.example;

import org.springframework.jdbc.core.JdbcTemplate;
import org.springframework.jdbc.datasource.DriverManagerDataSource;

public class Main {
    public static void main(String[] args) {
        // Database Connect Information
        String url = "jdbc:mysql://$host:$port/$database_name?useSSL=false";
        String username = "$user_name";
        String password = "$password";

        // create data source
        DriverManagerDataSource dataSource = new DriverManagerDataSource();
        dataSource.setDriverClassName("com.mysql.jdbc.Driver");
        dataSource.setUrl(url);
        dataSource.setUsername(username);
        dataSource.setPassword(password);

        // Create a JdbcTemplate object
        JdbcTemplate jdbcTemplate = new JdbcTemplate(dataSource);

        // Create table
        String createTableSql = "CREATE TABLE test_springjdbc (id INT, name VARCHAR(20))";
        jdbcTemplate.execute(createTableSql);
        System.out.println("Create table successfully.");

        // Insert data
        String insertDataSql = "INSERT INTO test_springjdbc (id,name) VALUES (1,'A1'), (2,'A2'), (3,'A3')";
        jdbcTemplate.update(insertDataSql);
        System.out.println("Insert data successfully.");

        // Update data
        String updateDataSql = "UPDATE test_springjdbc SET name = 'A11' WHERE id = 1";
        jdbcTemplate.update(updateDataSql);
        System.out.println("Update data successfully.");

        // Delete data
        String deleteDataSql = "DELETE FROM test_springjdbc WHERE id = 2";
        jdbcTemplate.update(deleteDataSql);
        System.out.println("Delete data successfully.");

        // Query data
        String selectDataSql = "SELECT * FROM test_springjdbc";
        jdbcTemplate.query(selectDataSql, (rs, rowNum) -> {
            int id = rs.getInt("id");
            String name = rs.getString("name");
            System.out.println("id: " + id + ", name: " + name);
            return null;
        });
        System.out.println("Query data successfully.");

        // Delete table
        String deleteTableSql = "DROP TABLE test_springjdbc";
        jdbcTemplate.execute(deleteTableSql);
        System.out.println("Table drop successfully.");
    }
}
References
For more information about MySQL Connector/J, see Overview of MySQL Connector/J. MySQL Mode|
This topic describes how to build an application by using the Spring JDBC framework, MySQL Connector/J, and OceanBase Database. The application can perform basic database operations, such as creating tables, inserting data, and querying data.
 Download the spring-jdbc-mysql-client sample project
  Connect to OceanBase Database by using Spring JDBC (MySQL mode)
Prerequisites
You have installed OceanBase Database and created a MySQL tenant.
You have installed JDK 1.8 and Maven.
You have installed Eclipse.
Note
The code examples in this topic are run in Eclipse IDE for Java Developers 2022-03. You can also use other tools that you prefer.
Procedure
Note
The following steps are for compiling and running the project in the Windows environment by using Eclipse IDE for Java Developers 2022-03. If you are using other operating systems or compilers, the steps may vary slightly.
- Import the
spring-jdbc-mysql-clientproject into Eclipse. - Obtain the URL of OceanBase Database.
- Modify the database connection information in the
spring-jdbc-mysql-clientproject. - Run the
spring-jdbc-mysql-clientproject.
Step 1: Import the spring-jdbc-mysql-client project into Eclipse
Start Eclipse and choose File > Open Projects from File System.
In the dialog box that appears, click Directory to select the project directory and then click Finish.
Note
When you import a Maven project into Eclipse, it automatically detects the
pom.xmlfile in the project, downloads the required dependency libraries based on the described dependencies, and adds them to the project.View the project.
Step 2: Obtain the URL of OceanBase Database
Contact the deployment personnel or administrator of OceanBase Database to obtain the database connection string.
Here is an example:
obclient -hxxx.xxx.xxx.xxx -P2881 -utest_user001@mysql001 -p****** -DtestFill in the corresponding information in the URL based on the OceanBase Database connection string.
jdbc:mysql://$host:$port/$database_name?user=$user_name&password=$password&useSSL=falseParameter description:
$host: the IP address for connecting to OceanBase Database. For the connection through OceanBase Database Proxy (ODP), use the IP address of an ODP. For direct connection, use the IP address of an OBServer node.$port: the port for connecting to OceanBase Database. For the connection through ODP, the default port is2883, which can be customized when ODP is deployed. For direct connection, the default port is2881, which can be customized when OceanBase Database is deployed.$database_name: the name of the database to be accessed.Notice
The user for connecting to the tenant must have the
CREATE,INSERT,UPDATE,DELETE,SELECT, andDROPprivileges on the database.$user_name: the tenant account. For the connection through ODP, the common format isusername@tenant name#cluster nameorcluster name:tenant name:username. For direct connection, the format isusername@tenant name.$password: the account password.
For more information about the connection properties of MySQL Connector/J, see Configuration Properties.
Here is an example:
jdbc:mysql://xxx.xxx.xxx.xxx:2881/test?user=test_user001@mysql001&password=******&useSSL=false
Step 3: Modify the database connection information in the spring-jdbc-mysql-client project
Based on the information obtained in Step 2: Obtain the URL of OceanBase Database, modify the database connection information in the spring-jdbc-mysql-client/src/main/java/com/example/Main.java file.
Here is an example:
- The IP address of an OBServer node is
xxx.xxx.xxx.xxx. - The access port is 2881.
- The name of the database to be accessed is
test. - The tenant account is
test_user001@mysql001.mysql001is a MySQL tenant created in OceanBase Database, andtest_user001is the username of themysql001tenant. - The password is
******.
Sample code:
...
        String url = "jdbc:mysql://xxx.xxx.xxx.xxx:2881/test?useSSL=false";
        String username = "test_user001@mysql001";
        String password = "******";
...
Step 4: Run the spring-jdbc-mysql-client project
In the Project Explorer view, find and expand the src/main/java directory.
Right-click the Main.java file and choose Run As > Java Application.
View the output in the console window of Eclipse.
Project code introduction
Click spring-jdbc-mysql-client to download the project code, which is a compressed file named spring-jdbc-mysql-client.zip.
After decompressing it, you will find a folder named spring-jdbc-mysql-client. The directory structure is as follows:
spring-jdbc-mysql-client
├── src
│   └── main
│       └── java
│           └── com
│                └── example
│                   └── Main.java
└── pom.xml
File description:
src: the root directory for source code.main: the main code directory, containing the core logic of the application.java: the directory for Java source code.com: the directory for Java packages.example: the directory for packages in the sample project.Main.java: the main class, containing logic such as table creation and data insertion.pom.xml: the configuration file for the Maven project, used to manage project dependencies and build settings.
Introduction to the pom.xml file
The pom.xml file is a configuration file for Maven projects. It defines the project's dependencies, plugins, and build rules. Maven is a Java project management tool that can automatically download dependencies, compile, and package projects.
The pom.xml file in this topic includes the following main sections:
File declaration statement.
This statement declares the file as an XML file using XML version
1.0and character encodingUTF-8.Sample code:
<?xml version="1.0" encoding="UTF-8"?>Configure the namespace and POM model version.
- Use
xmlnsto set the POM namespace tohttp://maven.apache.org/POM/4.0.0. - Use
xmlns:xsito set the XML namespace tohttp://www.w3.org/2001/XMLSchema-instance. - Use
xsi:schemaLocationto set the POM namespace tohttp://maven.apache.org/POM/4.0.0and the location of the POM XSD file tohttp://maven.apache.org/xsd/maven-4.0.0.xsd. - Use
<modelVersion>to set the POM model version to4.0.0.
Sample code:
<project xmlns="http://maven.apache.org/POM/4.0.0" xmlns:xsi="http://www.w3.org/2001/XMLSchema-instance" xsi:schemaLocation="http://maven.apache.org/POM/4.0.0 http://maven.apache.org/xsd/maven-4.0.0.xsd"> <modelVersion>4.0.0</modelVersion> <!-- Other configurations --> </project>- Use
Configure basic information.
- Use
<groupId>to set the project's group ID tocom.example. - Use
<artifactId>to set the project name tospring-jdbc-mysql-client. - Use
<version>to set the project version to1.0-SNAPSHOT.
Sample code:
<groupId>com.example</groupId> <artifactId>spring-jdbc-mysql-client</artifactId> <version>1.0-SNAPSHOT</version>- Use
Configure the properties of the project's source files.
Set the Maven compiler plugin to
maven-compiler-pluginand specify that the source and target Java versions are both 8. This means that the project's source code uses Java 8 features, and the compiled bytecode will be compatible with the Java 8 runtime environment. This configuration ensures that the project can correctly handle Java 8 syntax and features during compilation and runtime.Note
Java 1.8 and Java 8 are different names for the same version.
Sample code:
    <build>
        <plugins>
            <plugin>
                <groupId>org.apache.maven.plugins</groupId>
                <artifactId>maven-compiler-plugin</artifactId>
                <configuration>
                    <source>8</source>
                    <target>8</target>
                </configuration>
            </plugin>
        </plugins>
    </build>
Configure the components that the project depends on.
Add the
mysql-connector-javadependency library for database interaction:Note
This section defines the project's dependency on MySQL Connector/J version 5.1.40. For information about other versions, see MySQL Connector/J.
- Use
<groupId>to set the dependency's group ID tomysql. - Use
<artifactId>to set the dependency name tomysql-connector-java. - Use
<version>to set the dependency version to5.1.40.
Sample code:
<dependency> <groupId>mysql</groupId> <artifactId>mysql-connector-java</artifactId> <version>5.1.40</version> </dependency>- Use
Add the
spring-jdbcdependency library:- Use
<groupId>to set the dependency's group ID toorg.springframework. - Use
<artifactId>to set the dependency name tospring-jdbc. - Use
<version>to set the dependency version to5.2.0.RELEASE.
Sample code:
<dependency> <groupId>org.springframework</groupId> <artifactId>spring-jdbc</artifactId> <version>5.2.0.RELEASE</version> </dependency>- Use
Main.java code introduction
The Main.java file is part of the sample program. The code demonstrates how to use the Spring JDBC framework to perform database operations. It first configures the database connection information and then creates a JdbcTemplate object to execute database operations. The code also includes examples of creating tables, inserting data, and querying data.
The code in the Main.java file in this topic mainly includes the following parts:
Define the package and import the necessary classes.
- Declare the package name of the current code as
com.example. - Import the
JdbcTemplateclass, which is the core class in the Spring JDBC framework for executing database operations. - Import the
DriverManagerDataSourceclass, which is a data source class provided by Spring that implements theDataSourceinterface and is used to configure database connection information.
Sample code:
package com.example; import org.springframework.jdbc.core.JdbcTemplate; import org.springframework.jdbc.datasource.DriverManagerDataSource;- Declare the package name of the current code as
Create a
Mainclass and define themainmethod.- Define a public class named
Mainas the entry point of the program. The class name must be consistent with the file name. - Define a public static method
mainas the starting point of the program. - Other database operations.
Sample code:
public class Main { public static void main(String[] args) { // Database connection information // Create a data source // Create a JdbcTemplate object // Create a table // Insert data // Update data // Delete data // Query data // Delete the table } }- Define a public class named
Define the database connection information.
Define the URL, username, and password for connecting to the database. You need to replace
$host,$port,$database_name,$user_name, and$passwordwith the actual database connection information.Sample code:
        String url = "jdbc:mysql://$host:$port/$database_name?useSSL=false";
        String username = "$user_name";
        String password = "$password";
Parameter description:
$host: the IP address for connecting to OceanBase Database. For ODP connection, use an ODP address. For direct connection, use the IP address of an OBServer node.$port: the port for connecting to OceanBase Database. For ODP connection, the default value is2883, which can be customized when ODP is deployed. For direct connection, the default value is2881, which can be customized when OceanBase Database is deployed.$database_name: the name of the database to be accessed.$user_name: the tenant connection account. For ODP connection, the common format isusername@tenant name#cluster nameorcluster name:tenant name:username. For direct connection, the format isusername@tenant name.$password: the account password.
Create a data source.
Create a
DriverManagerDataSourceobject and configure the database connection information, including the driver class name, database URL, username, and password. The specific steps are as follows:- Create a
DriverManagerDataSourceobject to configure the database connection information. - Set the driver class name: call the
setDriverClassNamemethod to set the database driver class name tocom.mysql.jdbc.Driver. - Set the database URL: call the
setUrlmethod to set the database URL. - Set the username: call the
setUsernamemethod to set the database username. - Set the password: call the
setPasswordmethod to set the database password.
Sample code:
DriverManagerDataSource dataSource = new DriverManagerDataSource(); dataSource.setDriverClassName("com.mysql.jdbc.Driver"); dataSource.setUrl(url); dataSource.setUsername(username); dataSource.setPassword(password);- Create a
Create a
JdbcTemplateobject.Create a
JdbcTemplateobject, which is one of the core classes in the Spring JDBC framework. TheJdbcTemplateclass provides methods for executing database operations, such as executing SQL statements, updating data, and querying data.Sample code:
JdbcTemplate jdbcTemplate = new JdbcTemplate(dataSource);Create a table.
- Define an SQL statement for creating a table. The SQL statement specifies the table name as
test_springjdbcand defines two columns: anidcolumn of theINTtype and anamecolumn of theVARCHAR(20)type. - Execute the SQL statement for creating the table. The
jdbcTemplateobject calls theexecutemethod to execute the SQL statement for creating the table. - Output a message indicating that the table was successfully created to the console.
Sample code:
String createTableSql = "CREATE TABLE test_springjdbc (id INT, name VARCHAR(20))"; jdbcTemplate.execute(createTableSql); System.out.println("Create table successfully.");- Define an SQL statement for creating a table. The SQL statement specifies the table name as
Insert data.
- Define an SQL statement for inserting data. The SQL statement specifies the table to be inserted into as
test_springjdbc, the columns asidandname, and the data to be inserted as(1,'A1'),(2,'A2'), and(3,'A3'). - Execute the SQL statement for inserting data. The
jdbcTemplateobject calls theupdatemethod to execute the SQL statement for inserting data. - Output a message indicating that the data was successfully inserted to the console.
Sample code:
String insertDataSql = "INSERT INTO test_springjdbc (id,name) VALUES (1,'A1'), (2,'A2'), (3,'A3')"; jdbcTemplate.update(insertDataSql); System.out.println("Insert data successfully.");- Define an SQL statement for inserting data. The SQL statement specifies the table to be inserted into as
Update data.
- Define an SQL statement for updating the
namefield of the record withidequal to1in thetest_springjdbctable toA11. - Execute the SQL statement using the
jdbcTemplateobject to apply the update operation to the database. - Output a message indicating that the data was successfully updated to the console.
Sample code:
String updateDataSql = "UPDATE test_springjdbc SET name = 'A11' WHERE id = 1"; jdbcTemplate.update(updateDataSql); System.out.println("Update data successfully.");- Define an SQL statement for updating the
Delete data.
- Define an SQL statement for deleting the record with
idequal to2from thetest_springjdbctable. - Execute the SQL statement using the
jdbcTemplateobject to apply the delete operation to the database. - Output a message indicating that the data was successfully deleted to the console.
Sample code:
String deleteDataSql = "DELETE FROM test_springjdbc WHERE id = 2"; jdbcTemplate.update(deleteDataSql); System.out.println("Delete data successfully.");- Define an SQL statement for deleting the record with
Query data.
- Define an SQL statement for querying data. The SQL statement uses
SELECT *to select all columns from thetest_springjdbctable. - Execute the SQL statement for querying data. The
jdbcTemplateobject calls thequerymethod to execute the SQL statement for querying data and receives a callback function as a parameter. - The code in the callback function uses the
ResultSetobject (rs) to retrieve each row of data from the query result and process it. The callback function uses thegetIntandgetStringmethods to retrieve the values of theidandnamecolumns from theResultSetobject and prints them to the console. Finally, the callback function returnsnull. - Output a message indicating that the data was successfully queried to the console.
Sample code:
String selectDataSql = "SELECT * FROM test_springjdbc"; jdbcTemplate.query(selectDataSql, (rs, rowNum) -> { int id = rs.getInt("id"); String name = rs.getString("name"); System.out.println("id: " + id + ", name: " + name); return null; }); System.out.println("Query data successfully.");- Define an SQL statement for querying data. The SQL statement uses
Drop the table.
- Define an SQL statement to drop the
test_springjdbctable in the database. - Execute the SQL statement using the
jdbcTemplateobject to apply the drop table operation to the database. - Output a message indicating that the table was successfully dropped.
Sample code:
String deleteTableSql = "DROP TABLE test_springjdbc"; jdbcTemplate.execute(deleteTableSql); System.out.println("Table drop successfully.");- Define an SQL statement to drop the
Complete code
<?xml version="1.0" encoding="UTF-8"?>
<project xmlns="http://maven.apache.org/POM/4.0.0"
         xmlns:xsi="http://www.w3.org/2001/XMLSchema-instance"
         xsi:schemaLocation="http://maven.apache.org/POM/4.0.0 http://maven.apache.org/xsd/maven-4.0.0.xsd">
    <modelVersion>4.0.0</modelVersion>

    <groupId>com.example</groupId>
    <artifactId>spring-jdbc-mysql-client</artifactId>
    <version>1.0-SNAPSHOT</version>

    <build>
        <plugins>
            <plugin>
                <groupId>org.apache.maven.plugins</groupId>
                <artifactId>maven-compiler-plugin</artifactId>
                <configuration>
                    <source>8</source>
                    <target>8</target>
                </configuration>
            </plugin>
        </plugins>
    </build>

    <dependencies>
        <dependency>
            <groupId>mysql</groupId>
            <artifactId>mysql-connector-java</artifactId>
            <version>5.1.40</version>
        </dependency>
        <dependency>
            <groupId>org.springframework</groupId>
            <artifactId>spring-jdbc</artifactId>
            <version>5.2.0.RELEASE</version>
        </dependency>
    </dependencies>

</project>
package com.example;

import org.springframework.jdbc.core.JdbcTemplate;
import org.springframework.jdbc.datasource.DriverManagerDataSource;

public class Main {
    public static void main(String[] args) {
        // Database Connect Information
        String url = "jdbc:mysql://$host:$port/$database_name?useSSL=false";
        String username = "$user_name";
        String password = "$password";

        // create data source
        DriverManagerDataSource dataSource = new DriverManagerDataSource();
        dataSource.setDriverClassName("com.mysql.jdbc.Driver");
        dataSource.setUrl(url);
        dataSource.setUsername(username);
        dataSource.setPassword(password);

        // Create a JdbcTemplate object
        JdbcTemplate jdbcTemplate = new JdbcTemplate(dataSource);

        // Create table
        String createTableSql = "CREATE TABLE test_springjdbc (id INT, name VARCHAR(20))";
        jdbcTemplate.execute(createTableSql);
        System.out.println("Create table successfully.");

        // Insert data
        String insertDataSql = "INSERT INTO test_springjdbc (id,name) VALUES (1,'A1'), (2,'A2'), (3,'A3')";
        jdbcTemplate.update(insertDataSql);
        System.out.println("Insert data successfully.");

        // Update data
        String updateDataSql = "UPDATE test_springjdbc SET name = 'A11' WHERE id = 1";
        jdbcTemplate.update(updateDataSql);
        System.out.println("Update data successfully.");

        // Delete data
        String deleteDataSql = "DELETE FROM test_springjdbc WHERE id = 2";
        jdbcTemplate.update(deleteDataSql);
        System.out.println("Delete data successfully.");

        // Query data
        String selectDataSql = "SELECT * FROM test_springjdbc";
        jdbcTemplate.query(selectDataSql, (rs, rowNum) -> {
            int id = rs.getInt("id");
            String name = rs.getString("name");
            System.out.println("id: " + id + ", name: " + name);
            return null;
        });
        System.out.println("Query data successfully.");

        // Delete table
        String deleteTableSql = "DROP TABLE test_springjdbc";
        jdbcTemplate.execute(deleteTableSql);
        System.out.println("Table drop successfully.");
    }
}
References
For more information about MySQL Connector/J, see Overview of MySQL Connector/J.