ODC supports visualized view creation. This topic describes how to create a view with ODC.
Overview
A view is a virtual table that consists of data in one or more tables. You can use the SELECT statement to query a view. A view itself does not contain data.
Purposes of views
Simplifies data queries: You can use views to combine data from different tables in a database into a single virtual table, and thereby convert multi-table queries into a single-table query.
Controls data access: You can use views to present certain data to specific users. These users can view only the data in a specific view.

As shown in the preceding figure, you can create a view in the following five steps:
Specify the basic information.
Select base tables.
Select fields.
Verify the SQL statement.
Complete the view creation.
Procedure
In the following example, an employee salary view is created in the OceanBase Developer Center (ODC) console. The salary view consists of the name field in the employee table and the budget and dept_name fields in the consumer table. Procedure:
Step 1: Specify the basic information.
Log on to the ODC console and click the name of the desired connection to go to the corresponding connection management page. You can click View in the left-side navigation pane to get a list of views. To create a view, click + in the upper-right corner of the view list or click Create in the top navigation bar.
In the Basic Info section, specify View Name and Check Item.
View Name: specifies the name of the view.
Check Item: specifies the constraints on the input data. OceanBase Database in Oracle mode supports only the read-only mode. Default value: None.

After you specify all the basic information, click OK.
After the basic information is specified, you can either click Next: Verify SQL Statement to go to Step 4 and verify the SQL statement, or proceed to Step 2 and select base tables.
Step 2: Select base tables.
After you specify the basic information, you can proceed to Step 2 and select base tables, or skip this step.
In the Select Base Tables section, the list on the left displays available base tables in the hierarchy of schema > database > table/view. You can search for base tables in this list. Select tables or views in this base table list, and click the add icon (>) next to the list to add the selected tables or views to the table operation area on the right.
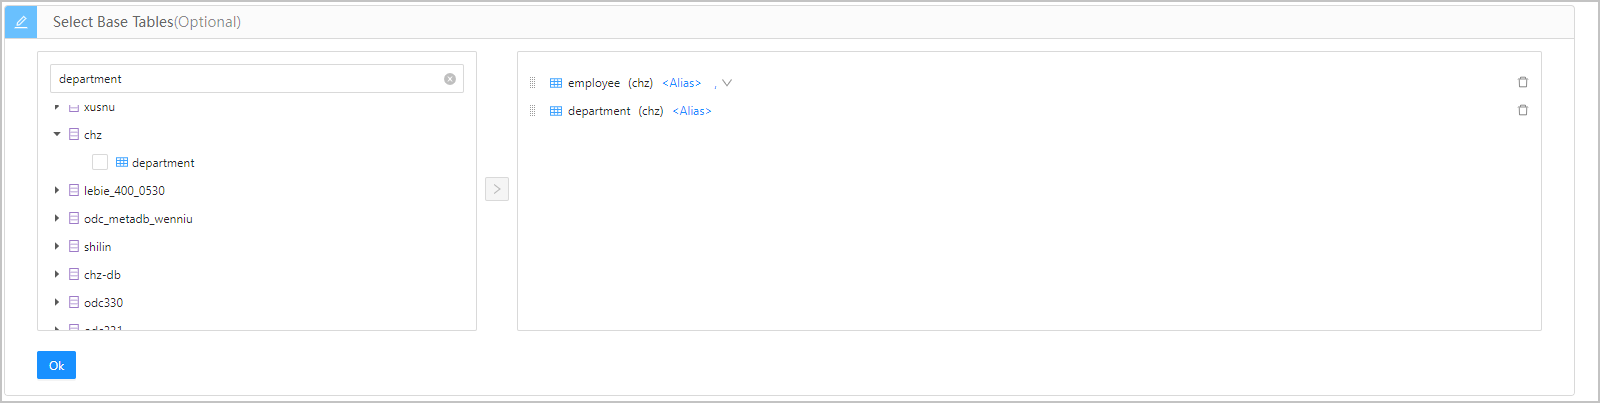
In the table operation area, you can perform the following operations on a selected base table.
Operation |
Description |
|---|---|
| Set an alias | You can set an alias for a selected base table. Click <Alias> next to the table name in the table operation area and enter the alias. This operation is optional. |
| Set association relationships | When two or more tables exist in the table operation area, you can define an association relationship between the tables. The default association is JOIN. You do not need to set an association relationship for the last table. Click the  icon next to Alias and select an association relationship. Supported options: JOIN, INNER JOIN, LEFT JOIN, RIGHT JOIN, CROSS JOIN, FULL JOIN, UNION, UNION ALL, INTERSECT, MINUS, LEFT OUTER JOIN, RIGHT OUTER JOIN, and FULL OUTER JOIN. icon next to Alias and select an association relationship. Supported options: JOIN, INNER JOIN, LEFT JOIN, RIGHT JOIN, CROSS JOIN, FULL JOIN, UNION, UNION ALL, INTERSECT, MINUS, LEFT OUTER JOIN, RIGHT OUTER JOIN, and FULL OUTER JOIN. |
| Adjust the association order | You can drag the base tables in the table operation area to reorder them. If you drag a table to the bottom of the list, the association relationships of this table are removed. |
| Delete a base table | You can click the delete icon next to a table in the table operation area to delete it from the table operation area. After you delete a table, its associations with the next table are removed. |
After you select and configure the base tables, click OK.
Step 3: Select fields.
After you select the base tables, you can proceed to Step 3 and select fields. If you skip Step 2, this step is unavailable.
In the Select Fields section, the list on the left displays the fields of the base tables that you selected in Step 2 in the hierarchy of schema > database > table/view. You can search for fields in this list. Select fields in the field list, and click the add icon (>) next to the list to add the selected fields to the field operation area on the right.
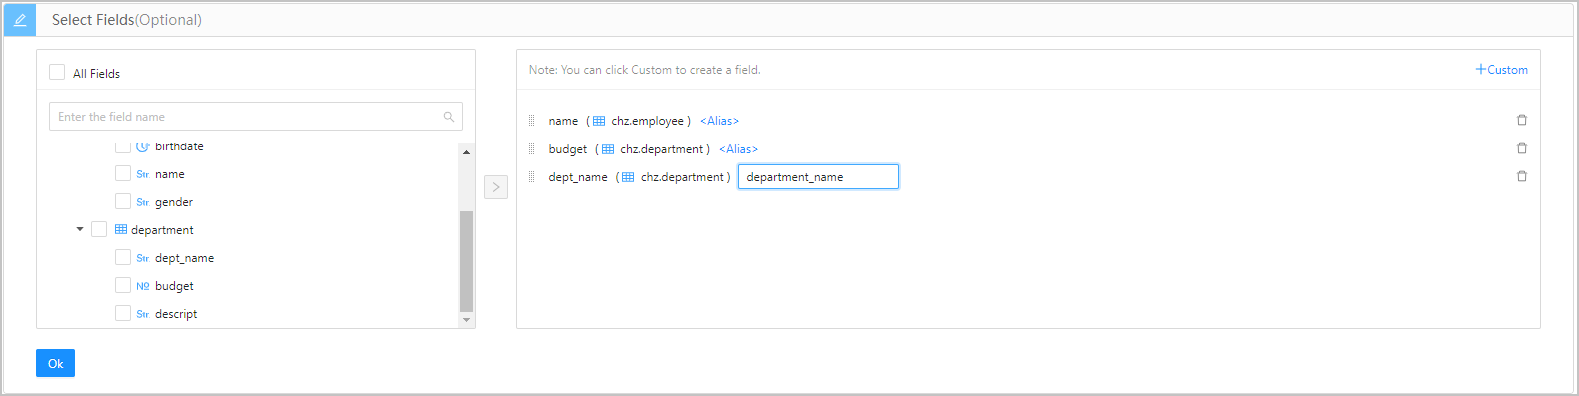
In the field operation area, you can perform the following operations on a selected field.
Operation |
Description |
|---|---|
| Set an alias | You can set an alias for a selected field. Click <Alias> next to the field name in the field operation area and enter the alias. This operation is optional. |
| Adjust the association order | You can drag the fields in the field operation area to reorder them. |
| Delete a field | You can click the delete icon next to a field in the field operation area to delete it from the operation area. |
| Customize fields | Click +Custom in the upper-right corner of the field operation area to add a field to the operation area. You must specify a name and an alias for the field. |
After you select and configure the fields, click OK.
Step 4: Verify the SQL statement.
After you complete all the previous steps, click Next: Verify SQL Statement to go to the statement editing page.

On the statement editing page, the view definition statements are generated based on the information specified in the Basic Info, Select Base Tables, and Select Fields sections. When two or more tables are included, you must complete the statement according to the relationship between the tables and logical conditions. After you complete the statements, click Create in the upper-right corner of the page to create the view.
You can edit the SQL statements of the created view on the Create View page. Syntax:
CREATE VIEW view_name AS
SELECT
  column1,
  column2.....
FROM
  table_name
WHERE
  [condition];
In addition, the toolbar on the editing page provides the following buttons.
Button |
Description |
|---|---|
| Format | Click this button to apply formatting, such as indentation, line break, and keyword highlighting, to the selected SQL statements or all the SQL statements in the current SQL window. |
| Find and Replace | Click this button and enter text in the search field to find the specific content and enter text in the replacement field to replace the content found. |
| Undo | Click this button to undo the last operation. |
| Redo | Click this button to reverse an Undo operation. |
| Case Sensitivity | The system supports three capitalization options: All Caps, All Lowercase, and Capitalize First Letter. Click the corresponding option to convert the selected statements in the script to the desired capitalization format. |
| Indent | You can add indents to or delete indents from the statements that you selected. |
| Comments | You can click Add Comments to convert the statements that you selected into comments or click Delete Comment to convert comments to SQL statements. |
| IN Value Conversion | A format such as A B can be converted to ('A','B') format. |
| Previous | Click this button to go back to the Create View page, where you can continue to edit or modify the parameters in the Basic Info, Select Base Tables, and Select Fields sections. |
Step 5: Complete the view creation.
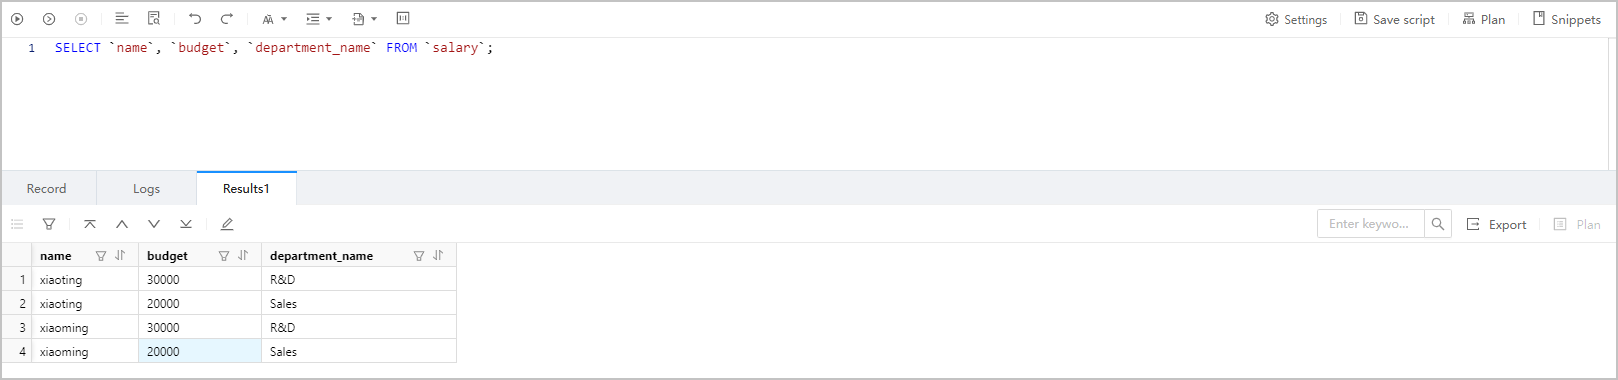
Click Create in the upper-right corner to create the view. After a view is created, you can use the SELECT statement to query it, just like how you query a table.

Note
To manage a view, right-click the view name in the left-side navigation pane, and select the required operation from the context menu, which provides the following options: View, Create, Delete, Download, and Copy.
For more information, see Manage views.
Syntax:
SELECT
column1,
column2.....
FROM
table_name;
Example:
SELECT `name`, `budget`, `department_name` FROM `salary`;