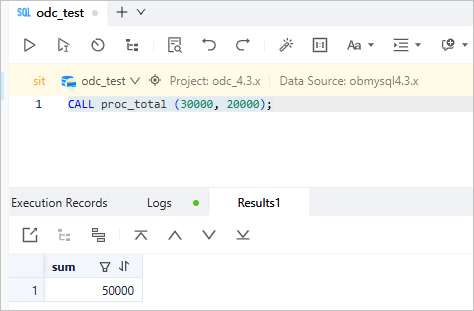
ODC supports visualized stored procedure creation. This topic describes how to create a stored procedure with ODC.
Overview
A stored procedure is a collection of one or more statements. To perform a series of complex operations on a database, you can use a stored procedure to encapsulate these complex operations into a reusable code block in the database. It helps developers reduce their workload.
In OceanBase Database, a stored procedure is a collection of SQL statements for implementing a specific feature. After you compile and store a stored procedure in the database, you can specify the stored procedure name and the required parameters to call this stored procedure for accelerated execution of the SQL statements.
A stored procedure can contain parameters and return values.
Differences between a stored procedure and a function
The return value of a function is a specific result value, while the return value of a stored procedure only indicates whether the execution is successful.
You can call a function by using a
SELECTstatement. You can call a stored procedure by using aCALLstatement.
Benefits of stored procedures
Improve the versatility and portability of the application: After you create a stored procedure, it can be repeatedly called by a program without rewriting the SQL statements of the procedure. In addition, stored procedures can be modified with no impact on the program source code, thereby improving the portability of the program.
Accelerate SQL execution: If an operation involves a large amount of SQL statements or repeated execution of the same SQL statements, you can compile the code into a stored procedure and execute the stored procedure, which is faster than separately executing the statements.
Alleviate the workload of the server: If one SQL statement is called at a time to perform operations on the database objects, a large number of SQL statements are transmitted. If an equivalent stored procedure, only the command for calling the procedure is sent, thereby reducing the network load.
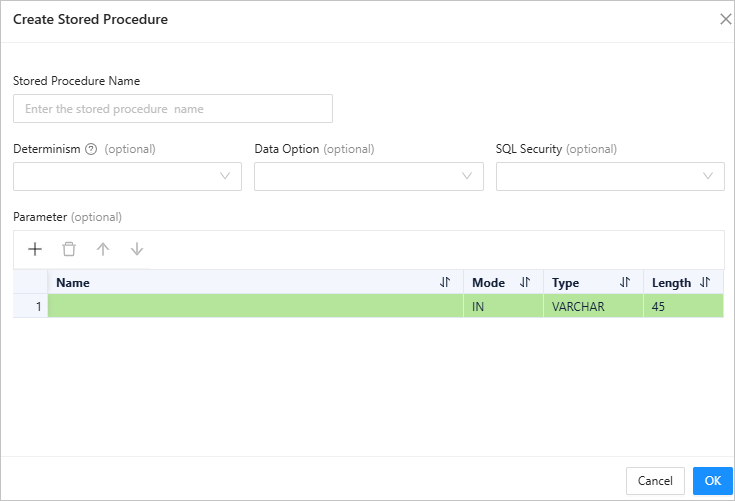
As shown in the preceding figure, you can create a stored procedure in the following five steps:
Specify the name of the stored procedure.
Specify parameters.
Verify the parameters of the stored procedure.
Edit the parameters of the stored procedure.
Complete the stored procedure creation.
Procedure
In the following example, a stored procedure named proc_total is created in the ODC console for the calculation of department budgets. The stored procedure contains two INT type input parameters budget_r and budget_s and calculates the sum of the two parameters. Procedure:
Step 1: Specify the name of the stored procedure.
Log in to the ODC console and click the name of the desired connection to go to the corresponding connection management page. You can click Stored Procedure in the left-side navigation pane to get a list of stored procedures. To create a stored procedure, click + in the upper-right corner of the Stored Procedure list or choose Create > Stored Procedure in the top navigation bar.
In the Create Stored Procedure dialog box, enter a name for the stored procedure.
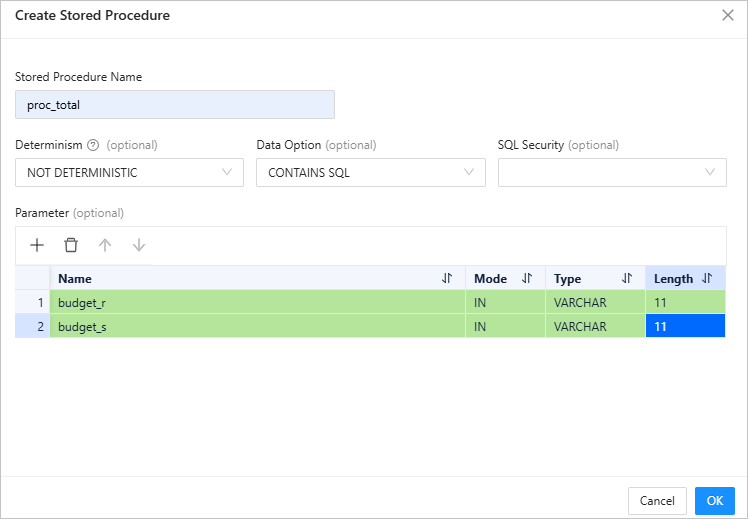
Step 2: Specify parameters.
Parameters specify the information passed to a function when the function is called.
In Oracle compatible mode, specify the following fields: Name, Mode, Type, and Default Value.
In MySQL compatible mode, specify Name, Mode, Type, and Length.
You can specify parameters by using one of the following three methods.
MethodDescriptionUse the quick access toolbar In the quick access toolbar, you can add, delete, and move up and down parameters. Click the row number - You can click a row number to select a row and display the quick access toolbar that allows you to delete the row or move the row up or down.
- You can click a row number to select the row, and then drag the row to adjust its order.
Right-click - Copy a row or move one row down: Drag the pointer to select a row, right-click it, and then select Copy or Move Down from the context menu that appears.
- Copy a cell: Select a cell, right-click it, and then select Copy from the context menu that appears.
Note
After copying a row, you can select a row and paste the copied row data with the shortcut keys Command + V / Ctrl + V.
You need to specify the mode for the parameters.
OceanBase Database in both MySQL compatible mode and Oracle compatible mode supports the following parameter modes: IN, OUT, and INOUT.
CREATE PROCEDURE proc_name ([[IN |OUT |INOUT ] parameter_name parameter_type...])Parameters
ParameterTypeIN Indicates an input parameter.
When a stored procedure is called, the input parameter is passed to the stored procedure and used in the execution of the stored procedure. Usually, input parameters are only used to pass values in, and are not modified or returned in the call of a stored procedure.OUT Indicates an output parameter.
When a stored procedure is called, the value of an output parameter is ignored and an empty value is passed to the stored procedure. The value of the output parameter is modified during the execution of the stored procedure. After the execution is complete, the modified value is assigned to the output parameter. Usually, output parameters are used to obtain the execution results of a stored procedure. Output parameters can be used to modify and return values in the call of a stored procedure.INOUT Indicates an inout parameter.
An inout parameter is both an input parameter and an output parameter.Parameter settings
PropertyRequiredDefaultModeName Yes Empty Oracle/MySQL Mode Yes IN Oracle/MySQL Type Yes VARCHAR Oracle/MySQL Length Yes 45 MySQL Default value No Empty Oracle
Step 3: Verify the parameters of the stored procedure.
Click OK to go to the Create Stored Procedure page.
Step 4: Edit the stored procedure.
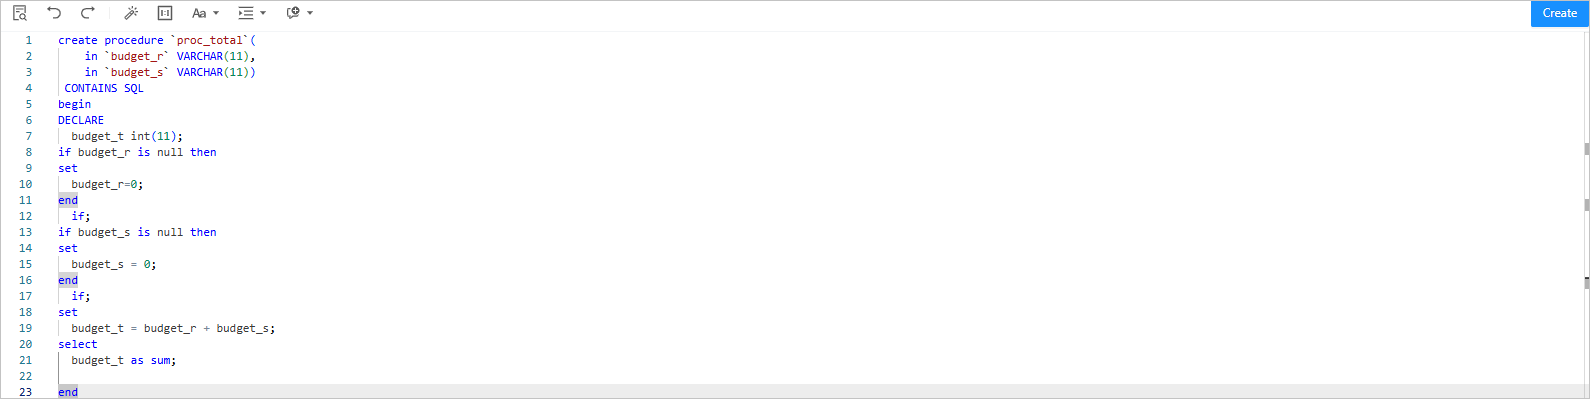
Edit the statements on the Create Stored Procedure page.
In addition, the toolbar on the editing page provides the following buttons.
Button |
Description |
|---|---|
| Format | Click this button to apply formatting, such as indentation, line break, and keyword highlighting, to the selected SQL statements or all the SQL statements in the current SQL window. |
| Find and Replace | Click this button and enter text in the search field to find the specific content and enter text in the replacement field to replace the content found. |
| Undo | Click this button to undo the last operation. |
| Redo | Click this button to reverse an Undo operation. |
| Case Sensitivity | The system supports three capitalization options: All Caps, All Lowercase, and Capitalize First Letter. Click the corresponding option to convert the selected statements in the script to the desired capitalization format. |
| Indent | You can add indents to or delete indents from the statements that you selected. |
| Comments | You can click Add Comments to convert the statements that you selected into comments or click Delete Comment to convert comments to SQL statements. |
You can edit the SQL statements of the created stored procedure on the Create Stored Procedure page. Syntax:
CREATE PROCEDURE proc_name (
  [proc_parameter[,...]])
IS
BEGIN
proc_body:
  Valid SQL routine statement
END [end_label]
Parameters:
Parameter |
Description |
|---|---|
| proc_name | The name of the stored procedure. By default, a stored procedure is created in the current database. To create a stored procedure in a specific database, add the database name as the prefix to the name of the stored procedure in the format of db_name.sp_name.
NoticeThe name of a stored procedure must differ from that of any built-in MySQL function. Otherwise, an error may occur. |
| [proc_parameter[,…] ] | The list of stored procedure parameters. A parameter is specified in the format of [IN|OUT|INOUT] parameter_name parameter_type. parameter_name specifies the parameter name and parameter_type specifies the parameter type, which can be any valid MySQL data type. If you need to specify multiple parameters, separate them with commas (,). A stored procedure can be created without a parameter. In this case, add a pair of parentheses after the name of the stored procedure.
NoticeThe parameter names must differ from the column names in the data table. Otherwise, the SQL statements of the stored procedure may take a parameter name as a column name, which results in errors. |
| proc_body | The body of the stored procedure, which contains the SQL statements to be executed when the stored procedure is called. The body begins with BEGIN and ends with END. If the body contains only one SQL statement, you can omit the BEGIN and END flags. |
Step 5: Complete the stored procedure creation.
Click Create in the upper-right corner to create the stored procedure. After a stored procedure is created, you can use the CALL statement to call it, just like how you call a built-in function.
Note
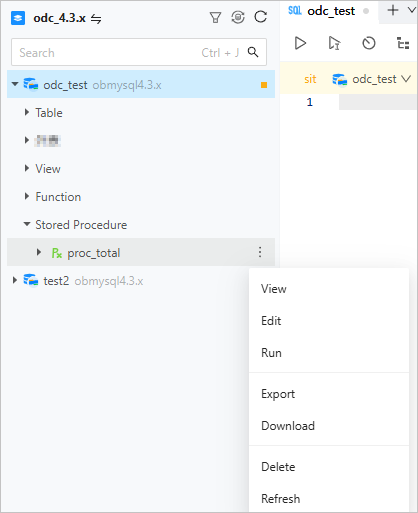
To manage a stored procedure, right-click the stored procedure name in the left-side navigation pane, and select the required operation from the context menu, which provides the following options: View, Create, Edit, Run, Download, Delete, and Refresh.For more information, see Manage stored procedures and Common features.
Syntax:
CALL proc_name ([proc_parameter [,...]]);
Example:
CALL proc_total (30000, 20000);