
You can configure Open Authorization (OAuth) 2.0, OpenID Connect (OIDC), or Lightweight Directory Access Protocol (LDAP) for logging in to OceanBase Developer Center (ODC) through single sign-on (SSO).
Background information
Both SSO and LDAP are identity authentication methods, which allow you to securely get authenticated in ODC by using a group of credentials.
Concepts
OAuth is an open standard authorization protocol that allows users to authorize third-party applications to access their protected information stored on resource services without providing the username or password to the third-party applications. This decouples authentication from authorization. OAuth is a widely recognized and used international standard. OAuth 2.0 is an extension to OAuth 1.0. It is more secure and easier to implement. However, it is incompatible with OAuth 1.0. In other words, OAuth 2.0 deprecates OAuth 1.0. OAuth defines a secure, open, and simple standard for authorizing user resources. A third party can obtain the authorization information of users without the need to obtain the user account and password.
OAuth 2.0 is a delegated authorization framework used for REST/APIs.
OAuth 2.0 is a token-based authorization protocol that grants applications limited access to user data without disclosing the user password.
OAuth 2.0 decouples authentication from authorization.
OIDC is a security authentication mechanism. A third-party application connects to the identity provider to request user information and the identity provider returns the information to the application in a secure and reliable manner. OIDC extends the OAuth 2.0 protocol. The ID Token field is added to provide basic user identity information. The ID Token field is encapsulated in the JSON Web Token (JWT) format. An ID token encapsulated in the JWT format is self-contained and provides a tamper-proof mechanism. Therefore, it can be securely transferred to a third-party application and easily verified.
LDAP is an industrial standard protocol used to access and manage directory services. It is generally used to store and retrieve information about users, groups, organizational structures, and other resources in a network environment.
Security Assertion Markup Language (SAML) is the industry standard for securely exchanging SAML assertions. ODC enables SSO by using SAML secure access tokens, which allows ODC to connect to identity providers (IDPs) that use the SAML 2.0 standard.
- The service provider (SP) is Web ODC.
- The IDPs are internal or third-party authentication systems.
Technical mechanism
OAuth 2.0
ODC adapts to the OAuth 2.0 authentication center and supports only the authorization-code mode. In this mode, applications use an authorization code to request an access token or refresh token from the authorization server.
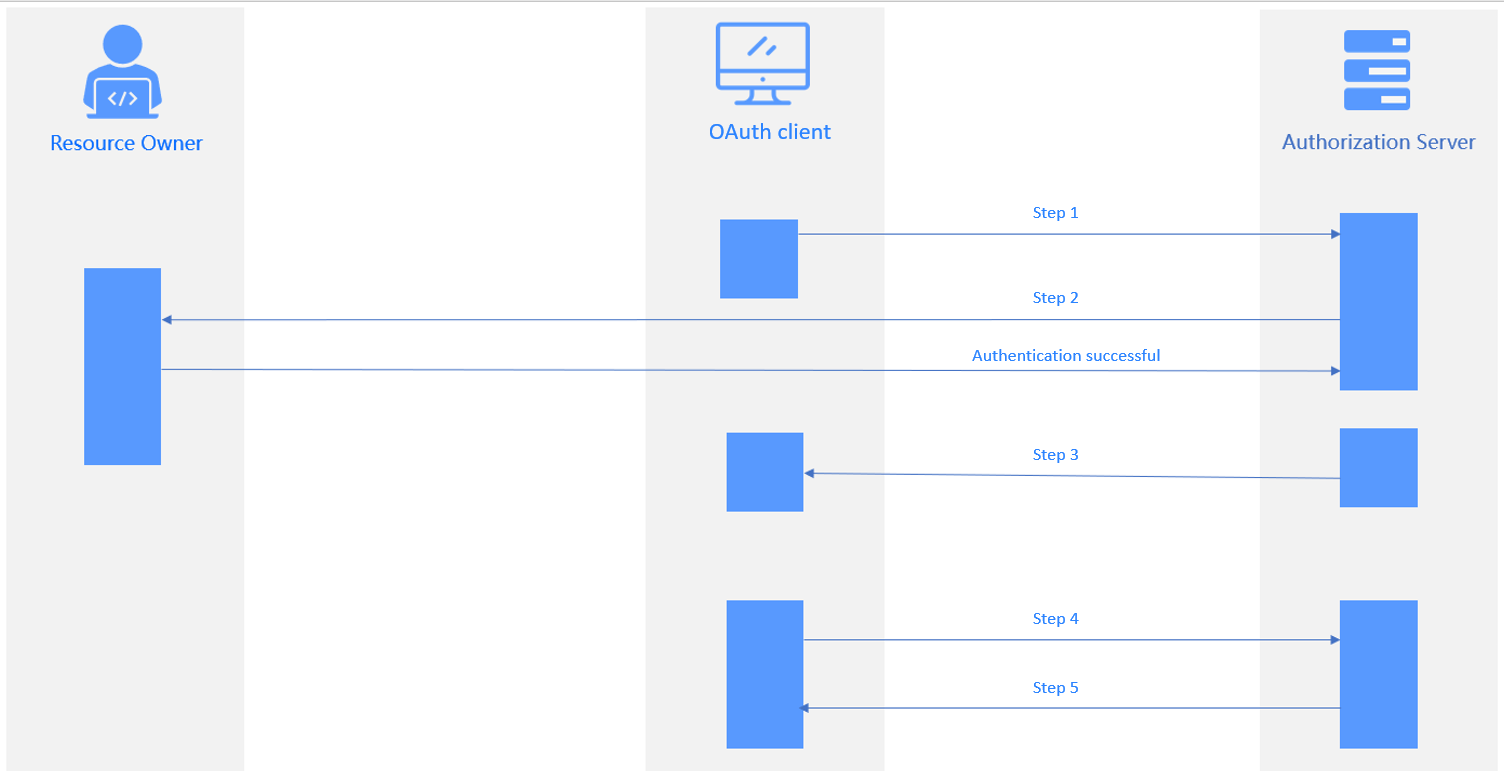
As shown in the preceding figure, the authorization process comprises the following steps:
- The user logs in to the application system. The request is forwarded to the authentication server. Then, the login authentication page appears, with the status code 302 returned.
- The user enters the account and password for authentication. After authentication, the authentication server returns an authorization code to the application system.
- The application system sends a request carrying the code to the authentication server to request an access token. The authentication server verifies the client ID and code and returns an access token to the application system.
- The application system uses the access token to query the user login information. The authentication server returns the user information, such as the username.
- The application system verifies the username, creates a session, and jumps to the redirection URL.
The following table describes the parameters involved in different steps.
Step |
Parameter |
|---|---|
| Step 1 | Authorization Request
|
| Step 2 | Parameters passed in Step 1 are verified. The login authentication page appears. You need to specify the resources accessible to the client. |
| Step 3 | Authorization Response The authorization server jumps to the redirection URL specified in Step 1 and returns the following information:
|
| Step 4 | Access Token Request
|
| Step 5 | Access Token Response
|
OIDC
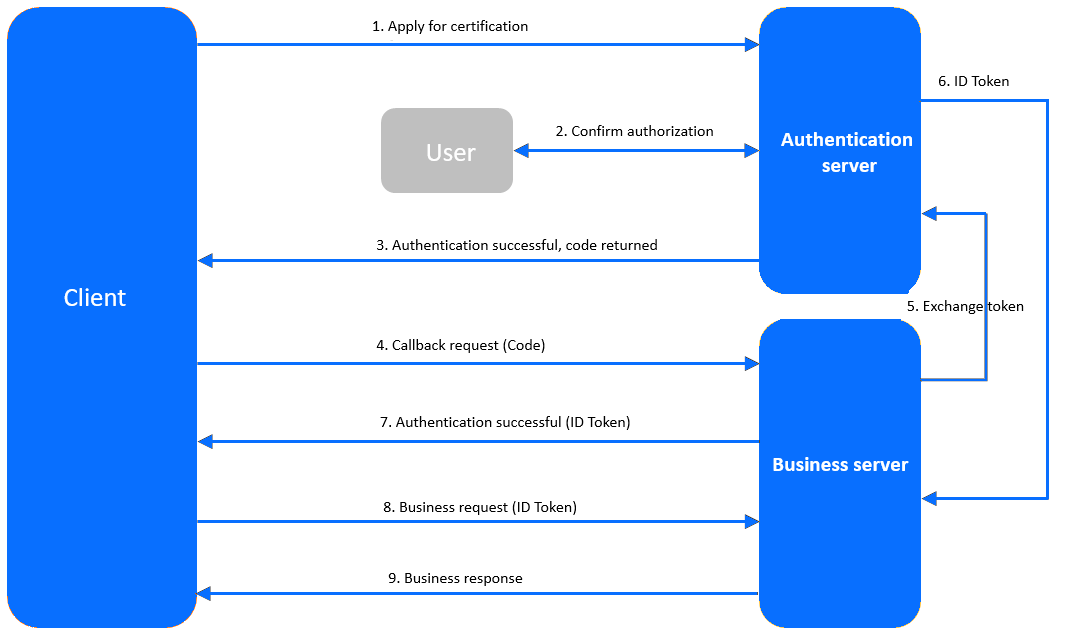
The client sends an authentication request to the authentication service.
The user logs in by using the username and password on the authentication page to confirm authorization.
The authentication service verifies the authentication request and returns a code to the client.
The client requests a callback API from the business service, carrying the code in the request.
The business service requests a token from the authentication service, carrying the code, client ID, and client secret in the request.
The authentication service verifies the information carried in the request and returns an ID token to the business service.
After authentication, the business service returns the ID token to the client.
The client initiates a business request, carrying the ID token in the request.
The business service verifies the ID token and returns a response to the client.
LDAP
ODC can integrate with an LDAP repository to authenticate users, retrieve user information, and bind user groups. The authorization process is as follows:
Configure information about the LDAP identity source in ODC.
Choose LDAP login on the login page and enter the username and password.
The LDAP authentication server verifies the username and password through a BIND request.
After successful authentication, the LDAP server returns the user information to ODC.
SAML
SSO allows you to log in to ODC by using the user identity information configured in the IDP. The authorization process is as follows:
- Obtain the SP metadata in ODC.
- Set ODC to a trusted SAML SP in the IDP and configure attributes of SAML assertions.
- Obtain the SAML metadata of the IDP.
- Set the IDP as a trusted SAML IDP in ODC.
- Enable SSO in ODC.
- Use the System for Cross-domain Identity Management (SCIM) to synchronize user information, or create a user with the same username for the IDP in ODC.
- Log in to ODC by using the user information configured in the IDP.
Prerequisites
You have the system integration permission.
You have deployed the authorization service.
Considerations
Only the authorization-code mode is supported in OAuth and OIDC.
When you log out from ODC in an application configured with SSO based on OAuth or OIDC, only the login state in ODC is cleared, and the login state in the SSO system is not cleared.
Create a login integration task
Configure SSO based on OAuth 2.0
Example: Use OAuth to integrate Apereo Central Authentication Service (CAS) to ODC so that you can access ODC by using a CAS account.
Log in to Web ODC. In the project collaboration window, choose Integrations > Login Integration > Create Login Integration.
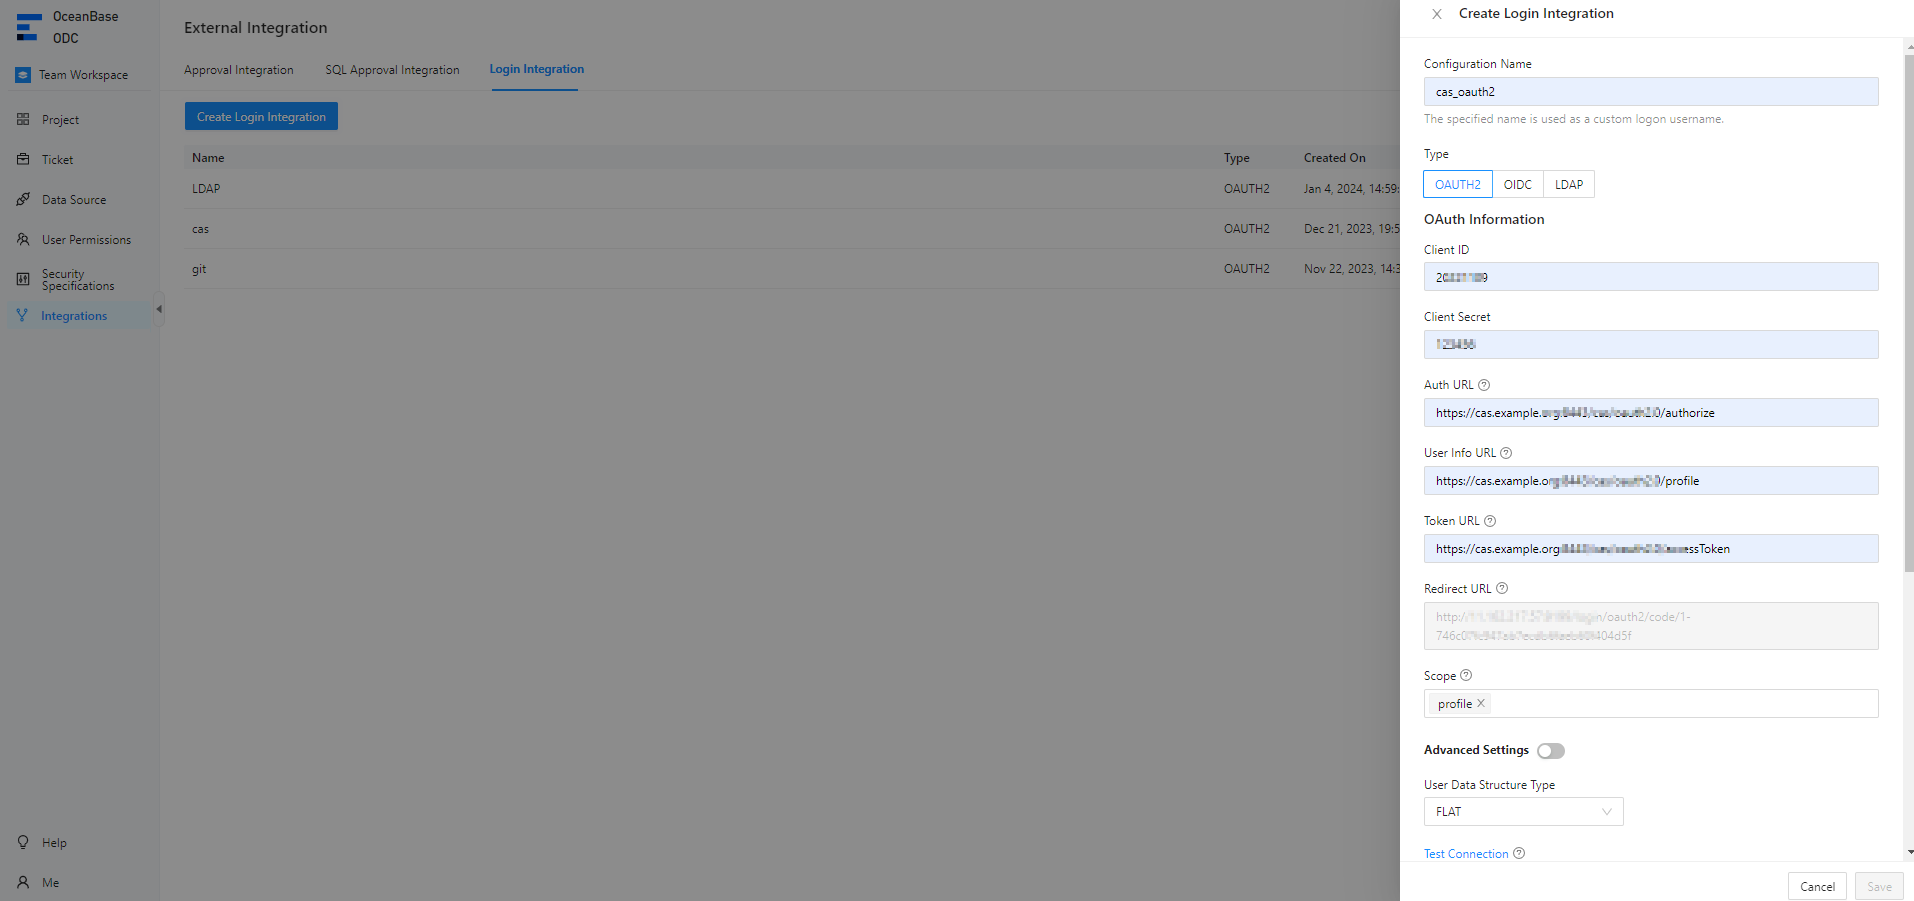
Configure gateway authentication parameters on the Create Login Integration page.
The following table describes parameters for SSO based on OAuth.
ParameterDescriptionConfiguration Name The configuration name will be used as a custom username for login. Type Select OAUTH2. Client ID The ID of the third-party application, which must be consistent with that registered with the authorization server. Auth URL The URL provided by the authorization server for obtaining the grant code. User Info URL The URL provided by the authorization server for obtaining user information. Token URL The URL provided by the authorization server for obtaining the access token. Redirect URL The callback URL used by the authorization server to call the ODC service. Notice
If the SSO system has a callback allowlist, you must add the redirection URL to the allowlist.
Data Structure Type of User Information The FLAT and NESTED structure types are supported. Scope The authorization scope. Separate multiple scopes with spaces. We recommend that you set the value to profile. Notice
When you configure SSO in a third-party application, the value of Scope must include
openid.jwkSet URL Optional. The URL provided by the authorization server for obtaining the public key, which is used for authentication. userNameAttribute Optional. The username. Client Authentication Method The identity authentication method used by the authorization server to authenticate the client. Authorization Grant Type The authorization method of OAuth 2.0. User Info Authentication Method The identity authentication method used when the access token in the resource request is sent to the resource server. Click Test Connection to go to the CAS login page.
Note
CAS does not require a callback allowlist. If a callback allowlist is required when you integrate another application to ODC, you can manually add an allowlist as prompted.
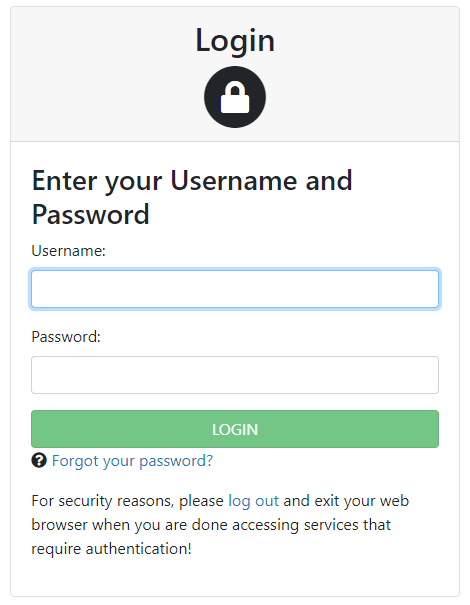
Enter the CAS account and password and click Allow on the authorization page to grant access to ODC.

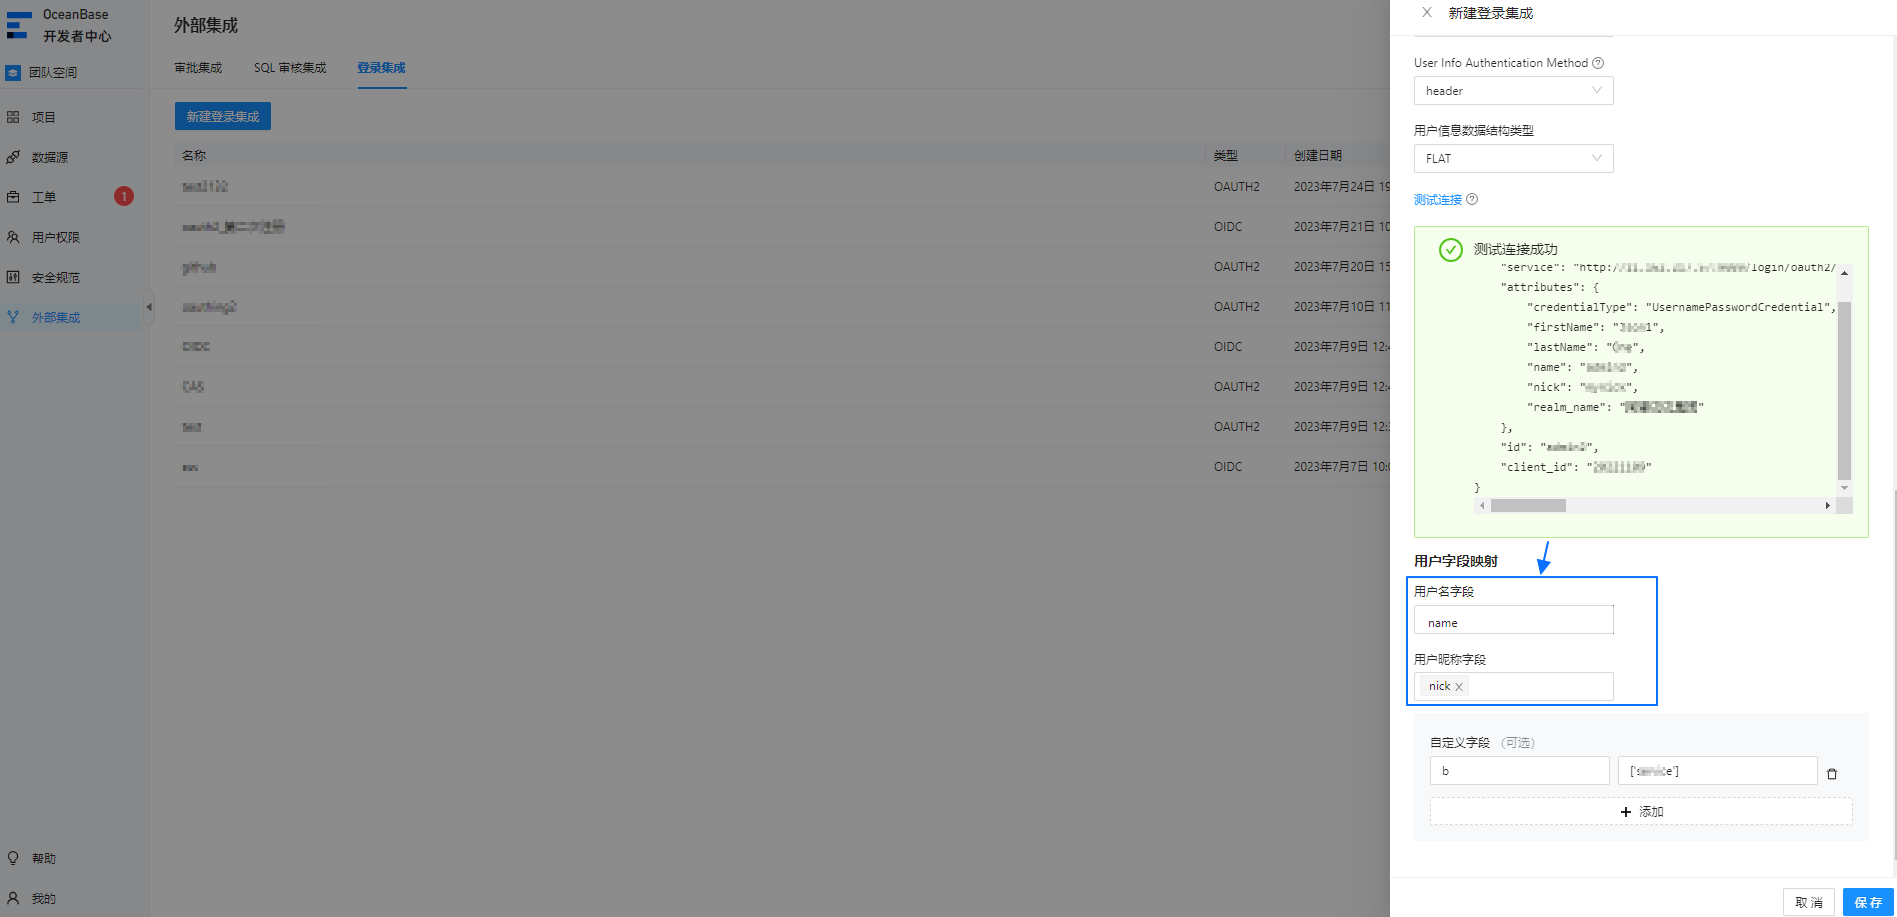
After the connection test succeeds, the user information API returns structure information. Configure the user field mapping parameters based on the returned information.
Note
- The structure returned by a user information API varies based on the third-party application. To map the user information of a third-party application to the user fields in ODC, you must configure the user field mappings. User field mappings identify the ODC account used for OAuth 2.0 login.
- You can configure the Username Field and Nickname Field parameters based on the returned connection information.
- You can also specify custom fields and custom field mapping rules.
- The system administrator can configure custom field names by automatic authorization. When you log in to ODC by using custom fields, you are automatically granted the specified roles or permissions.
Click Save.
In the login integration task list, enable the created login integration task.
Note
You can enable only one login integration task.
On the login page of Web ODC, click OAUTH2 to go to the third-party login page and use a third-party account to access ODC.
Configure SSO based on OIDC
Example: Use OIDC to integrate a third-party application to ODC and use a third-party account to access ODC.
Log in to Web ODC. In the project collaboration window, choose Integrations > Login Integration > Create Login Integration.
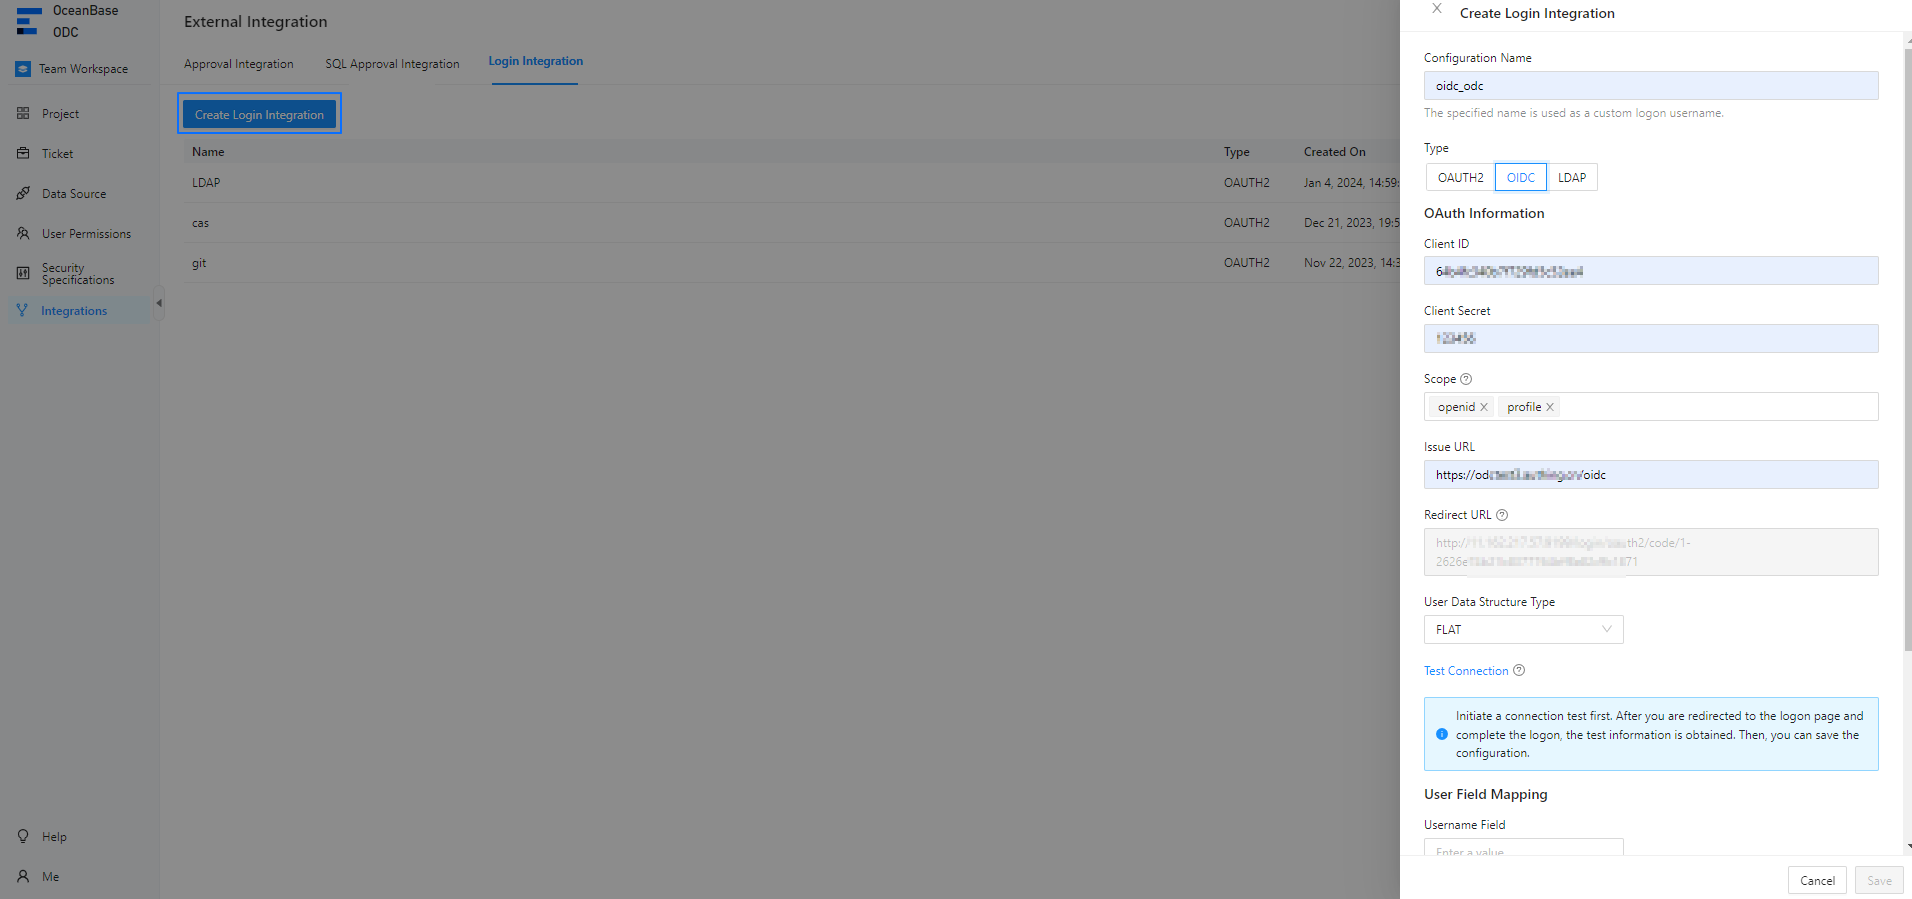
Configure gateway authentication parameters on the Create Login Integration page.
The following table describes parameters for SSO based on OIDC.
ParameterDescriptionConfiguration Name The configuration name will be used as a custom username for login. Type Select OIDC. Client ID The ID of the third-party application, which must be consistent with that registered with the authorization server. Client Secret The secret of the third-party application, which must be consistent with that registered with the authorization server. Scope The authorization scope. Separate multiple scopes with spaces. We recommend that you set the value to profile. Notice
When you configure SSO in a third-party application, the value of Scope must include
openid.Issue URL The issue URL of the authentication service. Redirect URL The callback URL used by the authorization server to call the ODC service. Notice
If the SSO system has a callback allowlist, you must add the redirection URL to the allowlist.
Data Structure Type of User Information The FLAT and NESTED structure types are supported. An independent callback allowlist is required for connection testing. Manually add an allowlist as prompted and then click Test Connection.
Enter the third-party account and password.
After the connection test succeeds, the user information API returns structure information. Configure the user field mapping parameters based on the returned information.
Note
- The structure returned by a user information API varies based on the third-party application. To map the user information of a third-party application to the user fields in ODC, you must configure the user field mappings. User field mappings identify the ODC account used for OIDC login.
- You can configure the Username Field and Nickname Field parameters based on the returned connection information.
- You can also specify custom fields and custom field mapping rules.
- The system administrator can configure custom field names by automatic authorization. When you log in to ODC by using custom fields, you are automatically granted the specified roles or permissions.
Click Save.
In the login integration task list, enable the created login integration task.
Note
You can enable only one login integration task.
On the login page of Web ODC, click OIDC to go to the third-party login page and use a third-party account to access ODC.
Configure SSO based on LDAP
Example: Use LDAP to integrate a third-party application to ODC and use a third-party account to access ODC.
Log in to Web ODC. In the project collaboration window, choose Integrations > Login Integration > Create Login Integration.
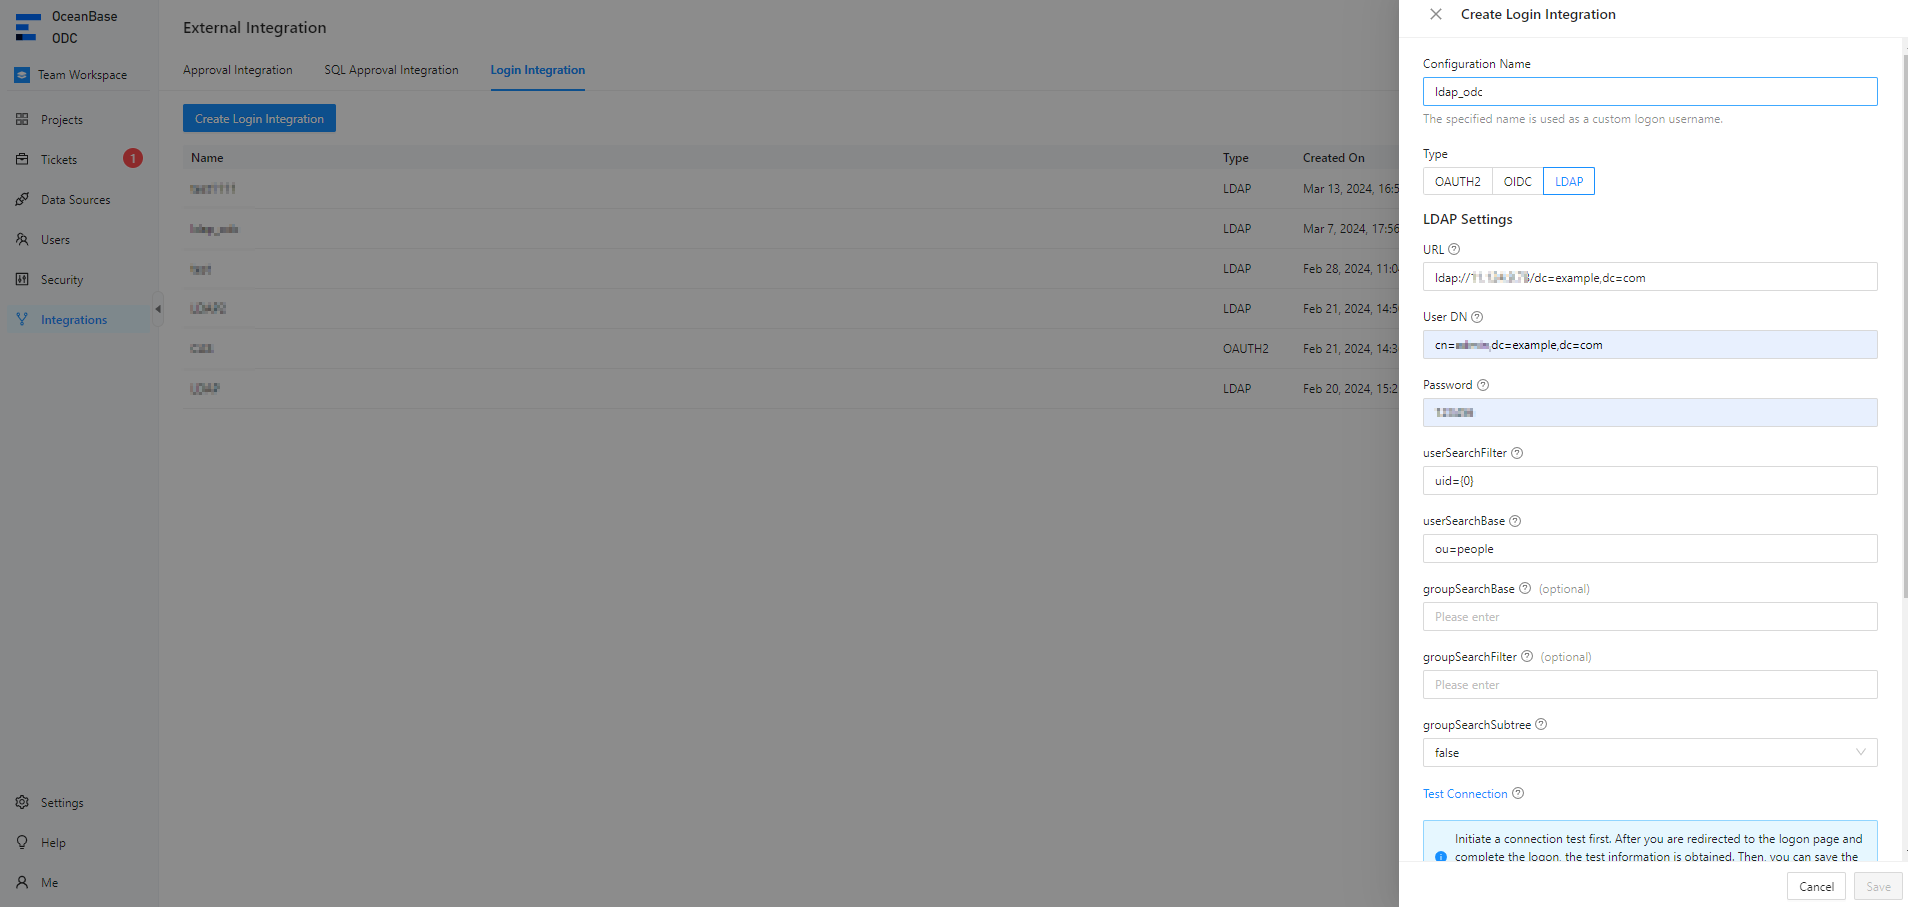
Configure gateway authentication parameters on the Create Login Integration page.
The following table describes parameters for SSO based on LDAP.
ParameterDescriptionConfiguration Name The configuration name will be used as a custom username for login. Type Select LDAP. URL The access URL of the LDAP server, which is a formatted string used to define the location and search parameters of the LDAP service. User DN The user domain name for accessing the LDAP server. Each LDAP entry is uniquely identified by a user domain name, which is the position of the entry in the LDAP directory tree. Password The password for accessing the LDAP server. userSearchFilter The condition for filtering user search results. For example, users can be filtered by username, email address, or department. userSearchBase The start or base point for user search, namely, the part or organization unit where the user is to be searched. groupSearchBase Optional. The start or base point for group search. groupSearchFilter Optional. The filter condition for group search. groupSearchSubtree Specifies whether to include parameters of sub-trees during group search. loginFailedLimit The maximum number of consecutive login failures allowed. lockTimeSeconds The interval for resetting the login count. Click Test Connection.
Enter the third-party account and password.
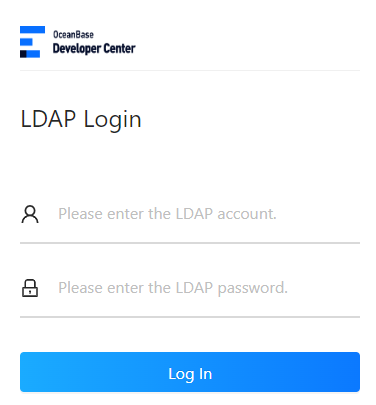
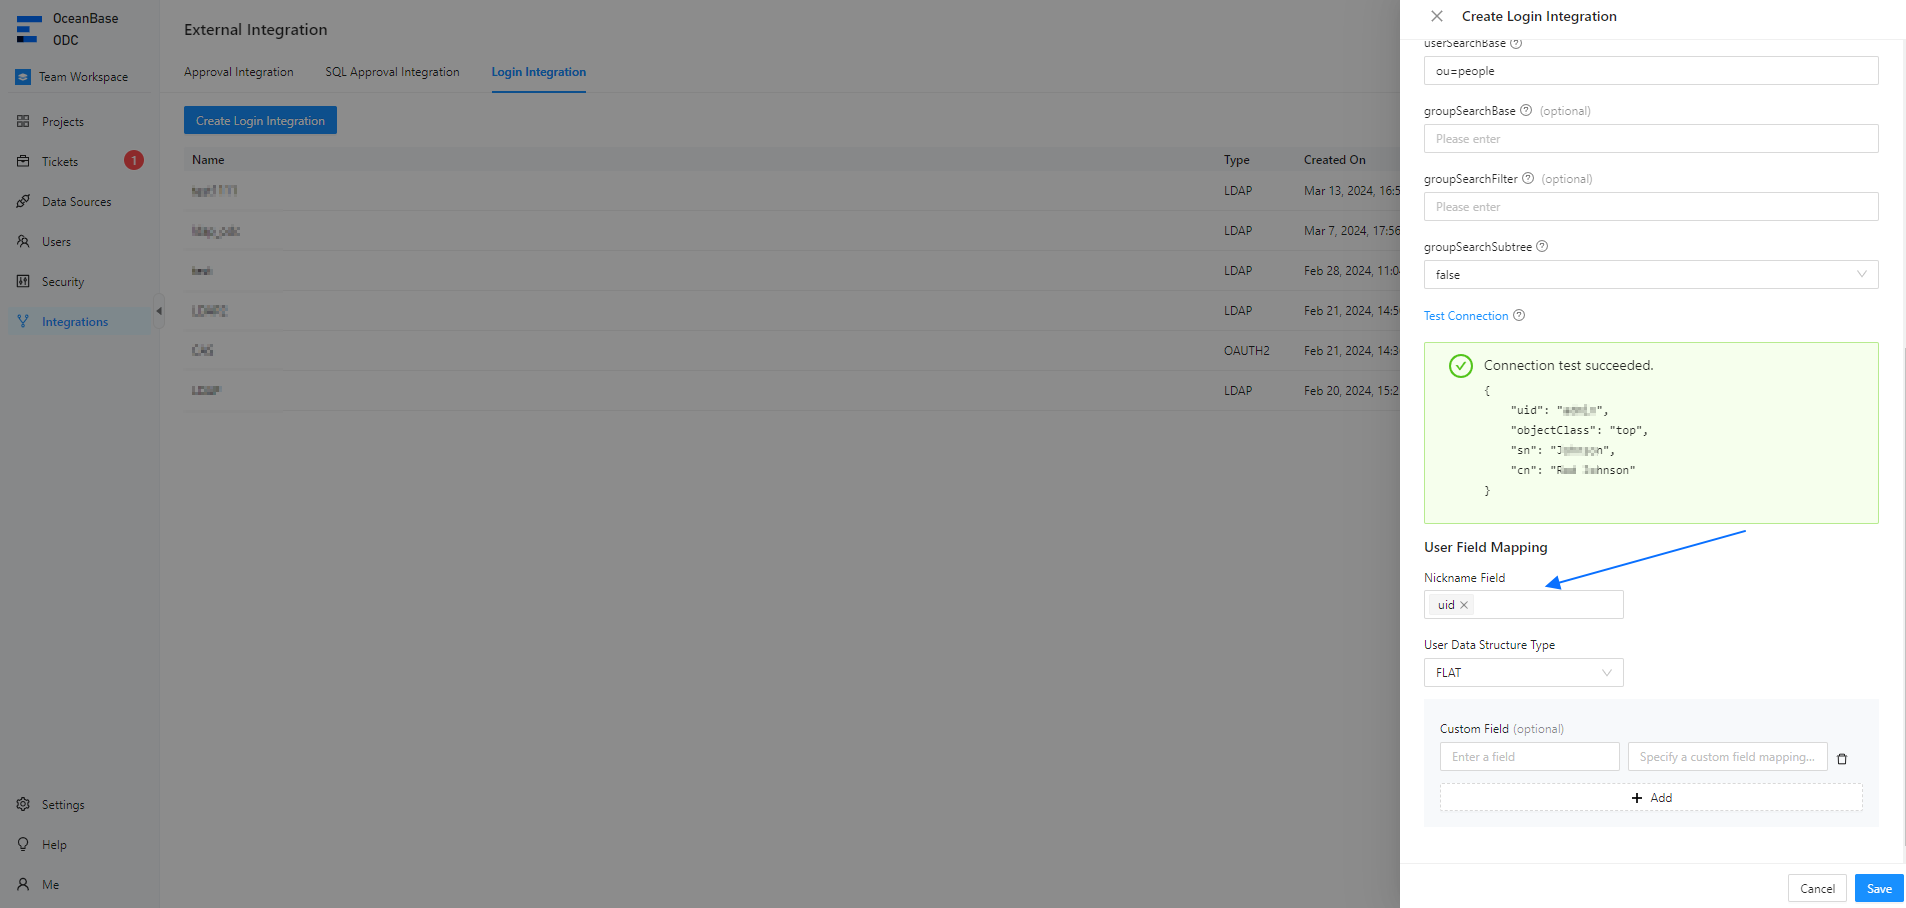
After the connection test succeeds, the user information API returns structure information. Configure the user field mapping parameters based on the returned information.
Note
- The structure returned by a user information API varies based on the third-party application. To map the user information of a third-party application to the user fields in ODC, you must configure the user field mappings. User field mappings identify the ODC account used for LDAP login.
- You can configure the Username Field and Nickname Field parameters based on the returned connection information.
- You can also specify custom fields and custom field mapping rules.
- The system administrator can configure custom field names by automatic authorization. When you log in to ODC by using custom fields, you are automatically granted the specified roles or permissions.
Click Save.
In the login integration task list, enable the created login integration task.

Note
You can enable only one login integration task.
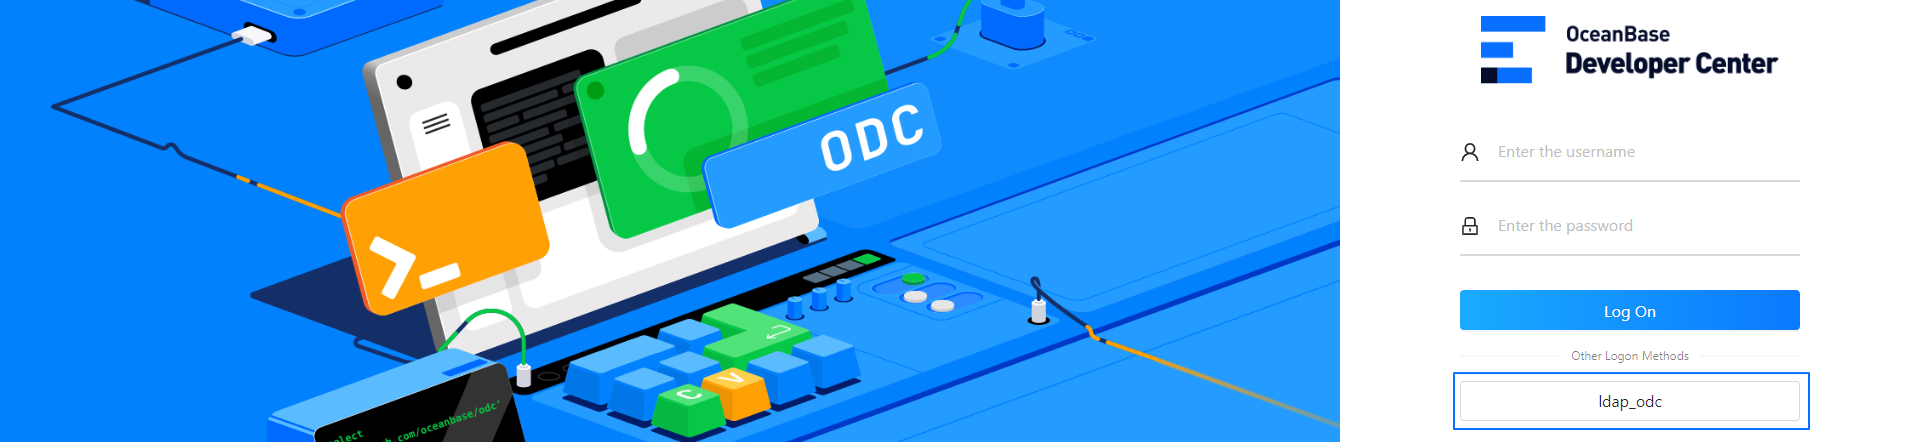
On the login page of Web ODC, click LDAP to go to the third-party login page and use a third-party account to access ODC.
Configure SSO based on SAML
Log in to Web ODC. In the project collaboration window, choose Integrations > Login Integration > Create Login Integration.
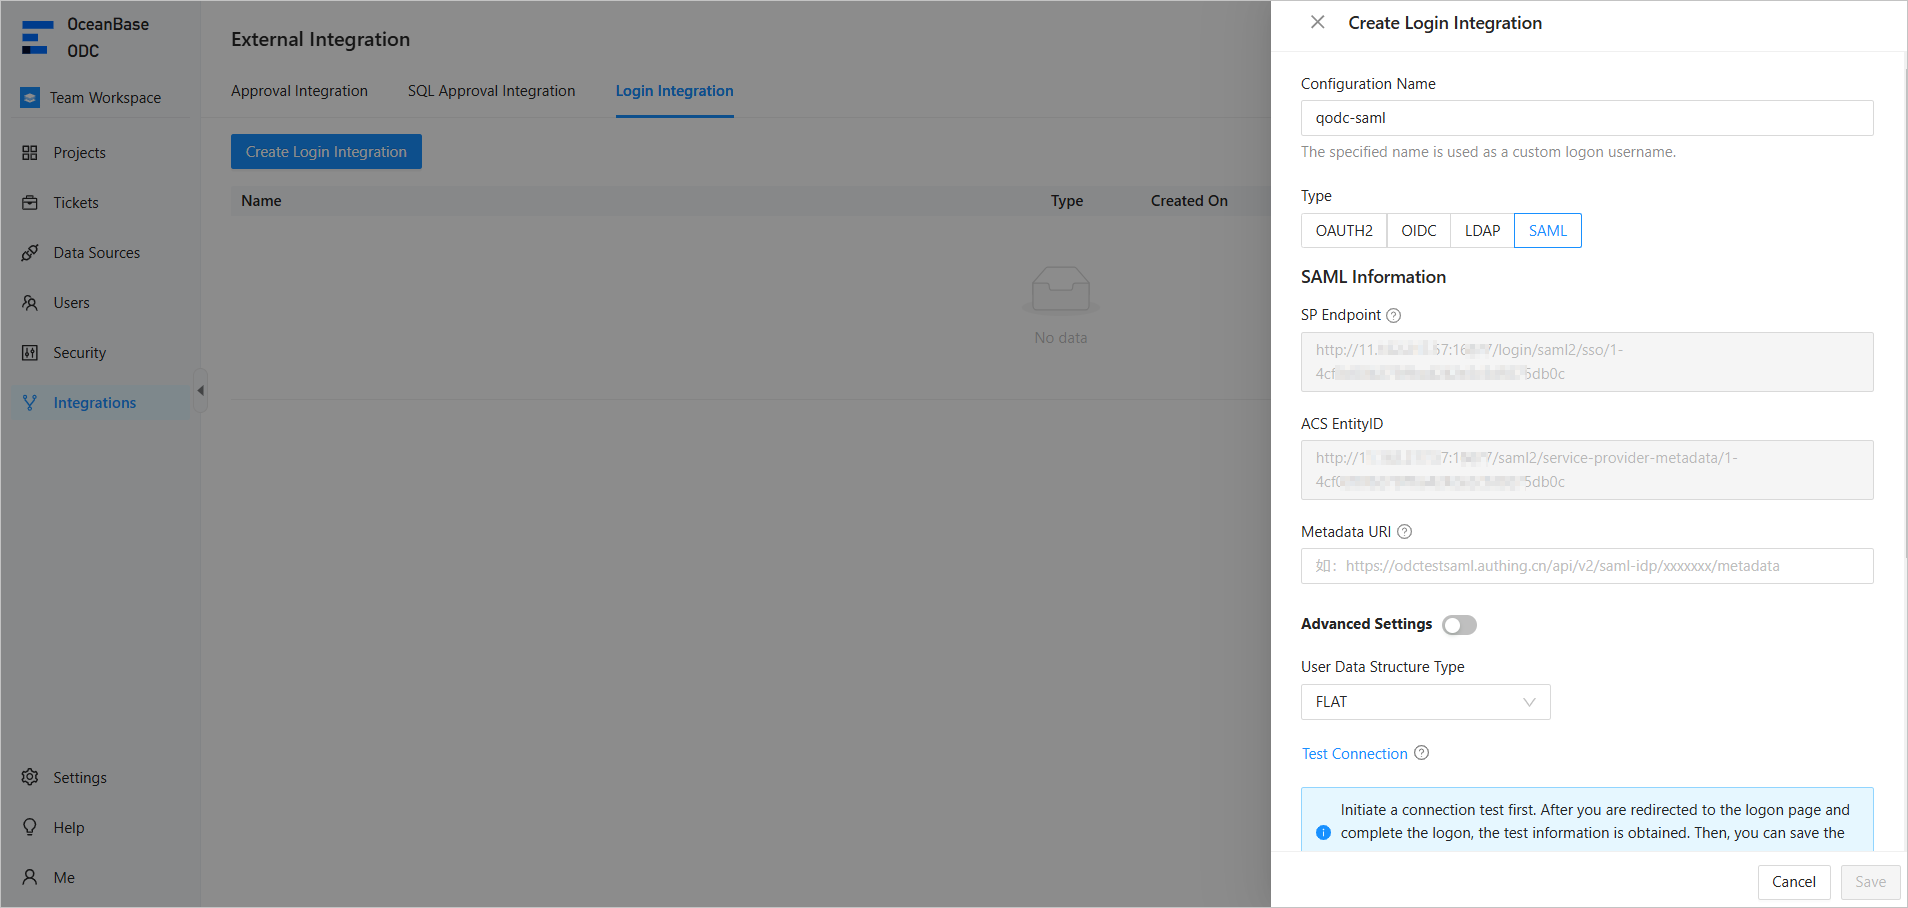
Configure gateway authentication parameters on the Create Login Integration page.
The following table describes parameters for SSO based on SAML.
ParameterDescriptionConfiguration Name The configuration name will be used as a custom username for login. Type Select SAML. SP Endpoint The endpoint of the SP. The value is used as the callback URL for applications in the IDP.
If you specify the configuration name, the system automatically populates the parameter.ACS EntityID The entity ID of the SP. The trusted entity ID is configured in the IDP.
If you specify the configuration name, the system automatically populates the parameter.Metadata URI Optional. The metadata URL. You can obtain the metadata URL from the SP. If you do not configure this parameter, you need to specify the SSO configuration information in the Advanced Options section. Provider EntityID The ID of the SP. The SP entity ID can be obtained by using the Metadata URI parameter. SSO Configuration Optional. If you do not specify the Metadata URI parameter, we recommend that you specify the parameters in the SSO Configuration section, namely URL (URL for the metadata file of the IDP), Binding Method, and Login Request. Signature Configuration The signature ensures that requests from ODC to the IDP service are not tampered with. Authentication Configuration The authentication information ensures that requests from the IDP to ODC are not tampered with. Decryption Configuration The decryption information ensures that requests from the IDP to ODC are decrypted. Data Structure Type of User Information The FLAT and NESTED structure types are supported. Click Test Connection. In the Test Connection dialog box, confirm the SP endpoint and ACS entity ID, and click OK to go to the login page.
Enter the account and password and click Log In to grant access to ODC.
After the connection test succeeds, the user information API returns structure information. Configure the user field mapping parameters based on the returned information.
Note
- The structure returned by a user information API varies based on the third-party application. To map the user information of a third-party application to the user fields in ODC, you must configure the user field mappings. User field mappings identify the ODC account used for SAML login.
- You can configure the Username Field and Nickname Field parameters based on the returned connection information.
- You can also specify custom fields and custom field mapping rules.
- The system administrator can configure custom field names by automatic authorization. When you log in to ODC by using custom fields, you are automatically granted the specified roles or permissions.
Click Save.
In the login integration task list, enable the created login integration task.
Note
You can enable only one login integration task.
On the login page of Web ODC, click qodc-saml to go to the third-party login page and use a third-party account to access ODC.
Manage login integration tasks
In the login integration task list, you can enable, view, edit, or delete a created login integration task.
