
This topic describes how to archive data by submitting a data archiving job.
Background information
ODC allows you to archive table data from the source database to another database on a scheduled basis. This way, the increase of online data does not affect the query performance and business operations.
The example in this topic shows you how to archive the employee and order tables from the odc_test_data_1 database to the odc_test_data_2 database in the same project.
Note
All data in this example is for reference only. You can replace them with actual data.
Principles
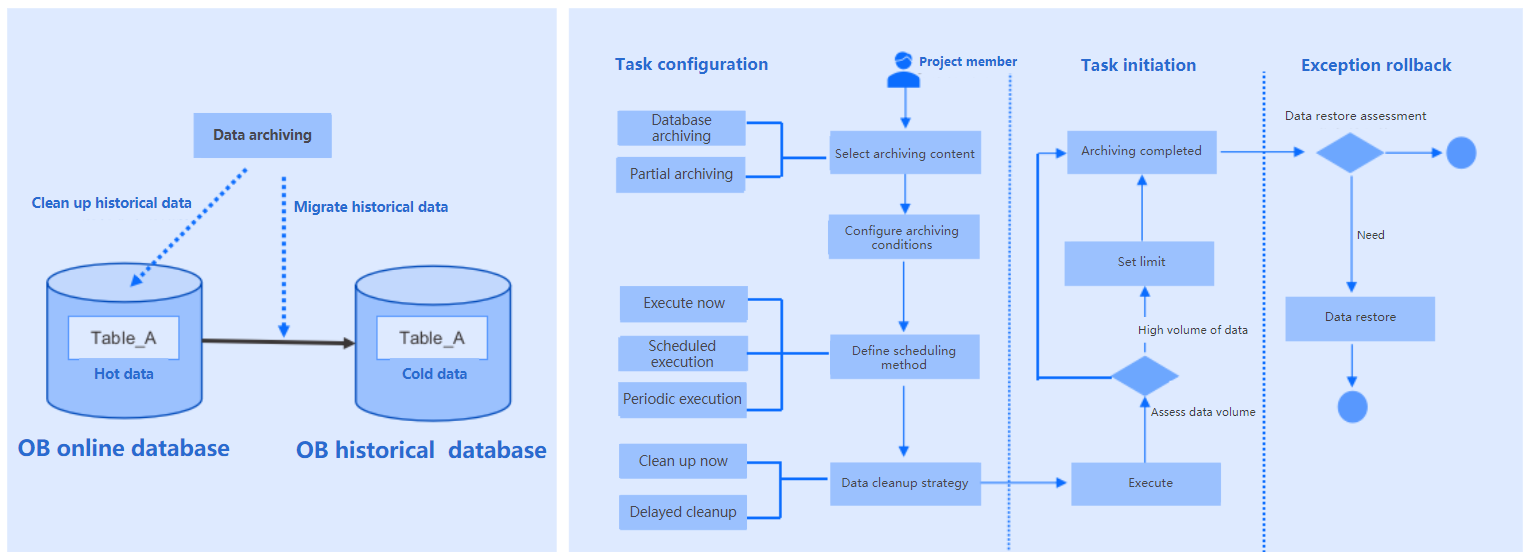
Considerations
Prerequisites:
The table to be archived must have a primary key. If the data source type is OceanBase MySQL compatible mode or MySQL, a unique index can also be archived.
The database user for archiving data must have the read/write permissions and access permissions to the internal views. For more information, see View user privileges, Overview of users and privileges, and Modify user privileges.
The source table columns must be compatible with the target database. The data archiving feature does not handle compatibility issues.
Table structure synchronization is not supported for homogeneous archiving links that involve subpartitioning. It is also not supported for heterogeneous databases, which means that you cannot synchronize schemas or create tables automatically.
Supported archiving links:
Links from OceanBase MySQL compatible mode to OceanBase MySQL compatible mode databases
Links from Oracle databases to OceanBase Oracle compatible mode databases
Links from MySQL databases to MySQL databases
Links from Oracle databases to Oracle databases
Links from PostgreSQL databases to OceanBase MySQL compatible mode databases
Links from OceanBase MySQL compatible mode, OceanBase Oracle compatible mode, MySQL, Oracle, and PostgreSQL databases to object storage services (OSS, COS, OBS, and S3)
Unsupported scenarios:
If the OceanBase MySQL compatible mode data source contains the XMLTYPE field type, archiving is not supported.
If the OceanBase Oracle compatible mode data source contains the JSON or XMLTYPE field type, archiving is not supported.
If the PostgreSQL data source defines tables that contain the array, composite, enumeration, geometric, XML, HSTORE, or full-text search type, archiving is not supported.
If the archiving condition contains the LIMIT clause, archiving is not supported.
Archiving is not supported if the table contains foreign keys.
Supported automatic table creation links:
- Links from OceanBase Oracle compatible mode to OceanBase Oracle compatible mode databases
- Links from OceanBase MySQL compatible mode to OceanBase MySQL compatible mode databases
- Links from MySQL databases to MySQL databases, except for MySQL 5.7 and earlier
Supported schema synchronization links:
- Links from OceanBase MySQL compatible mode to OceanBase MySQL compatible mode
Create a data archiving job
In the SQL window, execute the following SQL statements to create an employee table and an order table.
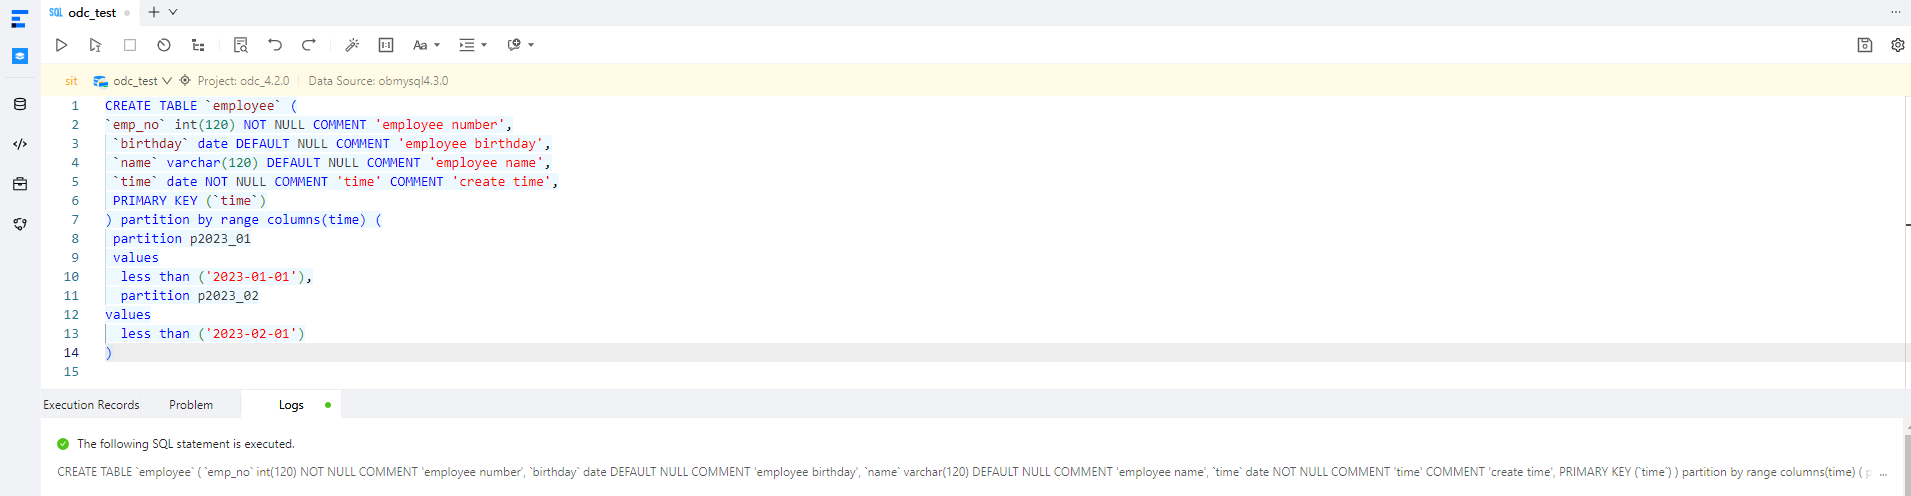
CREATE TABLE `employee` (
`emp_no` int(120) NOT NULL COMMENT 'employee number',
`birthday` date DEFAULT NULL COMMENT 'employee birthday',
`name` varchar(120) DEFAULT NULL COMMENT 'employee name',
`time` date NOT NULL COMMENT 'time' COMMENT 'create time',
PRIMARY KEY (`time`)
) partition by range columns(time) (
partition p2023_01
values
less than ('2023-01-01'),
 partition p2023_02
values
 less than ('2023-02-01')
);

CREATE TABLE `order` (
`time` date NOT NULL,
 `parti_key` int(11),
 `name` varchar(120) DEFAULT NULL,
 PRIMARY KEY (`time`, parti_key)
) partition by range columns(time, parti_key)
(partition p2023_01 values less than ('2023-01-01', 20230101),
partition p2023_02 values less than ('2023-02-01', 20230201));
Right-click the name of the source database and select Job Scheduling > Data Archiving. You can also select Jobs > Data Archiving > Create New.
Configure the following parameters.
ParameterDescriptionSource Database The database to which the source table belongs. Note
In ODC V4.2.2 and later, you can select a MySQL database to archive data from the MySQL database to the OceanBase database.
Target Database The database to which the source table is archived. Note
In ODC V4.2.2 and later, you can select a MySQL database to archive data from the OceanBase database to the MySQL database.
Archiving Scope - Partial archiving: Archive data from specific tables in the source database based on filter conditions.
- You can set filter conditions by using constants or variables defined in the variable configuration. For example,
time<'${create_time}'. In this example,create_timeis the name of a variable defined in the variable configuration, andtimeis a column in the table to be archived.Note
You can set filter conditions for associated tables.
- If you want to archive data from specific partitions, select the Specify Partition check box.
- Click +Add to add a table to be archived and archive the table to the target database.
- Click +Batch Add to add multiple tables to be archived and archive the tables to the target database.
- You can set filter conditions by using constants or variables defined in the variable configuration. For example,
- Archive all tables in the source database.
Custom Variable Optional. Define variables and set time offsets to archive rows that meet the conditions. Execution Mode Select Periodic Execution, Immediate Execution, or Scheduled Execution. Set Limit Configure throttling conditions. - CPU Usage: If the CPU usage of the OceanBase database exceeds the specified value, the program is automatically paused.
- Memory Usage: The memory usage is calculated as
MEMSTORE_USED * 100 / MEMSTORE_LIMIT. If this parameter is not specified, the program is throttled when the memory usage exceeds 1.05 times the memory limit. If the memory usage of the OceanBase database exceeds the specified value, the program is automatically paused. - Row Limit: Limits the number of rows processed per second to the specified value.
- Data Size Limit: Limits the amount of data processed per second to the specified value.
Job Settings - Auto-create Missing Target Table Schema: If the target database does not contain the table to be archived, the table is automatically created based on the schema in the source database.
- Data Retrieval through Full Table Scan: Supports full-table scan and conditional matching.
- Clean Up Archived Data in Source: If you select this option, data in the source is cleaned up based on the settings. By default, the data is immediately cleaned up and not backed up. You can roll back the cleanup task.
- Modify Session-level Cluster ID Parameter during Cleanup: You can select this option if you have selected Clean Up Archived Data in Source. If the source is OceanBase Database, you can specify the value of the cluster_id parameter at the session level to help downstream tools identify the cleanup records. Make sure to avoid duplication with values already used by the tenant.
- Data Insertion Strategy: When data archiving is executed, duplicate data is ignored or updated.
- Specify Task Duration: If the task is not completed after running for the specified duration, the scheduling is paused and resumed in the next schedule.
- Partial archiving: Archive data from specific tables in the source database based on filter conditions.
Click Pre-check at the bottom of the page. The system will pre-check the job and remind you of any errors in the job configuration.
After the pre-check is completed, click Next: Preview SQL at the bottom of the page.
In the Preview SQL interface, check the execution SQL statements, set the job name, and then click OK to confirm the archiving SQL statements.
After the job is generated, you can view or delete the job in the Jobs > Data Archiving list.
View a data archiving job
Go to Jobs > Data Archiving, click the name of the target job in the list to view the job details. You can also click ··· in the Actions column to perform more operations on the job.
- Terminate: If the job execution mode is set to periodic execution or scheduled execution, you can terminate the job. You can also select the target jobs and click Batch Terminate at the top to terminate multiple jobs.
- Disable/Enable: If the job execution mode is set to periodic execution or scheduled execution, you can disable the job to temporarily stop its execution. The job will resume execution after it is enabled.
- Edit: If the job status is disabled, you can edit the job to update its content.
- Delete: If the job status is completed or terminated, you can delete the job.
- View: View the job details.
- Clone: Clone the job to quickly generate a new job with the same configuration.
- Share: Copy the job access address.
In the job details panel, the Basic Information tab is displayed by default. You can view the job type, source database, target database, variable settings, archiving scope, and execution mode.
In the job details panel, click the Execution Records tab to view the job status and execution details.
In the job details panel, click the Operation Records tab to view the approval status and change history of the job.
Batch import and export
Batch export
Go to Jobs > Data Archiving.
Select the target tasks and click Batch Actions > Batch Export.
Confirm the export content and click Export to complete the batch export.
After the export is completed, the export result is displayed on the right side of the page. You can view the key and view the exported file locally.
Notice
Keep the key properly. It is required when you import the exported file.
Batch import
Go to Jobs > Data Archiving.
Click the ∨ icon next to Create New and select Import Data Archiving.
Select the file to import, enter the file key, select the target project, and click Next: Import.
Select the tasks to import and the target database, and click Import after you select I acknowledge the relevant business risks..
After the tasks are imported, you can view them in the list.