OceanBase
English日本語简体中文
Docs Home
Products
Integrations
Release Notes

Databases

OceanBase DatabaseOceanBase Cloud OceanBase Best Practices

Tools

OceanBase Cloud PlatformOceanBase Migration ServiceOceanBase Developer CenterOceanBase Migration AssessmentOceanBase Admin ToolOceanBase Loader and DumperOceanBase DeployerKubernetes operator for OceanBaseOceanBase Diagnostic Tool OceanBase Binlog Service

Connectors and Middleware

OceanBase Database Proxy OceanBase Connector/C OceanBase Connector/J OceanBase Connector/ODBC OceanBase Connector/NETOceanBase Command-Line Client

Databases

OceanBase DatabaseOceanBase Cloud OceanBase Best Practices

Connectors and Middleware

OceanBase Database Proxy OceanBase Connector/C OceanBase Connector/J OceanBase Connector/ODBC OceanBase Connector/NETOceanBase Command-Line Client

Tools

OceanBase Cloud PlatformOceanBase Migration ServiceOceanBase Developer CenterOceanBase Migration AssessmentOceanBase Admin ToolOceanBase Loader and DumperOceanBase DeployerKubernetes operator for OceanBaseOceanBase Diagnostic Tool OceanBase Binlog Service
OceanBase DatabaseOceanBase Cloud ToolsConnectors and MiddlewareLifecycle Support Policy

OceanBase Migration Service

V3.3.1Community Edition
  • Product updates
  • Product Introduction
    • What is OMS Community Edition?
    • Architecture
      • Overview
      • Hierarchical functional system
      • Basic components
    • Limits
    • Terms
  • Deployment Guide
    • Overview
    • System requirements
    • Resource configuration specifications
    • Prepare the environment
    • Deploy a time-series database (Optional)
    • Deploy OMS Community Edition on a single node
    • Deploy OMS Community Edition on multiple nodes in a single region
    • Deploy OMS Community Edition on multiple nodes in multiple regions
    • Check the deployment
    • Scale out OMS Community Edition
  • User Guide
    • OMS Community Edition console
      • Log on to the OMS Community Edition console
      • Overview
      • User center
        • Configure user information
        • Change your logon password
        • Log off
    • Users and privileges
      • Create a database user
      • User privileges
      • Enable binlogs for the MySQL database
    • Manage data sources
      • Add a data source
        • Add an OceanBase Community Edition data source
        • Add a MySQL data source
        • Add a TiDB data source
        • Add a Kafka data source
        • Add a RocketMQ data source
      • View data source information
      • Copy a data source
      • Edit a data source
      • Delete a data source
    • Data migration
      • Overview
      • Supported DDL operations for incremental migration and limits
      • Create a data migration project
        • Create a project to migrate data from a MySQL database to OceanBase database Community Edition
        • Create a project to migrate data from OceanBase database Community Edition to a MySQL database
        • Migrate data within OceanBase database Community Edition
        • Create an active-active disaster recovery project in OceanBase database Community Edition
        • Create a project to migrate data from a TiDB database to OceanBase database Community Edition
      • Manage data migration projects
        • View details of a data migration project
        • Start, pause, and resume a data migration project
        • Release a data migration project
        • Delete a data migration project
        • Use tags to manage data migration projects
        • Download and import the settings of migration objects
      • Configure matching rules for migration objects
    • Data synchronization
      • Overview
      • Data formats
      • Create a data synchronization project
        • Create a project to synchronize data from an OceanBase database Community Edition to a Kafka instance
        • Create a project to synchronize data from an OceanBase database Community Edition to a RocketMQ instance
      • Manage data synchronization projects
        • View details of a data synchronization project
        • Start, pause, and resume a data synchronization project
        • Release and delete a data synchronization project
        • Use tags to manage data synchronization projects
        • Download and import the settings of synchronization objects
    • OPS & Monitoring
      • Go to the overview page
      • Server
        • View server information
        • Update the quota
        • View server logs
        • Paths of component logs
      • Components
        • Store
          • Create a store
          • View details of a store
          • Update the configurations of a store
          • Start and pause a store
          • Destroy a store
        • Connector
          • View details about a connector
          • Start and pause a connector
          • Migrate a connector
          • Update the configurations of a connector
          • Batch O&M
          • Delete a connector
        • JDBCWriter
          • View details of a JDBCWriter
          • Start and pause a JDBCWriter
          • Migrate a JDBCWriter
          • Update the configurations of a JDBCWriter
          • Batch O&M
          • Delete a JDBCWriter
        • Checker
          • View details of a checker
          • Start and pause a checker
          • Rerun and recover a checker
          • Update the configurations of a checker
          • Delete a checker
      • O&M ticket
        • View details of an O&M ticket
        • Skip a ticket or sub-ticket
        • Retry a ticket or sub-ticket
      • Component parameters
        • Store parameters
          • Parameters of a MySQL store
          • Parameters of an OceanBase store
        • Connector parameters
          • Parameters of a destination RocketMQ instance
          • Parameters of a DataflowSink instance
          • Parameters of a destination Kafka instance
          • Parameters of a source database in full migration
          • Parameters for intermediate-layer synchronization
        • JDBCWriter parameters
        • Checker parameters
    • System management
      • User management
      • Alert center
        • View project alerts
        • View system alerts
        • Manage alert settings
      • Associate with OCP
      • System Parameters
        • Modify system parameters
        • Modify HA configurations
  • Alert Reference
    • oms_host_down
    • oms_host_down_migrate_resource
    • oms_host_threshold
    • oms_migration_failed
    • oms_migration_delay
    • oms_sync_failed
    • oms_sync_status_inconsistent
    • oms_sync_delay
  • API Reference
    • Obtain the status of a migration project
    • Obtain the status of a synchronization project
  • Upgrade Guide
    • Overview
    • Upgrade OMS Community Edition in single-node deployment mode
    • Upgrade OMS Community Edition in multi-node deployment mode
    • FAQ

Download PDF

Document Feedback
  1. Documentation Center
  2. OceanBase Migration Service
  3. V3.3.1

Manage alert settings

Last Updated:2026-09-04 08:14:02

Background information
Alert settings
Create an alert channel
Obtain the access token of the DingTalk chatbot

OceanBase Migration Service (OMS) Community Edition allows you to configure the built-in monitoring metrics, alert thresholds, and alert frequency, and create, edit, and delete alert channels in the OMS Community Edition console.

Background information

OMS Community Edition alerts generated upon monitoring metrics such as the long-term synchronization channel status are sent to the customer environment by using OceanBase Cloud Platform (OCP). On the Alert Settings page, you can configure the thresholds of different protection levels for data migration and synchronization projects.

OMS Community Edition supports the following alert protection levels: No Protection, High Protection, Medium Protection, and Low Protection.

  • No Protection: No alert is generated. This protection level is suitable for short-term migration or business scenarios with low real-time requirements.

  • High Protection: This protection level is applicable to scenarios with extremely high requirements on latency.

    A high protection alert is triggered when:

    • The synchronization latency is greater than the specified threshold.

    • The interruption duration of a schema migration or full data synchronization task exceeds the specified threshold.

  • Medium Protection: This protection level is applicable to scenarios with high requirements on latency. The threshold must be higher than or equal to the threshold configured for high protection.

  • Low Protection: This protection level is applicable to scenarios with low requirements on latency. The threshold must be higher than or equal to that configured for medium protection.

The admin user can modify the alert threshold and alert frequency for each protection level. Regular users can mark the protection level for their own data synchronization tasks and view the alert threshold and alert frequency of each protection level.

Alert settings

  1. Log on to the OMS Community Edition console.

  2. In the left-side navigation pane, choose System Management > Alerts.

  3. On the Alerts page, click the Alert Settings tab.

  4. On the Alert Settings tab, configure the Alert Threshold and Alert Frequency parameters for High Protection, Medium Protection, and Low Protection.

    Protection level
    Parameter
    Description
    High protection Synchronization Latency Value range: 1 second to 5 minutes.
    High protection Interruption Duration Value range: 1 second to 5 minutes.
    Medium protection Synchronization Latency Value range: 30 seconds to 10 minutes.
    Medium protection Interruption Duration Value range: 30 seconds to 10 minutes.
    Low protection Synchronization Latency Value range: 5 minutes to 3 hours.
    Low protection Interruption Duration Value range: 5 minutes to 3 hours.
    Alert Frequency Value range: 1 minute to 600 minutes. The default value is 3 minutes. You can configure the frequency based on your business requirements.
  5. On the Data Migration and Data Synchronization pages, view and modify the alert protection levels.

    For example, you can perform the following operations on the Data Migration page:

    1. In the left-side navigation pane, click Data Migration.

    2. On the Migration Projects page, click the More icon for the project whose alert protection level you want to modify, and then click Modify Alert Level in the drop-down list.

    3. In the Modify Alert Level dialog box, select the desired alert protection level.

    4. Click Submit.

Create an alert channel

  1. Log on to the OMS Community Edition console. In the left-side navigation pane, choose System Management > Alerts.

  2. On the Alerts page, click the Alert Settings tab.

  3. In the Alert Channels section, click Create Alert Channel in the upper-right corner.

    Create

  4. In the Create Alert Channel dialog box, specify the following parameters.

    Parameter
    Description
    Channel Name The name of the input channel. The name must be 1 to 50 characters in length and can contain Chinese characters, English letters, digits, and underscores (_).
    Channel Type Valid values: OCP Alert and DingTalk Alerts.
    Configuration Information Fill in the configuration information based on the selected channel type. If you select OCP Alert , select an OCP cluster from the associated OCP clusters. If you select DingTalk Alerts , you must specify the webhook access token of the DingTalk chatbot. For more information, see the "Obtain the access token of the DingTalk chatbot" section of this topic. If you select DingTalk Alerts, you can specify a DingTalk group to receive the alerts.
  5. Click Test Connection.

  6. After the test succeeds, click Submit.

After you create an alert channel, you can edit or delete it.

  • Edit an alert channel

    1. Click Edit in the Actions column of the channel that you want to edit.

    2. In the Modify Alert Channel dialog box, modify the parameters.

      You can modify the Channel Name , Channel Type , and Configuration Information parameters.

    3. Click Test Connection.

    4. After the test succeeds, click Submit.

  • Delete an alert channel

    1. Click Delete in the Actions column of the channel that you want to delete.

    2. In the dialog box that appears, click Delete.

Obtain the access token of the DingTalk chatbot

  1. Open the destination DingTalk group and click the Group Settings icon in the upper-right corner.

  2. Click Group Assistant.

  3. In the Group Assistant panel, click Add Robot.

  4. In the ChatBot dialog box, click the + icon.

  5. Click Custom under the prompt Please choose which robot to add.

  6. In the Robot details dialog box, click Add.

  7. In the Add Robot dialog box, specify the following parameters.

    Parameter
    Description
    Chatbot name The name of the custom chatbot.
    Add to Group The DingTalk group to which the chatbot is added. You cannot modify this parameter after you specify it.
    Security Settings Valid values: Custom Keywords , Additional Signature , and IP Address. To ensure the security of the custom chatbot, select at least one security setting.
  8. Select I have read and accepted DingTalk Custom Robot Service Terms of Service and click Finished.

  9. In the dialog box that appears, click Copy to copy the webhook address. Obtain the string after the access_token= field. You can also directly copy the access token in the webhook address.

    Notice

    Keep the webhook address confidential. If the webhook address is disclosed, security risks may occur.
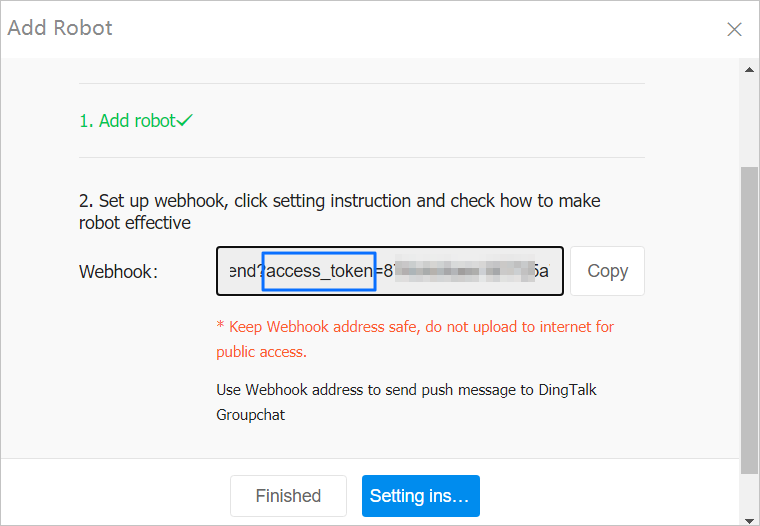
    Token information

  10. Click Finished.

Previous topic

View system alerts
Last

Next topic

Associate with OCP
Next
on this page
Background information
Alert settings
Create an alert channel
Obtain the access token of the DingTalk chatbot