OceanBase
English日本語简体中文
Docs Home
Products
Integrations
Release Notes

Databases

OceanBase DatabaseOceanBase Cloud OceanBase Best Practices

Tools

OceanBase Cloud PlatformOceanBase Migration ServiceOceanBase Developer CenterOceanBase Migration AssessmentOceanBase Admin ToolOceanBase Loader and DumperOceanBase DeployerKubernetes operator for OceanBaseOceanBase Diagnostic Tool OceanBase Binlog Service

Connectors and Middleware

OceanBase Database Proxy OceanBase Connector/C OceanBase Connector/J OceanBase Connector/ODBC OceanBase Connector/NETOceanBase Command-Line Client

Databases

OceanBase DatabaseOceanBase Cloud OceanBase Best Practices

Connectors and Middleware

OceanBase Database Proxy OceanBase Connector/C OceanBase Connector/J OceanBase Connector/ODBC OceanBase Connector/NETOceanBase Command-Line Client

Tools

OceanBase Cloud PlatformOceanBase Migration ServiceOceanBase Developer CenterOceanBase Migration AssessmentOceanBase Admin ToolOceanBase Loader and DumperOceanBase DeployerKubernetes operator for OceanBaseOceanBase Diagnostic Tool OceanBase Binlog Service
OceanBase DatabaseOceanBase Cloud ToolsConnectors and MiddlewareLifecycle Support Policy

OceanBase Developer Center

V4.1.3Enterprise Edition
  • Document Overview
  • Overview
    • What is ODC?
    • Benefits
    • Architecture
    • Features
    • Limits
  • Quick Start
    • Overview
    • Install ODC
    • Log on to ODC with an account
    • Create a private connection
  • Tutorials
    • Tips on the SQL Console
    • Create a connection
    • Export data
    • Import data
    • Debug a stored procedure
    • View the performance of an SQL statement
  • User Guide (Web ODC)
    • Log on to ODC
      • Log on to ODC with an account
      • Change the password
    • ODC homepage
    • Connect to a database
      • Create a private connection
      • Manage private connections
    • Public resource management
      • Overview
      • Quick start
      • Resource permissions
        • Manage public connections
        • Manage resource groups
        • Manage roles
        • Manage users
        • Automatic authorization rules
      • Task process management
      • Manage operation records
      • Data desensitization management
      • System settings
    • Use the workspace
      • Overview
      • SQL window
      • Anonymous block window
      • Command-line window
      • Stored scripts
      • Snippet
    • Use tools
      • Data export and import
        • Overview
        • Export and import formats
        • Batch export and import
        • Single table export and import
      • Data mocking
      • Partitioning plan
      • Database changes
      • Shadow table synchronization
      • SQL plan
    • Recycle bin
    • View operation records
    • Task management
      • Overview
      • Import tasks
      • Export tasks
      • Data mocking tasks
      • Database change tasks
      • Partitioning plan task
      • Permission application tasks
      • Shadow table synchronization tasks
      • SQL plan task
    • Session management
    • Database objects
      • Table objects
        • Overview
        • Create a table
        • Table list
        • Manage table attributes
        • Manage table data
      • View objects
        • Overview
        • Create a view
        • Manage views
      • Function objects
        • Overview
        • Create a function
        • Manage functions
      • Stored procedure objects
        • Overview
        • Create a stored procedure
        • Manage stored procedures
      • Sequence objects
        • Overview
        • Create a sequence
        • Manage sequences
      • Package objects
        • Overview
        • Create a program package
        • Manage program packages
      • Trigger objects
        • Overview
        • Create a trigger
        • Manage triggers
      • Type objects
        • Overview
        • Create a type
        • Manage types
      • Synonym objects
        • Overview
        • Create a synonym
        • Manage synonyms
    • Help center
  • User Guide (Client ODC)
    • Install ODC
    • ODC homepage
    • Connect to a database
      • Create a private connection
      • Manage connections
    • Use the workspace
      • Overview
      • SQL window
      • Anonymous block window
      • Command-line window
      • Stored scripts
      • Snippet
    • Use tools
      • Data export and import
        • Overview
        • Export and import formats
        • Batch export and import
        • Single table export and import
      • Data mocking
      • Asynchronous execution
      • Shadow table synchronization
    • Recycle bin
    • View operation records
    • Task management
      • Overview
      • Import tasks
      • Export tasks
      • Data mocking tasks
      • Database Change
      • Shadow table synchronization tasks
    • Session management
    • Database objects
      • Table objects
        • Overview
        • Create a table
        • Table list
        • Manage table attributes
        • Manage table data
      • View objects
        • Overview
        • Create a view
        • Manage views
      • Function objects
        • Overview
        • Create a function
        • Manage functions
      • Stored procedure objects
        • Overview
        • Create a stored procedure
        • Manage stored procedures
      • Sequence objects
        • Overview
        • Create a sequence
        • Manage sequences
      • Package objects
        • Overview
        • Create a program package
        • Manage program packages
      • Trigger objects
        • Overview
        • Create a trigger
        • Manage triggers
      • Type objects
        • Overview
        • Create a type
        • Manage types
      • Synonym objects
        • Overview
        • Create a synonym
        • Manage synonyms
    • Help center
  • Deployment Guide
    • Deployment overview
    • Preparations before deployment
    • Deploy a single ODC node
      • Deployment process
      • Load and run an ODC image
    • Deploy ODC in high availability mode
      • Deployment process
      • Load and run an ODC image
      • Deploy SSL certificate
      • Deploy the NGINX proxy
      • Configure certificate trust
    • Deployment verification
  • Upgrade Guide
    • Overview
    • Preparations before upgrade
    • Upgrade single-node ODC
      • Upgrade process
      • Stop ODC of the earlier version
      • Load and run an ODC image
    • Upgrade high-availability
      • Upgrade process
      • Stop ODC of the earlier version
      • Load and run an ODC image
      • Upgrade NGINX image
    • Upgrade verification
    • Rollback after upgrade failed
  • FAQ
  • Release Note
    • V4.1
      • ODC V4.1.3
      • ODC V4.1.1
      • ODC V4.1.2
      • ODC V4.1.0
    • V4.0
      • ODC V4.0.2
      • ODC V4.0.0
    • V3.4
      • ODC V3.4.0
    • V3.3
      • ODC V3.3.3
      • ODC V3.3.2
      • ODC V3.3.1
      • ODC V3.3.0
    • V3.2
      • ODC V3.2.3
      • ODC V3.2.2
      • ODC V3.2.1
      • ODC V3.2.0

Download PDF

Document Feedback
  1. Documentation Center
  2. OceanBase Developer Center
  3. V4.1.3

Partitioning plan

Last Updated:2026-09-04 08:15:22

Background
Create a partitioning plan
Related topics

Background

  • Range partitioning: Multiple rows with column values in an ordered, continuous, and non-overlapping range are assigned to a partition. For details, see Set partitioning rules.

  • Partitioning Plan: When inserting data in a range-partitioned table, if the inserted data exceeds the upper limit value of the current partition table, the data will not be inserted and an error will be returned. Partitioning plan is an extension function specially for range partitioning. ODC supports automatic management of range-partitioned table according to the partitioning strategy set by the user. Users do not need to manually create new partitions to facilitate the maintenance of range-partitioned table.

This topic describes how to use a partitioning plan in the OceanBase Development Center (ODC) console, including performing automatic management on created and dropped table partitions.

Create a partitioning plan

Notice
The Partitioning Plan of ODC V4.0.0 only supports the Range partition table of the Timestamp field type and the Range Columns partition table of the Date field type. When Range/Range Columns partition tables of other field types exist, the creation of partitioning plan of this type will be skipped and a warning log will be recorded.

  1. Log on to the ODC console, and click the name of the target connection to go to the corresponding database object management page.

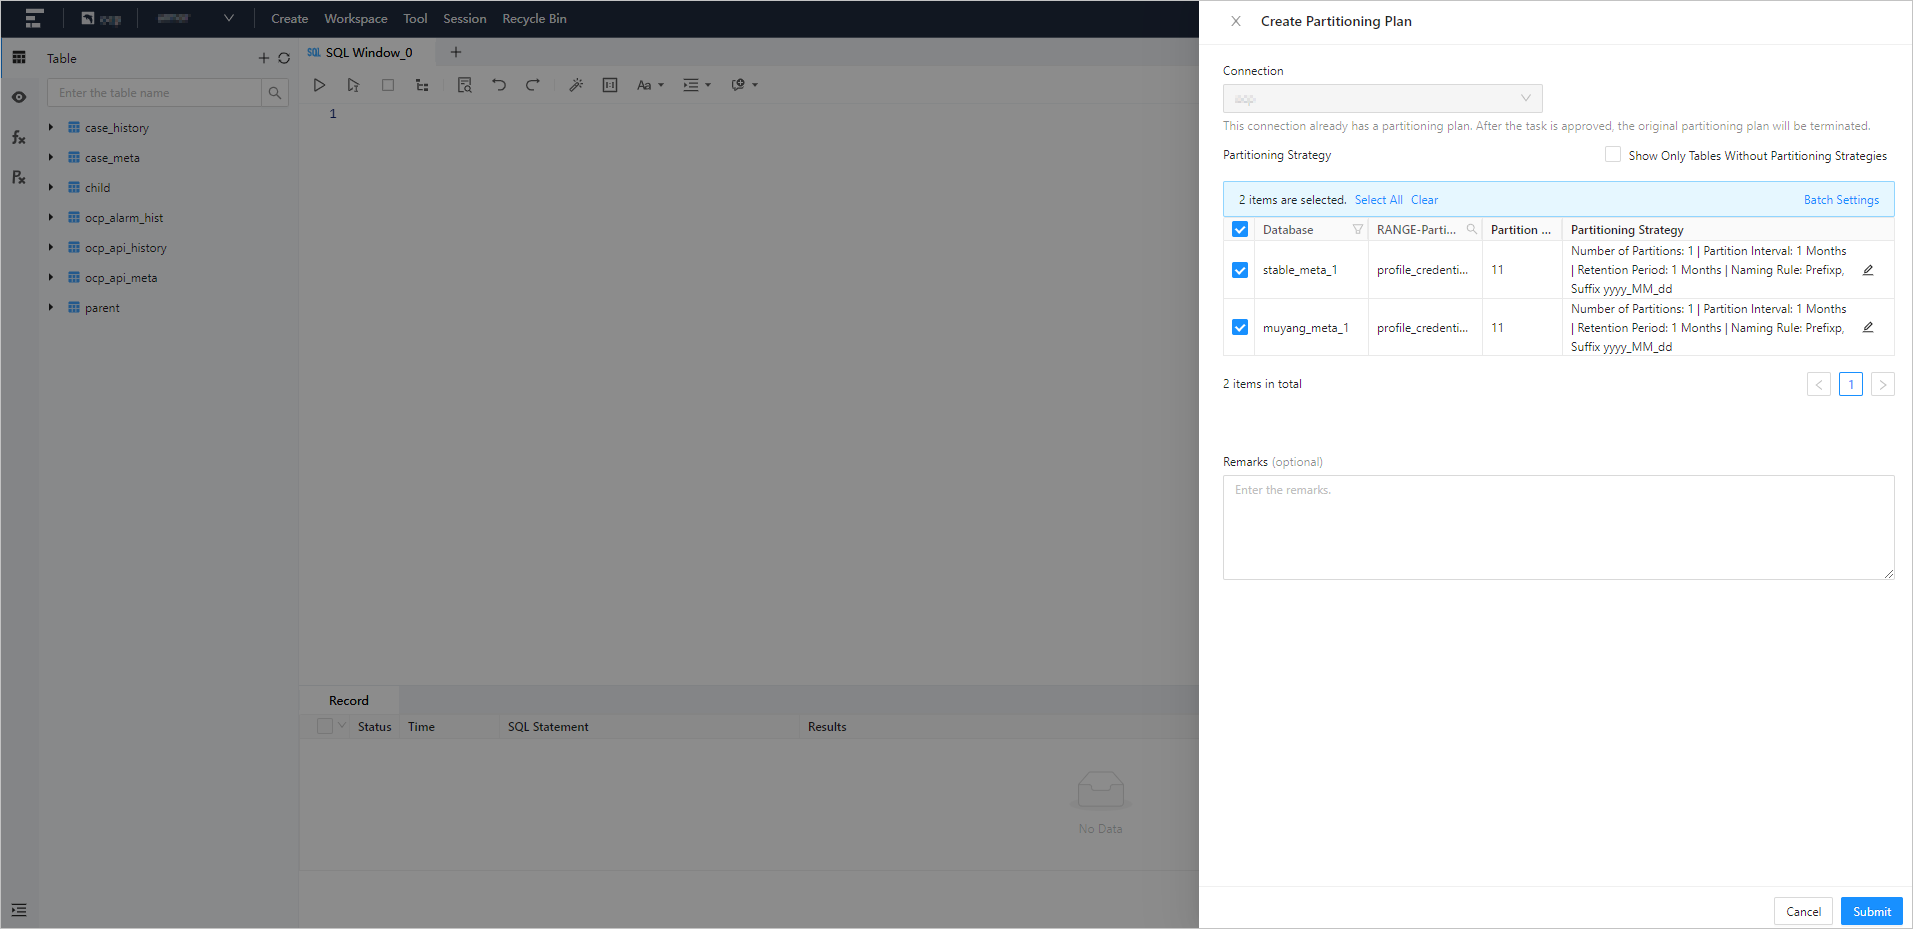
  2. In the top navigation pane, choose Tool > Partition Plan to display the Create a partition plan panel.

    Partitioning plan 1

  3. In the Create a partition plan panel, specify the following information.
    Partitioning plan 2

    Parameter
    Description
    Connection The connection to which the partitioning plan belongs. The default value is the current connection.
    Partition policy The information about the partitioning strategy. Search for and select a range-partitioned table in the database and edit its partitioning strategy.
    • You can select Only tables that are not set are displayed on the right side of Partition policy to display only tables with no partitioning strategies.
    • You can also select multiple range-partitioned tables and configure a partitioning strategy for them at a time.
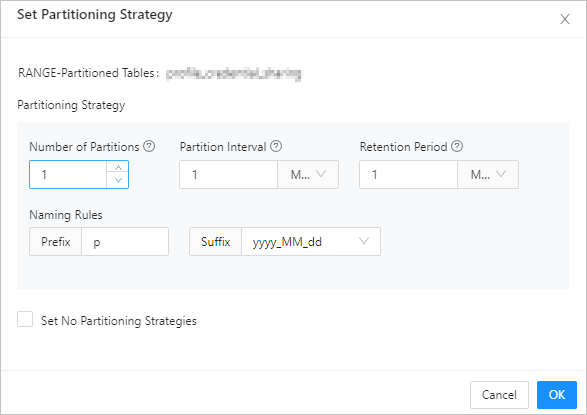
    • In the Partitioning Strategy column, click the edit icon and then you can edit the number of partitions to create, partitioning interval, retention period, and naming rules.
      • Number of Partitions: set the number of partitions to pre-create.
      • Partition Interval: pre-create the corresponding number of partitions based on the time interval, unit: day/month/year.
      • Retention Period: the created partition is automatically cleared after the retention period expires, unit: day/month/year.
        Example: The number of partitions is 1, the partition interval is 1 month, and the retention period is 1 month, which means that 1 partition is pre-created for the current table, and 1 partition will be created every 1 month, and the created partition will be cleaned up automatically after 1 month.
        edit
    Remarks The business background of the project, such as the change purposes and expected goals.
  4. After you specify the preceding information, click Submit in the lower-right corner of the panel.

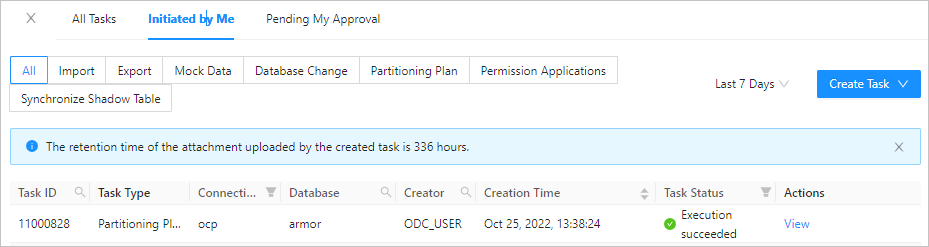
  5. After the task is generated, the Task Center panel automatically appears, where you can view the task status and task information. For more information, see Partitioning plan task.
    Partitioning plan 3

Related topics

  • Task process management

  • Partitioning plan task

Previous topic

Data mocking
Last

Next topic

Database changes
Next
on this page
Background
Create a partitioning plan
Related topics