
This topic describes how to set partition creation strategies and partition deletion strategies.
Set a partitioning strategy for an OceanBase MySQL compatible mode table
The following example describes how to set a partitioning strategy for the order table in the doc_test_data_1 database of the mysql441 data source. The example also describes how to set a drop partitioning strategy for the order table.
In the SQL window, execute the following statement to create the
ordertable.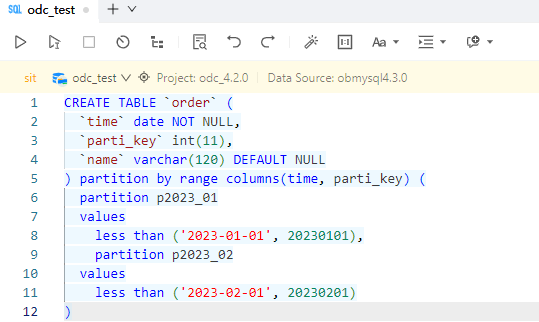
CREATE TABLE `order` (
 `time` date NOT NULL,
 `parti_key` int(11),
 `name` varchar(120) DEFAULT NULL
) partition by range columns(time, parti_key)
(partition p2023_01 values less than ('2023-01-01', 20230101),
partition p2023_02 values less than ('2023-02-01', 20230201))
Click Jobs > Partitioning Plan > Create New in the SQL window.
Select the target database, and click
 next to the target partition table to edit the partitioning strategy.
In the configure partitioning strategy panel, select Creation Strategy and Deletion Strategy under Partitioning Strategy to create a partitioning strategy.
In the Create Partitions section, set the partitioning strategy.
Specify the number of partitions to be created.
Create rules.
For example, you can set the partitioning strategy for the
timeandparti_keypartitioning keys of theordertable.time: Thetimepartitioning key is of theDATEtype, which is a time type. Therefore, you can set the Sequential Increment strategy as the partitioning strategy for this partitioning key. In this example, the creation strategy of thetimepartitioning key is to generate several partitions based on the current time (that is, the time when the partitioning plan task actually runs) as the starting point, with a monthly interval.parti_key: Theparti_keypartitioning key is of theINTtype. You can set the Custom strategy as the partitioning strategy. Assume that you want to generate partitions based on the current time as the starting point, with a monthly interval. To set a custom partitioning strategy, follow the steps described in the Custom Partitioning Strategy section. The expression can be generated based on the following steps:Obtain the base time for generating partitions. In this example, the current time serves as the base time. Therefore, you can directly use the
now()function.Define the interval for generating partitions. In this example, partitions are to be generated with a monthly interval. To set the Create Rule, click Rule Details > Interval. Enter 1 as the fixed interval and add the interval expression to the basis expression in Step 1 to generate the next partition. The expression is
now () + interval ${INTERVAL} month, where${INTERVAL}refers to the value entered in Creation Rule > Rule Details > Interval.Generate a partitioning expression corresponding to the type of the partitioning key. The
parti_keypartitioning key is of theinttype, but the expression generated in Step 1 is of the time type. Therefore, you need to convert it to aninttype. You can first convert it to a numeric string and then convert it to aninttype. The expression is:cast(date_format(now() + interval ${INTERVAL} month, '%Y%m01') as signed).Here:
CAST(xxx AS SIGNED): converts a field to an integer.DATE_FORMAT(): converts a field to a date format.NOW(): returns the current date.Note
In ODC, you can also use the ${LAST_PARTITION_VALUE} variable to introduce the upper limit of the partition in the current database for subsequent partition generation. For example,
${LAST_PARTITION_VALUE} + interval ${INTERVAL} monthgenerates partitions from the upper limit of the latest partition in the database.INTERVAL ${INTERVAL} MONTH: a monthly interval expression.${INTERVAL}is a fixed usage in ODC.'%Y%m01': the date format.
Select a naming method.
For example, the selected naming method is Prefix+Suffix, which consists of a fixed prefix and a time-based suffix.
Prefix: You can specify the prefix as you like.
Suffix: You can select the upper bound of the time-type partitioning key as the suffix for naming the current partition. You can also specify the formatted output format and the incremental interval of time.
After the settings are completed, you can click Test Generation to view the partition names.
Copy Statistics from Table's Last Partition to New Partition: No.
In the Delete Partitions section, configure the partition deletion strategy. The following table describes the parameters in the current example.
Number of Reserved Partitions: Retain the most recent 1 partition, which means that the other partitions except the most recent 1 partition will be deleted.
Set Partition Data Retention Time: Retain data in the most recent 12 months. When a partition is deleted, the upper bound of the partition must be earlier than the retention time point. Otherwise, the partition will not be deleted.
Rebuild Index after Deletion: Rebuild the index automatically after a partition is deleted.
Click Preview SQL in the lower-right corner of the Partitioning Strategy panel to view the SQL statements generated based on the partition strategy.
Click OK to complete the partition strategy configuration.
Set a partitioning strategy for an OceanBase Oracle compatible mode table
The following example describes how to set a partitioning strategy for the order table in the database named SYS.
In the SQL window, execute the following statement to create the
ordertable.CREATE TABLE "SYS"."order" ( "TIME" DATE NOT NULL ENABLE, "KEY" NUMBER(*,0) NOT NULL ENABLE, "NAME" VARCHAR2(120) DEFAULT NULL ) COMPRESS FOR ARCHIVE REPLICA_NUM = 1 BLOCK_SIZE = 16384 USE_BLOOM_FILTER = FALSE TABLET_SIZE = 134217728 PCTFREE = 0 partition by range("TIME", "KEY") (partition "p2024_01" values less than (TO_DATE(' 2024-01-01 00:00:00', 'SYYYY-MM-DD HH24:MI:SS', 'NLS_CALENDAR=GREGORIAN'),20240101), partition "p2024_02" values less than (TO_DATE(' 2024-02-01 00:00:00', 'SYYYY-MM-DD HH24:MI:SS', 'NLS_CALENDAR=GREGORIAN'),20240201));Click Jobs > Partitioning Plan > Create New in the SQL window.
Select the target database, and click
next to the target partition table to edit the partitioning strategy.In the configure partitioning strategy panel, select Creation Strategy and Deletion Strategy under Partitioning Strategy to create a partitioning strategy.
In the Create Partitions section, set the partitioning strategy.
Specify the number of partitions to be created.
Create rules.
For example, you can set a partitioning strategy for the
TIMEandKEYpartitioning keys of theordertable.TIME: This partitioning key is of theDATEtype and therefore a time type. You can use Sequential Increment as the partitioning strategy for this key. In this example, the creation strategy for theTIMEpartitioning key is to generate several partitions starting from the current time (that is, the time when the partitioning plan task actually runs) with an interval of 1 month.KEY: This partitioning key is of theNUMBERtype. You can use Custom as the partitioning strategy. Assume that you want to generate partitions with an interval of 1 month starting from the current system time as the baseline. To create a custom partitioning strategy, follow the steps outlined in Create a custom partitioning strategy. The expression can be generated in the following steps:Obtain the baseline time for partition generation. In this example, the current system time is used as the baseline. You can directly use the
sysdatefunction.Define the interval for partition generation. In this example, partitions are to be generated with an interval of 1 month. To create partitions with an interval of 1 month, set Creation Rule > Rule Details > Interval to
NUMTOYMINTERVAL(1, 'MONTH')for fixed intervals, and add this to the expression in step 1 to generate the next partition. The expression will be in a datetime format, such asSYSDATE + ${INTERVAL}, where${INTERVAL}indicates the value set in Creation Rule > Rule Details > Interval.Generate an expression for the partitioning key type. The
KEYpartitioning key is of theNUMBERtype, but the expression generated in step 1 is in a datetime format. You need to convert it to theNUMBERtype. You can first convert it to a numeric string and then convert it to theNUMBERtype. The expression will beTO_CHAR(SYSDATE + ${INTERVAL}, 'YYYYMM"01"').Here:
TO_CHAR: converts a field to a character string.SYSDATE: returns the current system time.YYYYMM"01": the datetime format.
Select a naming method.
For example, the selected naming method is Prefix+Suffix, which consists of a fixed prefix and a time-based suffix.
Prefix: You can specify this prefix as you like.
Suffix: You can select the upper bound of a time-type partition key as the suffix for the current partition. You can also specify the datetime format and the increment interval of the time.
After you configure the preceding parameters, click Test Generation to view the partition names.
Copy Statistics from Table's Last Partition to New Partition: No.
In the Delete Partitions section, configure the partition deletion strategy. The following table describes the parameters in the current example.
Number of Reserved Partitions: Retain the most recent 200 partitions, which means that the other partitions except the most recent 200 partitions will be deleted.
Set Partition Data Retention Time: Retain data in the most recent 12 months. When a partition is deleted, the upper bound of the partition must be earlier than the retention time point. Otherwise, the partition will not be deleted.
Rebuild Index after Deletion: Rebuild the index automatically after a partition is deleted.
Click Preview SQL in the lower-right corner of the Partitioning Strategy panel to view the SQL statements generated based on the partition strategy.
Click OK to complete the partition strategy configuration.