OceanBase
English日本語简体中文
Docs Home
Products
Integrations
Release Notes

Databases

OceanBase DatabaseOceanBase Cloud OceanBase Best Practices

Tools

OceanBase Cloud PlatformOceanBase Migration ServiceOceanBase Developer CenterOceanBase Migration AssessmentOceanBase Admin ToolOceanBase Loader and DumperOceanBase DeployerKubernetes operator for OceanBaseOceanBase Diagnostic Tool OceanBase Binlog Service

Connectors and Middleware

OceanBase Database Proxy OceanBase Connector/C OceanBase Connector/J OceanBase Connector/ODBC OceanBase Connector/NETOceanBase Command-Line Client

Databases

OceanBase DatabaseOceanBase Cloud OceanBase Best Practices

Connectors and Middleware

OceanBase Database Proxy OceanBase Connector/C OceanBase Connector/J OceanBase Connector/ODBC OceanBase Connector/NETOceanBase Command-Line Client

Tools

OceanBase Cloud PlatformOceanBase Migration ServiceOceanBase Developer CenterOceanBase Migration AssessmentOceanBase Admin ToolOceanBase Loader and DumperOceanBase DeployerKubernetes operator for OceanBaseOceanBase Diagnostic Tool OceanBase Binlog Service
OceanBase DatabaseOceanBase Cloud ToolsConnectors and MiddlewareLifecycle Support Policy

OceanBase Developer Center

V4.5.0
  • Topics Overview
  • Overview
    • What is ODC?
    • Features
    • Architecture
    • Limitations
    • ODC console
  • Quick Start
    • Client ODC
      • Overview
      • Install Client ODC
      • Use Client ODC
    • Web ODC
      • Overview
      • Deploy Web ODC
      • Use Web ODC
  • Data Source Management
    • Create a data source
    • Data sources and project collaboration
    • Database O&M
      • Session management
      • Global variable management
      • Recycle bin management
  • SQL Development
    • Edit and execute SQL statements
    • Perform PL compilation and debugging
    • Use the command-line window
    • Edit and export the result set
    • Execution Analysis
    • Generate test data
    • System settings
    • Intelligent SQL development
    • Common features
    • Database objects
      • Table objects
        • Overview
        • Create a table
      • View objects
        • Overview
        • Create a view
        • Manage views
      • Materialized view objects
        • Overview
        • Create a materialized view
        • Manage materialized views
      • Function objects
        • Overview
        • Create a function
        • Manage functions
      • Stored procedure objects
        • Overview
        • Create a stored procedure
        • Manage stored procedures
      • Sequence objects
        • Overview
        • Create a sequence
        • Manage sequences
      • Package objects
        • Overview
        • Create a program package
        • Manage program packages
      • Trigger objects
        • Overview
        • Create a trigger
        • Manage triggers
      • Type objects
        • Overview
        • Create a type
        • Manage types
      • Synonym objects
        • Overview
        • Create a synonym
        • Manage synonyms
      • External resource objects
        • External resources
        • Create an external resource
        • Manage external resources
  • Database Change Risk Management
    • Project collaborative management
      • Project management
      • Manage databases
      • Manage logical databases
      • Add object storage files
      • Manage project members
      • Desensitize data
      • Notification management
        • Overview
        • View notification records
        • Manage notification channels
          • Create a notification channel
          • View, edit, and delete a notification channel
          • Configure a custom channel
        • Manage notification rules
    • Manage user permissions
      • Users and roles
      • Automatic authorization
      • Apply for project permissions
      • Apply for database permissions
      • Apply table/view permissions
    • Security standards
      • Environment configuration
        • SQL check specifications
        • SQL window specification
      • Risk Management
        • Overview
        • Manage risk identification rules
        • Manage approval processes
      • Desensitization algorithms
      • Operation audit
  • Ticket Management
    • Import schemas and data
    • Export schemas and data
    • Database change management
    • Manage changes to logical databases
    • Batch database change management
    • Online schema changes
    • Synchronize shadow tables
    • Schema comparison
  • Data Lifecycle Management
    • Data archiving
    • Data cleanup
    • Manage partitioning plans
      • Manage partitioning plans
      • Set partitioning strategies
      • Examples of partitioning strategies
    • SQL Plan
  • System Integration
    • Login integration
    • Approval integration
    • SQL approval integration
    • Bastion host integration
    • Integrate with LLMs
  • Deployment Guide
    • Deployment overview
    • Preparations before deployment
    • Deploy ODC in single-node mode
    • Deploy ODC in high-availability mode
    • Deployment verification
  • Upgrade Guide
    • Upgrade Overview
    • Preparations for upgrade
    • Update single-node ODC
    • Update high-avaliability ODC
    • Upgrade verification
    • Rollback after upgrade failed
  • Best Practices
    • Tips for SQL development
    • Explore ODC team workspaces
    • Understanding real-time SQL diagnostics for OceanBase AP
    • OceanBase historical database solutions
    • ODC SQL check for automatic identification of high-risk operations
    • Integration with ODC enterprise-level account system
    • Manage and modify sharded databases and tables via ODC
    • Data masking and control practices
    • Enterprise-level control and collaboration: Safeguard every database change
  • Troubleshooting
    • ODC troubleshooting process
    • Collect message
      • View the runtime environment and version information
      • View web ODC logs
      • View client ODC logs
      • View end-to-end ODC-related logs
      • View ODC MetaDB data
      • Query the index status in OceanBase Database V4.x
      • Query the index status in OceanBase Database V1.4.x to V3.2.x
      • Collect JVM runtime information
      • Use tcpdump to capture packets
    • FAQ
      • Installation of client ODC
      • Web ODC deployment and startup
      • Connection Information
      • Command-line window
      • DDL statement display
  • Release Notes
    • V4.5
      • ODC V4.5.0
    • V4.4
      • ODC V4.4.0
      • ODC V4.4.1
      • ODC V4.4.2
      • ODC V4.4.3
    • V4.3
      • ODC V4.3.4
      • ODC V4.3.3
      • ODC V4.3.2
      • ODC V4.3.1
      • ODC V4.3.0
    • V4.2
      • ODC V4.2.4
      • ODC V4.2.3
      • ODC V4.2.2
      • ODC V4.2.1
      • ODC V4.2.0
    • V4.1
      • ODC V4.1.3
      • ODC V4.1.2
      • ODC V4.1.1
      • ODC V4.1.0
    • V4.0
      • ODC V4.0.2
      • ODC V4.0.0
    • V3.4
      • ODC V3.4.0
    • V3.3
      • ODC V3.3.3
      • ODC V3.3.2
      • ODC V3.3.1
      • ODC V3.3.0
    • V3.2
      • ODC V3.2.3
      • ODC V3.2.2
      • ODC V3.2.1
      • ODC V3.2.0

Download PDF

Document Feedback
  1. Documentation Center
  2. OceanBase Developer Center
  3. V4.5.0

Manage partitioning plans

Last Updated:2026-10-09 03:23:33

Background information
Partitioning plan execution process
Considerations
Create a partitioning plan
View a partitioning plan job
Job information
Batch import and export
Batch export
Batch import
References

This topic describes how to apply a partitioning plan in OceanBase Developer Center (ODC) for automatic partition management, including partition creation and deletion.

Background information

The partitioning plan feature is an extension of RANGE partitioning. ODC can automatically manage RANGE-partitioned tables based on the specified partitioning strategies, and you do not need to manually create partitions. This facilitates maintenance of the RANGE-partitioned tables.

  • RANGE partitioning: RANGE partitioning is the most commonly used partitioning method. It is often used when you want to query tables with dates. In RANGE partitioning, the database maps rows to partitions based on ranges of partitioning key values. For more information, see Set partitioning rules and Partitioning types.

  • Partitioning plan: When you insert data into a RANGE-partitioned table, if the inserted data exceeds the upper bound of the current range, the operation fails and an error is returned.

  • Creation strategy: Table data is divided into corresponding partitions based on the specified time interval and data range. Two partition creation methods are supported:

    Sequential Increment: A method for creating partitioning strategies, applicable only to time, numeric, and character field types.
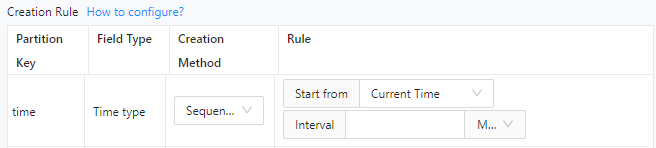
    5

    • Custom: You can define a custom SQL expression for partitioning for any field type.

      6

  • Deletion strategy: Based on the specified number of partitions allowed, the latest partitions are retained and redundant partitions are deleted.

Partitioning plan execution process

  1. Set a partition creation strategy and a partition deletion strategy for a table.
  2. Set a strategy execution cycle.
  3. Approve the job process.
  4. Execute the partitioning plan.

Considerations

  • Only OceanBase MySQL compatible mode and OceanBase Oracle compatible mode data sources are supported.

  • Only RANGE-partitioned tables are supported.

  • When the upper bound of the last partition in a RANGE-partitioned table reaches the value specified by MAXVALUE, no partition can be created. In this case, you cannot create a partitioning strategy via the ODC partitioning plan job.

  • By default, a partitioning plan is executed on the hour.

  • Creating partitions for a table within a table group can fail or break the load balancing status. Proceed with caution when you decide to configure a partition creation strategy for such a table.

  • Creating partitions for a table within a table group can invalidate the table group, because tables in the same table group must have the same number of partitions.

  • Deleting partitions from a table that contains a global index will invalidate the global index. Proceed with caution. Choosing to rebuild the global index may cause business issues due to the time-consuming process or online issues resulting from rebuilding failures.

    • Partition deletion may block new partition creation: When a table contains a global index, deleting partitions may block subsequent new partition creation operations. The system will trigger a risk warning. It is recommended to perform partition deletion during off-peak hours.
    • Global index fields: The system returns information about the global index fields in the table, helping you assess the impact of partition deletion on your business.
  • The option of rebuilding global indexes is provided only in Oracle compatible mode. In MySQL compatible mode, global indexes will be rebuilt by default.

Create a partitioning plan

Example: Create a partition for the order table in the doc_test_data_1 database of the mysql441 data source at a time interval of 1 month.

| Parameter | Example value | |Project name | odc_test | |Data source | mysql441 | |Database name |doc_test_data_1| |Database name |order| |Table name |order |

  1. In the SQL window, edit the SQL statements to create the order table.

    CREATE TABLE `order` (
    `time` date NOT NULL,
     `parti_key` int(11),
     `name` varchar(120) DEFAULT NULL
    ) partition by range columns(time, parti_key)
    (partition p2023_01 values less than ('2023-01-01', 20230101),
    partition p2023_02 values less than ('2023-02-01', 20230201))
    
  2. Click Jobs > Partitioning Plan > Create New in the SQL window.

  3. Specify the following information.

    Parameter
    Description
    Database Select the database for which the partitioning plan is created.
    Partitioning Strategy Select the target RANGE-partitioned table in the specified database and click edit to set partitioning strategies. For more information, see Set partitioning strategies and Examples.

    Note

    • You can select the Show Only Unconfigured Tabls option next to Partitioning Strategy to display only tables with no partitioning strategies.
    • You can also select multiple RANGE-partitioned tables and configure partitioning strategies for them at a time.
    Execution Mode
    • Set the execution mode for all partition creation strategies by selecting Periodic Execution, Immediate Execution, or Scheduled Execution. For example, execute at 2:00 a.m. every day.
    • Customize Deletion Strategy Execution Period: If you do not select this option, the partition deletion strategies will be scheduled together with partition creation strategies.
    Job Settings
    • Task Error Handling Method:
      • Stop Task: This is the default option. When you select this option, the task is aborted if an error occurs when you run the script.
      • Ignore Error and Continue: When you select this option, the system skips the statement where an error occurs and continues to execute other statements in the script.
    • Execution Timeout. The default value is 2 hours.
  4. After you specify the preceding information, click Submit.

  5. After the job is generated, you can view the job information in the Job > Partitioning Plan list.

View a partitioning plan job

Job information

  1. Go to Job > Partitioning Plan, click the name of the target task in the list to view the job details. You can also click ··· in the Actions column to perform more operations on the job.

    • Terminate: If the job execution mode is set to periodic execution or scheduled execution, you can terminate the job. You can also select the target jobs and click Batch Terminate at the top to terminate multiple jobs.
    • Disable/Enable: If the job execution mode is set to periodic execution or scheduled execution, you can disable the job to temporarily stop its execution. The job will resume execution after it is enabled.
    • Edit: If the job status is disabled, you can edit the job to update its content.
    • Delete: If the job status is completed or terminated, you can delete the job.
    • View: View the job details.
    • Clone: Clone the job to quickly generate a new job with the same configuration.
    • Share: Copy the job access address.
  2. In the job details panel, the Basic Information tab is displayed by default. You can view the job type, database information, variable configuration, partitioning strategy, and execution method.

  3. In the job details panel, click the Execution Records tab to view the execution records of the job.

  4. In the job details panel, click the Operation Records tab to view the approval status and change records of the job.

Batch import and export

Batch export

  1. Go to Tasks > Partitioning Plan.

  2. Select the target tasks and click Batch Actions > Batch Export.

  3. Confirm the export content and click Export to complete the batch export.

  4. After the export is completed, the export result is displayed on the right side of the page. You can view the key and view the exported file locally.

    Notice

    Keep the key properly. It is required when you import the exported file.

Batch import

  1. Go to Jobs > Partitioning Plan.

  2. Click the ∨ icon next to Create New and select Import Partitioning Plan.

  3. Select the file to import, enter the file key, select the target project, and click Next: Import.

  4. Select the tasks to import and the target database, and click Import after you select I acknowledge the relevant business risks..

  5. After the tasks are imported, you can view them in the list.

References

  • Set partitioning strategies

  • Examples

Previous topic

Data cleanup
Last

Next topic

Set partitioning strategies
Next
on this page
Background information
Partitioning plan execution process
Considerations
Create a partitioning plan
View a partitioning plan job
Job information
Batch import and export
Batch export
Batch import
References