OceanBase
English日本語简体中文
Docs Home
Products
Integrations
Release Notes

Databases

OceanBase DatabaseOceanBase Cloud OceanBase Best Practices

Tools

OceanBase Cloud PlatformOceanBase Migration ServiceOceanBase Developer CenterOceanBase Migration AssessmentOceanBase Admin ToolOceanBase Loader and DumperOceanBase DeployerKubernetes operator for OceanBaseOceanBase Diagnostic Tool OceanBase Binlog Service

Connectors and Middleware

OceanBase Database Proxy OceanBase Connector/C OceanBase Connector/J OceanBase Connector/ODBC OceanBase Connector/NETOceanBase Command-Line Client

Databases

OceanBase DatabaseOceanBase Cloud OceanBase Best Practices

Connectors and Middleware

OceanBase Database Proxy OceanBase Connector/C OceanBase Connector/J OceanBase Connector/ODBC OceanBase Connector/NETOceanBase Command-Line Client

Tools

OceanBase Cloud PlatformOceanBase Migration ServiceOceanBase Developer CenterOceanBase Migration AssessmentOceanBase Admin ToolOceanBase Loader and DumperOceanBase DeployerKubernetes operator for OceanBaseOceanBase Diagnostic Tool OceanBase Binlog Service
OceanBase DatabaseOceanBase Cloud ToolsConnectors and MiddlewareLifecycle Support Policy

OceanBase Developer Center

V4.3.3
  • Overview
    • What is ODC?
    • Features
    • Architecture
    • Limitations
    • ODC console
  • Quick Start
    • Client ODC
      • Overview
      • Install Client ODC
      • Use Client ODC
    • Web ODC
      • Overview
      • Deploy Web ODC
      • Use Web ODC
  • Data Source Management
    • Create a data source
    • Data sources and project collaboration
    • Database O&M
      • Session management
      • Global variable management
      • Recycle bin management
  • SQL Development
    • SQL editing and execution
    • Perform PL compilation and debugging
    • Use the command-line window
    • Edit and export the result set of an SQL statement
    • Execution analysis
    • Generate test data
    • Database objects
      • Table objects
        • Overview
        • Create a table
      • View objects
        • Overview
        • Create a view
        • Manage views
      • Function objects
        • Overview
        • Create a function
        • Manage functions
      • Stored procedure objects
        • Overview
        • Create a stored procedure
        • Manage stored procedures
      • Sequence objects
        • Overview
        • Create a sequence
        • Manage sequences
      • Package objects
        • Overview
        • Create a program package
        • Manage program packages
      • Trigger objects
        • Overview
        • Create a trigger
        • Manage triggers
      • Type objects
        • Overview
        • Create a type
        • Manage types
      • Synonym objects
        • Overview
        • Create a synonym
        • Manage synonyms
  • Import and Export
    • Import schemas and data
    • Export schemas and data
  • Database Change Management
    • User Permission Management
      • Users and roles
      • Automatic authorization
    • Project collaboration management
    • Risk levels, risk identification rules, and approval processes
    • SQL check specifications
    • SQL window specification
    • Database change management
    • Logical database change management
    • Batch database change management
    • Online schema changes
    • Synchronize shadow tables
    • Schema comparison
  • Data Lifecycle Management
    • Archive data
    • Clean up data
    • Partitioning Plan Management
      • Manage partitioning plans
      • Set partitioning strategies
      • Examples
    • SQL plan task
  • Data Desensitization and Auditing
    • Desensitize data
    • Operation records
  • Notification Management
    • Overview
    • View notification records
    • Manage Notification Channel
      • Create a notification channel
      • View, edit, and delete a notification channel
      • Configure a custom channel
    • Manage notification rules
  • System Integration
    • Login integration
    • Approval integration
    • SQL approval integration
    • Bastion host integration
  • Deployment Guide
    • Deployment overview
    • Preparations before deployment
    • Deploy ODC in single-node mode
    • Deploy ODC in high-availability mode
    • Deployment verification
  • Upgrade Guide
    • Upgrade Overview
    • Preparations before upgrade
    • Update single-node ODC
    • Update high-avaliability ODC
    • Upgrade verification
    • Rollback after upgrade failed
  • Troubleshooting
    • ODC troubleshooting process
    • Collect Message
      • View the runtime environment and version information
      • View web ODC logs
      • View client ODC logs
      • View end-to-end ODC-related logs
      • View ODC MetaDB data
      • Query the index status in OceanBase Database V4.x
      • Query the index status in OceanBase Database V1.4.x to V3.2.x
      • Collect JVM runtime information
      • Use tcpdump to capture packets
    • FAQ
      • Installation of client ODC
      • Web ODC deployment and startup
      • Connection Information
      • Command-line window
      • DDL statement display
  • Release Note
    • V4.3
      • ODC V4.3.3
      • ODC V4.3.2
      • ODC V4.3.1
      • ODC V4.3.0
    • V4.2
      • ODC V4.2.4
      • ODC V4.2.3
      • ODC V4.2.2
      • ODC V4.2.1
      • ODC V4.2.0
    • V4.1
      • ODC V4.1.3
      • ODC V4.1.2
      • ODC V4.1.1
      • ODC V4.1.0
    • V4.0
      • ODC V4.0.2
      • ODC V4.0.0
    • V3.4
      • ODC V3.4.0
    • V3.3
      • ODC V3.3.3
      • ODC V3.3.2
      • ODC V3.3.1
      • ODC V3.3.0
    • V3.2
      • ODC V3.2.3
      • ODC V3.2.2
      • ODC V3.2.1
      • ODC V3.2.0

Download PDF

Document Feedback
  1. Documentation Center
  2. OceanBase Developer Center
  3. V4.3.3

Create a trigger

Last Updated:2026-09-03 09:10:53

Specify the basic information
Configure the advanced settings
Verify the SQL statement

Log in to OceanBase Developer Center (ODC) and click the name of the target connection to go to the corresponding connection management page. You can click Trigger in the left-side navigation pane to get a list of triggers. To create a trigger, click + in the upper-right corner of the trigger list or click Create in the navigation bar on the top of the page

To create a trigger, perform the following three steps:

  1. Specify the basic information.

  2. Configure the advanced settings.

  3. Verify the SQL statement.

Image 228

Specify the basic information

This is Step 1. The Basic Information section contains the following parameters:

  • Trigger Name: specifies the name of the trigger.

  • Base Object Mode: specifies the schema where the object that the trigger works on is located.

  • Base Object Type: specifies the type of the object that the trigger works on. The current version supports only TABLE objects.

  • Base Object Name: specifies the name of the object that the trigger works on.

  • Trigger Status: specifies the state of the trigger. Valid value: On or Disable.

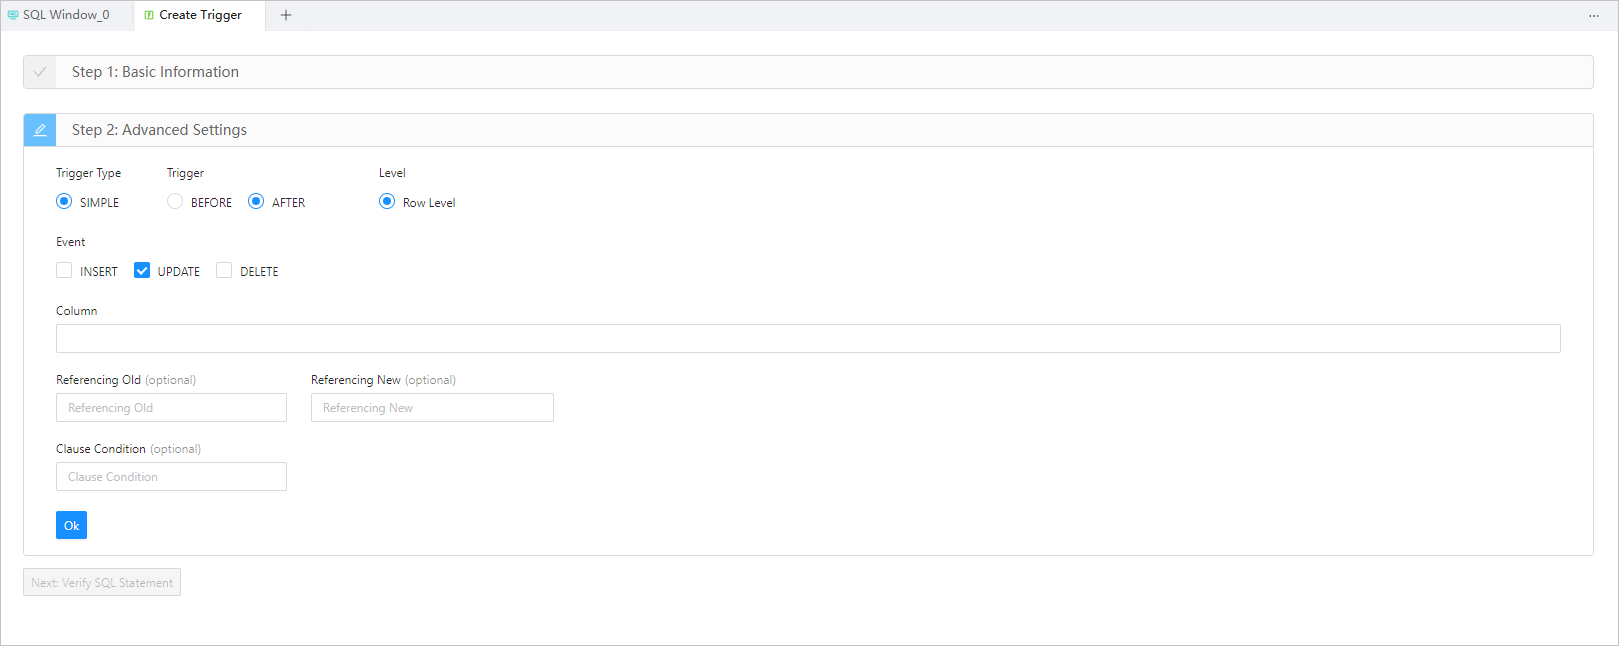
Configure the advanced settings

This is Step 2. The Advanced Settings section contains the following parameters:

  • Trigger Type: specifies the type of the trigger. The current version supports only SIMPLE triggers.

  • Trigger: specifies whether the trigger is activated before or after the triggering event. Valid value: BEFORE or AFTER.

  • Level: specifies the level of the trigger. The current version supports only row-level triggers.

  • Event: specifies the type of operation that activates the trigger. Valid value: INSERT, UPDATE, or DELETE.

  • Column (Optional): specifies the range that the event specified in Event applies to. This parameter is displayed when you set Event to UPDATE. The current version allows you to create only row-level triggers in a table. Therefore, the range here is the columns that the event applies to.

  • Referencing Old (Optional): specifies an alias for the referenced object that corresponds to the value specified for REFERENCEING OLD in the trigger creation statement.

  • Referencing New (Optional): specifies an alias for the referenced object that corresponds to the value specified for REFERENCEING NEW in the trigger creation statement.

  • Clause Condition (Optional): specifies a logical expression for the trigger. After you specify a clause condition, the action specified by the trigger is executed only if the value of the expression is True.

Verify the SQL statement

After you specify all the information in the Basic Info and Advanced Settings sections, click Next: Verify SQL Statement to go to the statement editing page.

The trigger definition statement is generated on the statement editing page based on the information that you specified in the Basic Info and Advanced Settings sections. You only need to complete the trigger body, which specifies the action to be executed. After you complete the trigger body, click the Create button in the upper-right corner of the page to complete the creation of the trigger.

In addition, the toolbar on the editing page provides the following buttons:

Button
Description
Format Click this button to apply formatting, such as indentation, line break, and keyword highlighting, to the selected SQL statements or all the SQL statements in the current SQL window.
Find and Replace You can specify search criteria in the search box to find specific content in the script and enter other content in the replacement box to replace the content found.
Undo Click this button to undo the last operation.
Redo Click this button to reverse an Undo operation.
Case Sensitivity The system supports three configurations: All Caps, All Lowercase, and Capitalize the first letter. Click this button to convert the selected statements in the script to the corresponding capitalization format.
Indent The Add Indents and Delete Indent options are provided, to allow you to add indents to or delete indents from the selected statements in the script.
Comment The Add Comments and Delete Comment options are provided, which respectively allow you to convert the selected statements in the script to comments and convert comments to SQL statements.
Previous Click this button to go back to the Create Trigger page, where you can continue to edit or modify the parameters in the Basic Information and Advanced Settings sections.

Previous topic

Overview
Last

Next topic

Manage triggers
Next
on this page
Specify the basic information
Configure the advanced settings
Verify the SQL statement